Starting your book project on Ghostwriter Express is an exciting step towards realizing your vision as a published author. This Quick Start AI Book Generator Guide provides a short demonstration aimed at helping you write and download your first book efficiently. The video tutorial included here will guide you through each phase of the book creation process, from setting up your initial draft to exporting the final product.
This short guide is designed to make your initial experience with our AI book generator as straightforward and productive as possible. For detailed guides on each template simply click the ‘Tutorial’ button on each template, or visit the ‘Tutorials’ in our Help Center.
This demo, will walk you through crafting your first book.
Introduction
Here's the Ghostwriter Express dashboard. Let's create our first book!
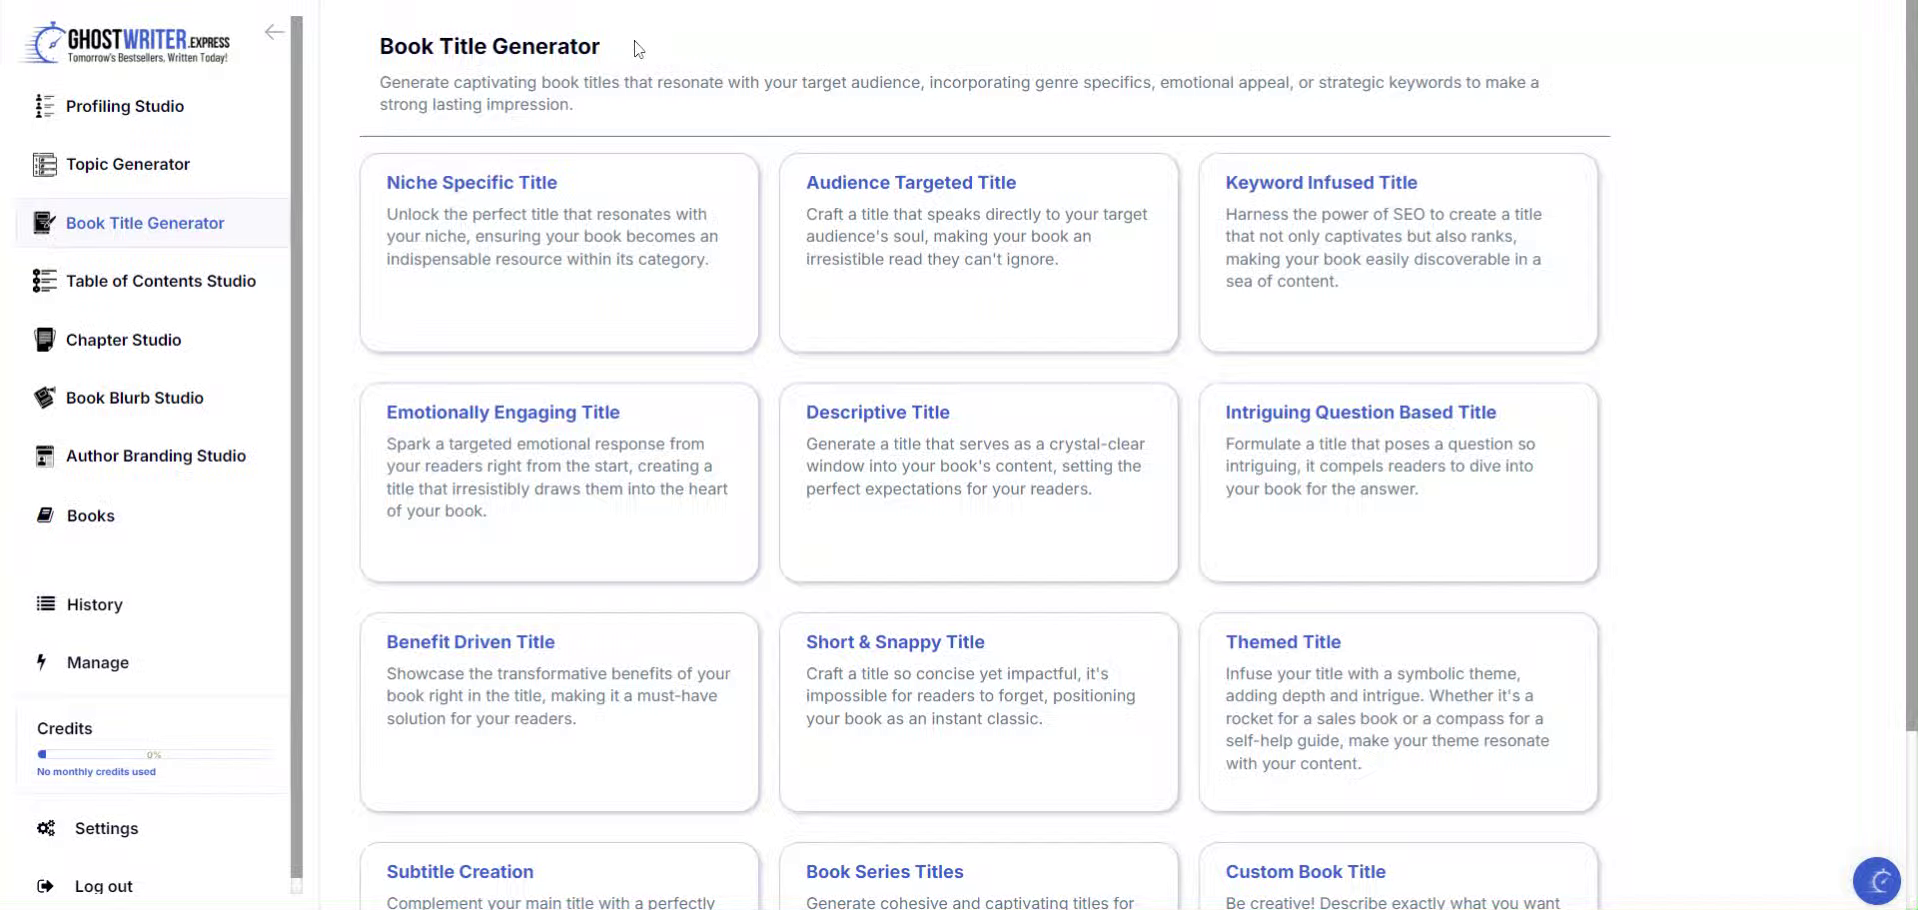)
Click "Unlock the perfect title that resonates with your niche, ensuring your book becomes an indispensable resource within its category."
The first step to creating your book is to go to the book title generator. Choose the template style that best aligns with the book title you would like to create.
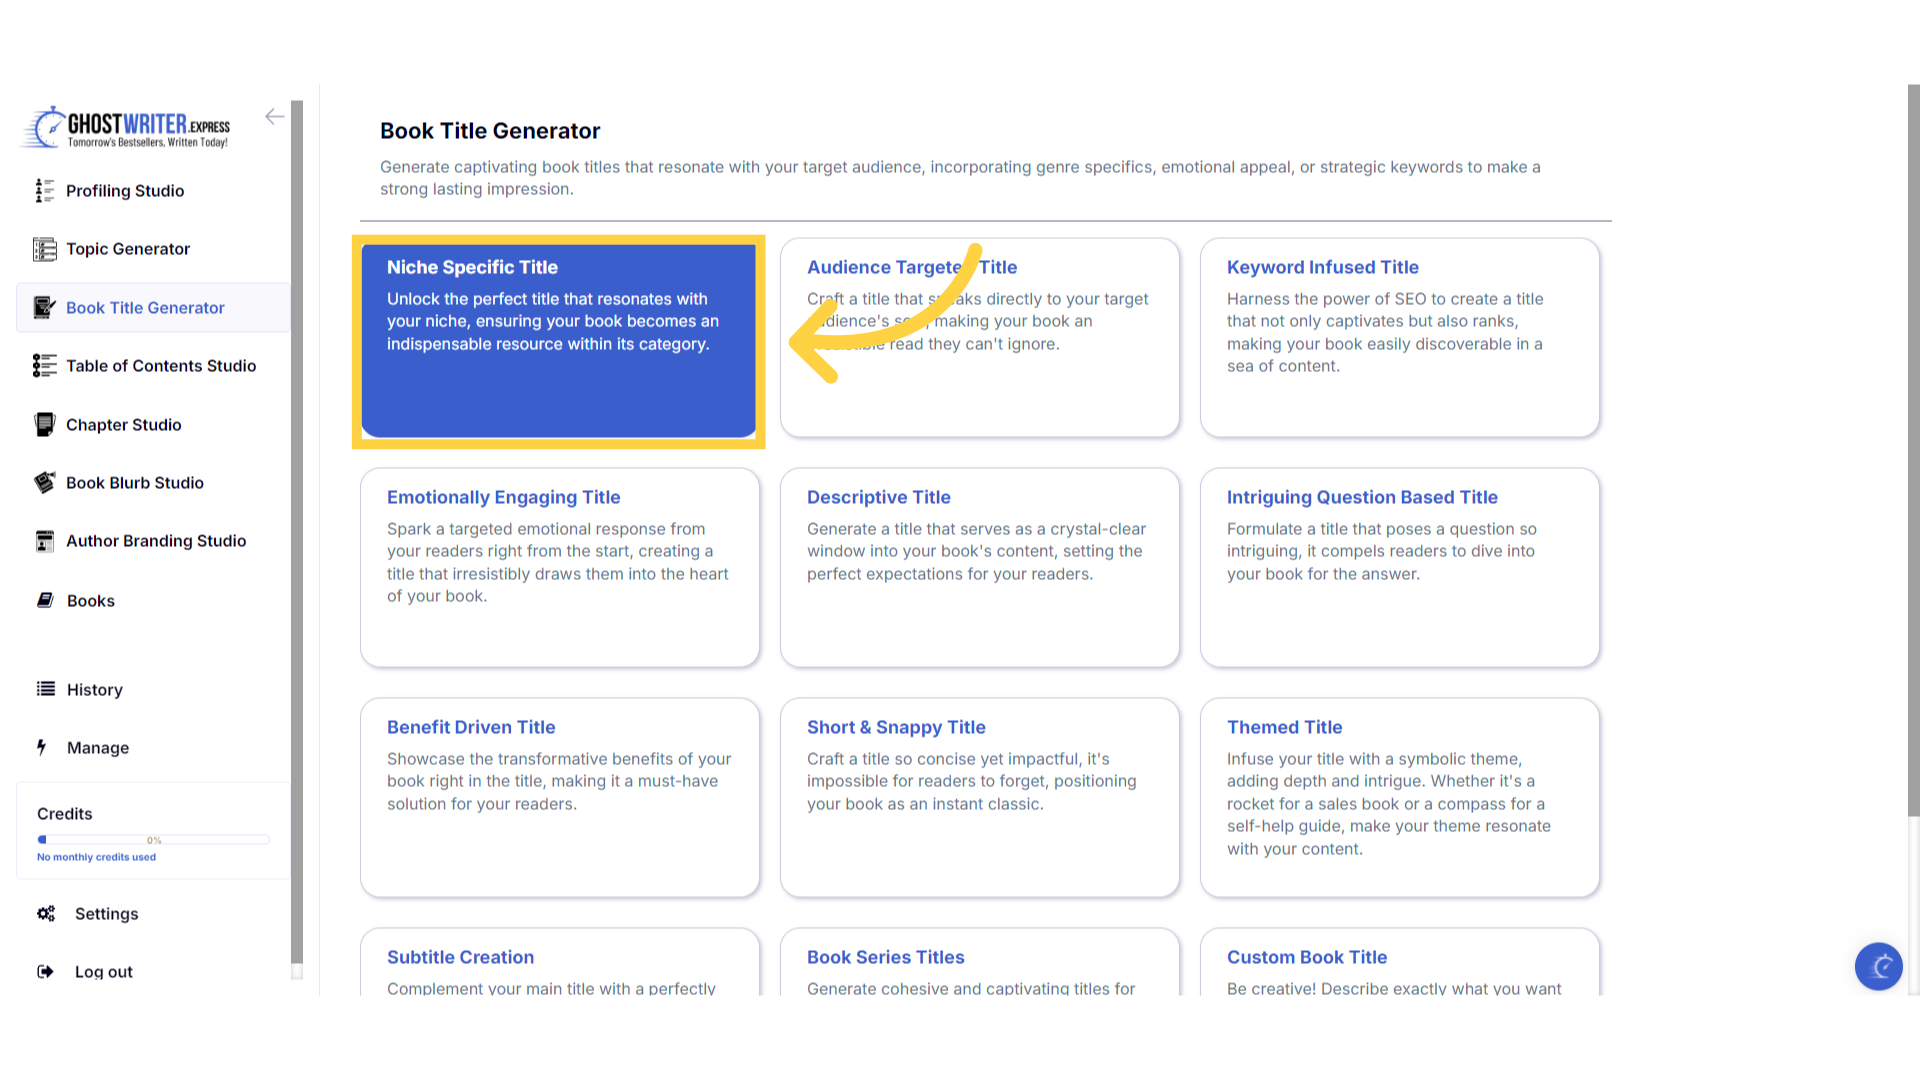)
To continue working on a book you've already created, click the dropdown menu and select the book title.
Once you choose a template, you will be taken into the book builder section. To continue working on a book you've already created, select the book title from the dropdown menu.
)
To create a new book, simply click "Create New".
Or to create a new book, simply click Create New.
)
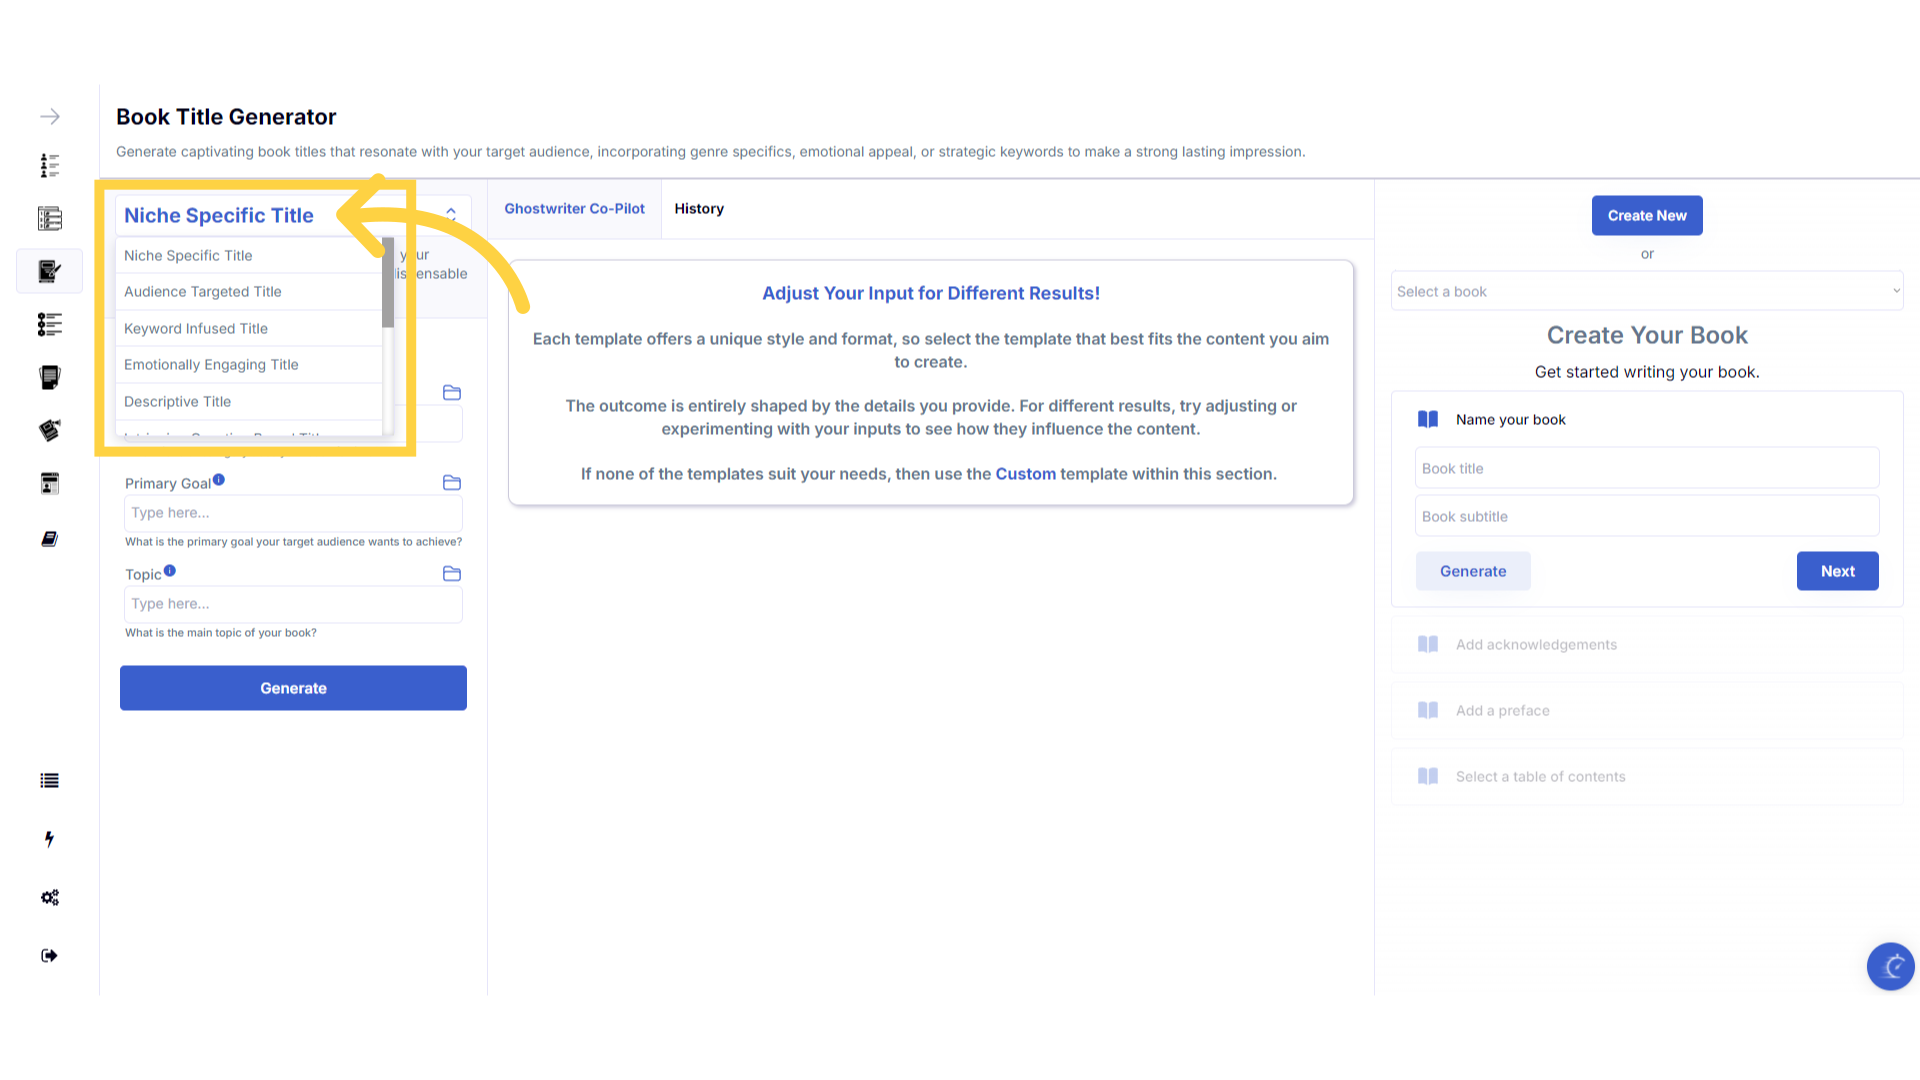
Click on the template name, to open the dropdown menu, and select or change the template you wish to use within that section.
You can select or change the template you wish to use within each section, by clicking on the template name to open the dropdown menu.
)
View and copy your previous content generation in the "History" section.
The history stores all of the content you've generated. Select the history button to view all of the past content you've created for that template.
)
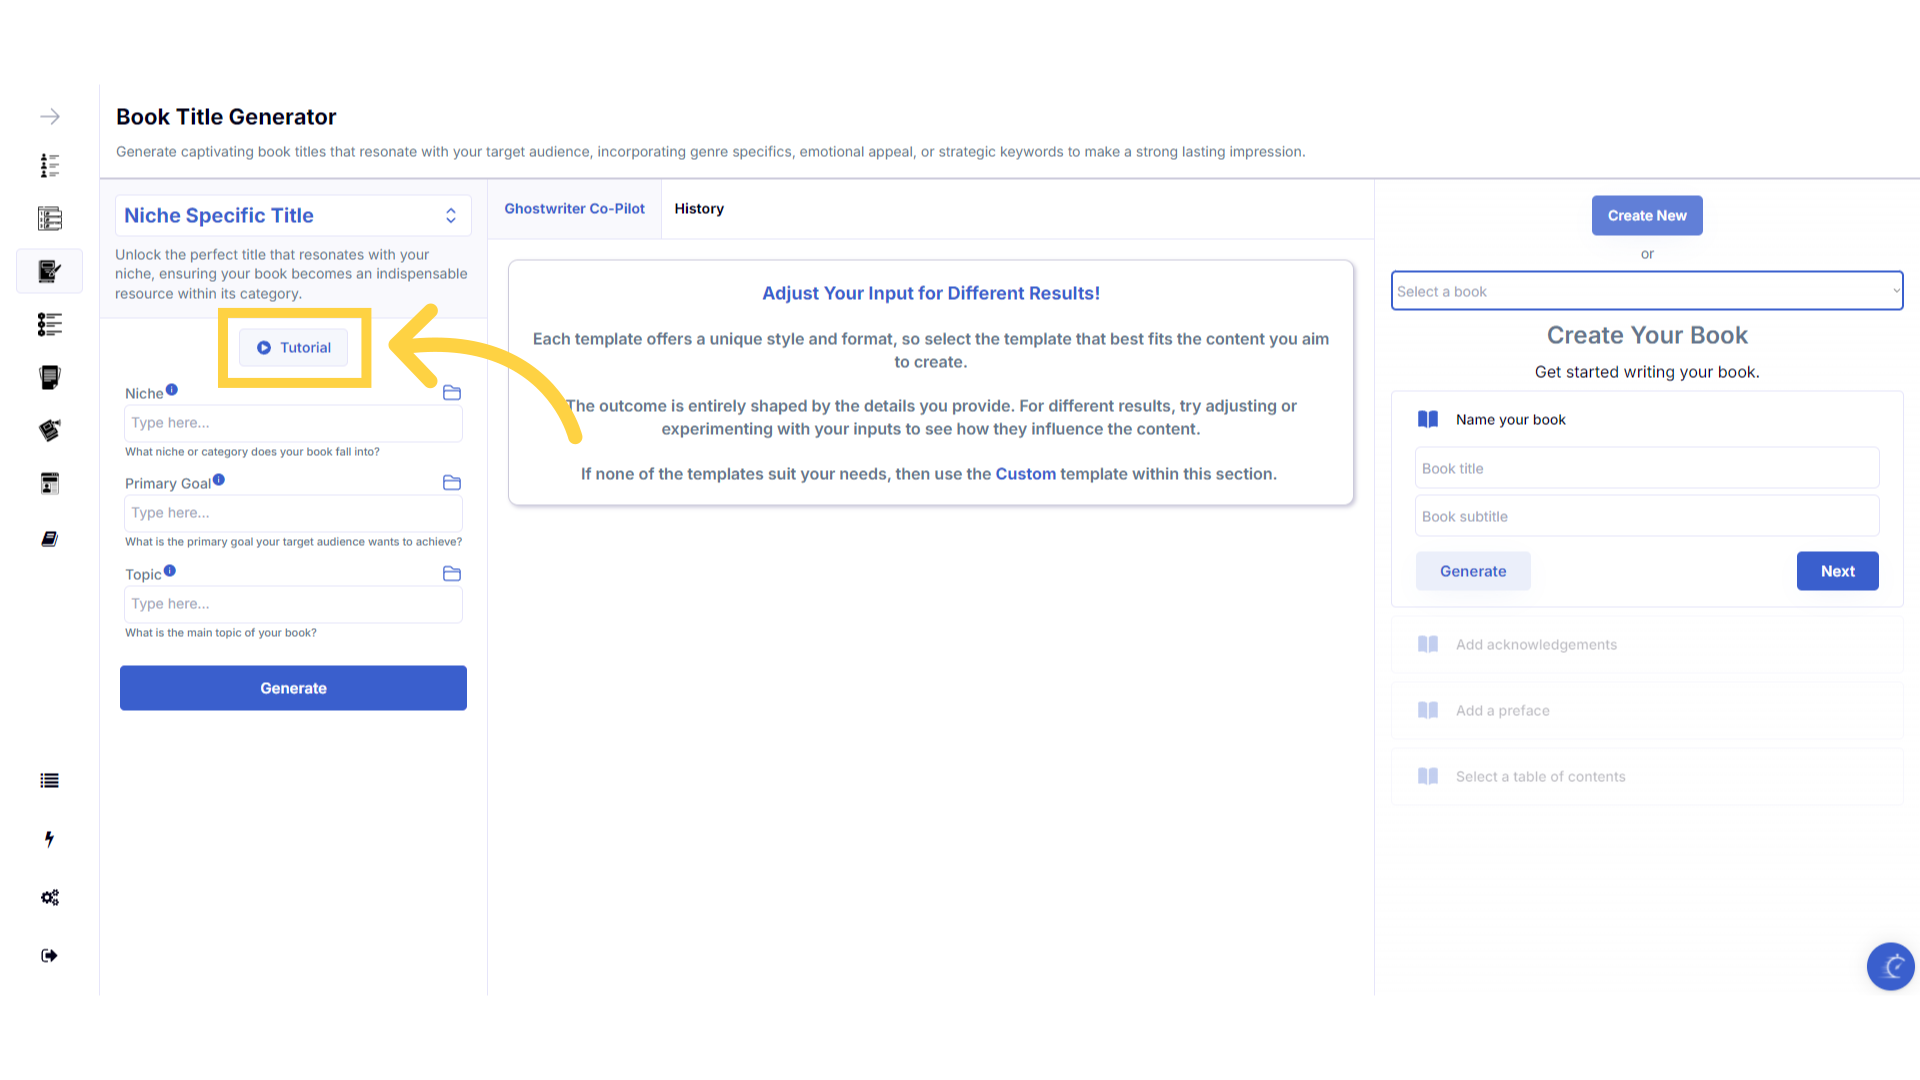
Click the "Tutorial" button to learn more about how to use the template.
If you need help at any time you can watch the tutorial.
)
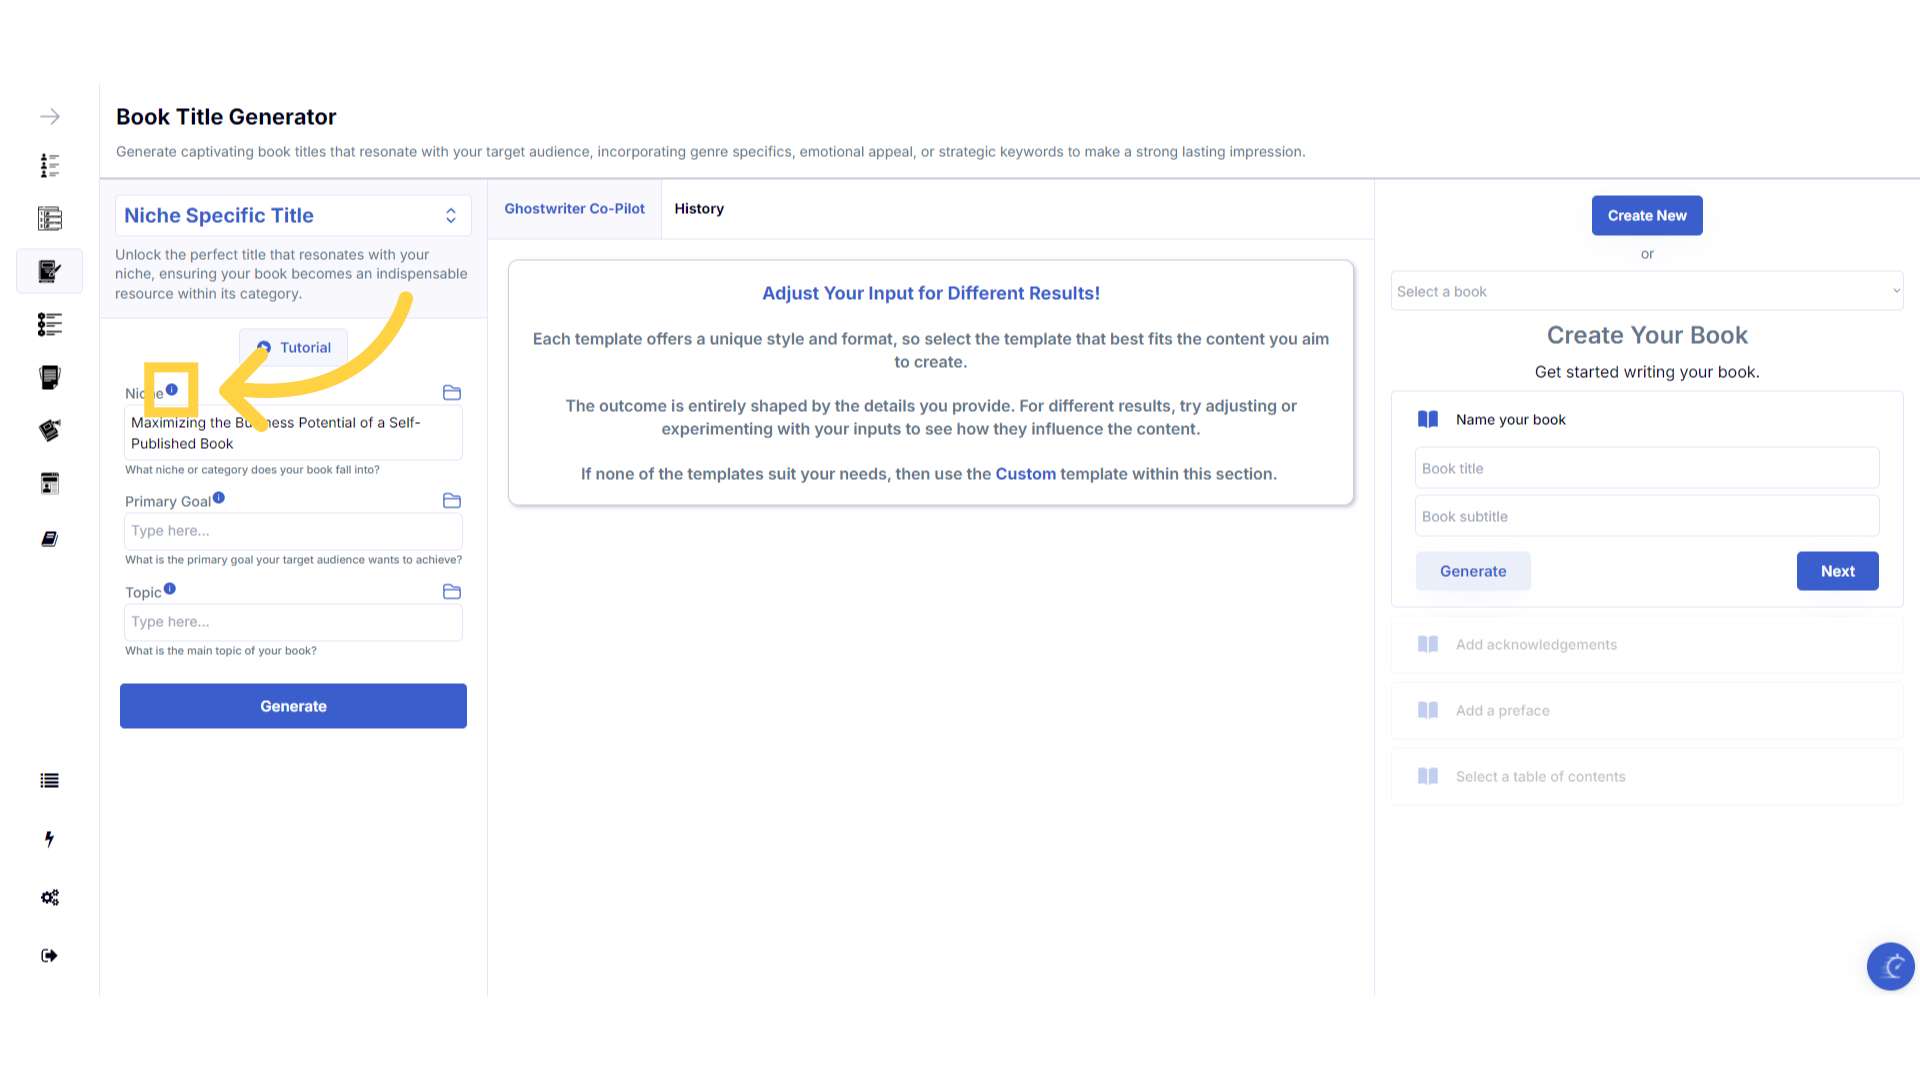
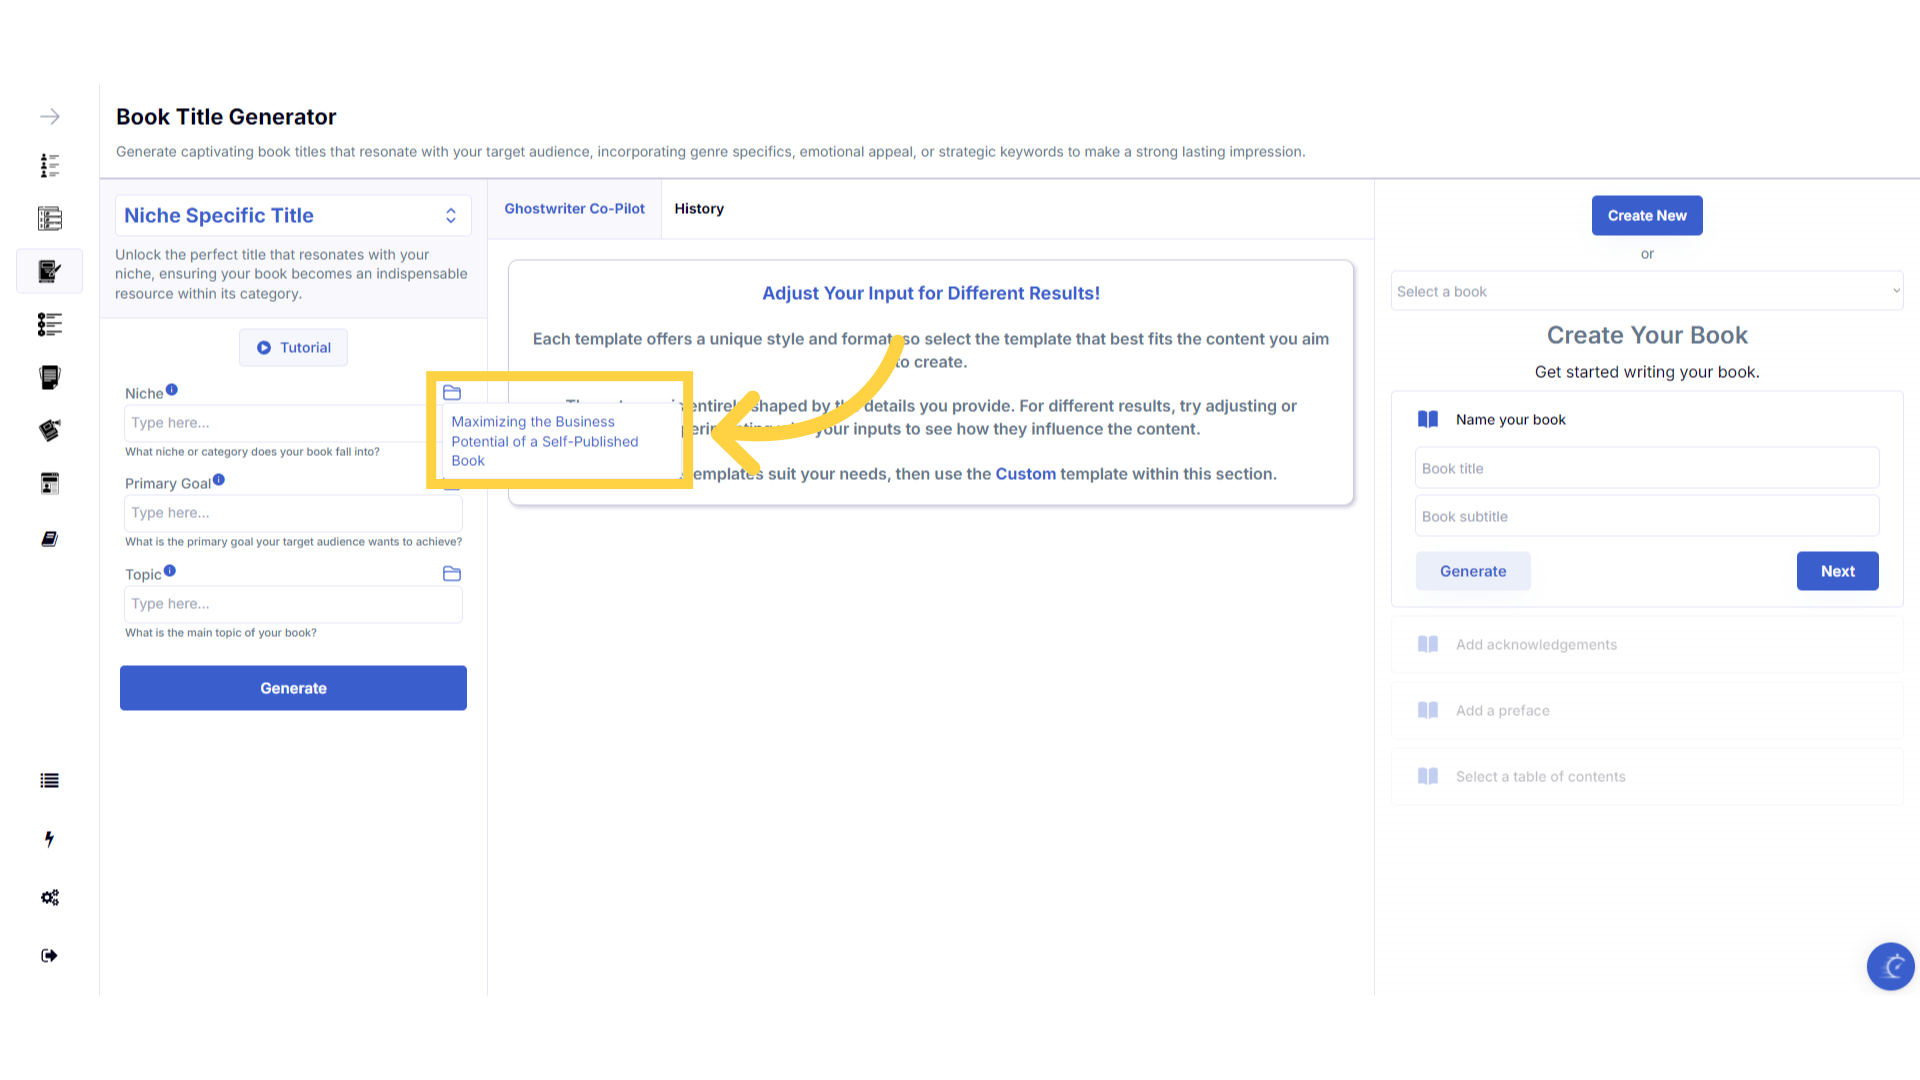
Click the blue "i" icon beside the field name, for an explanation and examples of the information you need to enter in that field.
To help you craft the perfect content, you can select the blue tooltip beside each field name. This will give you an explanation and examples of the information you need to enter in that field.
)
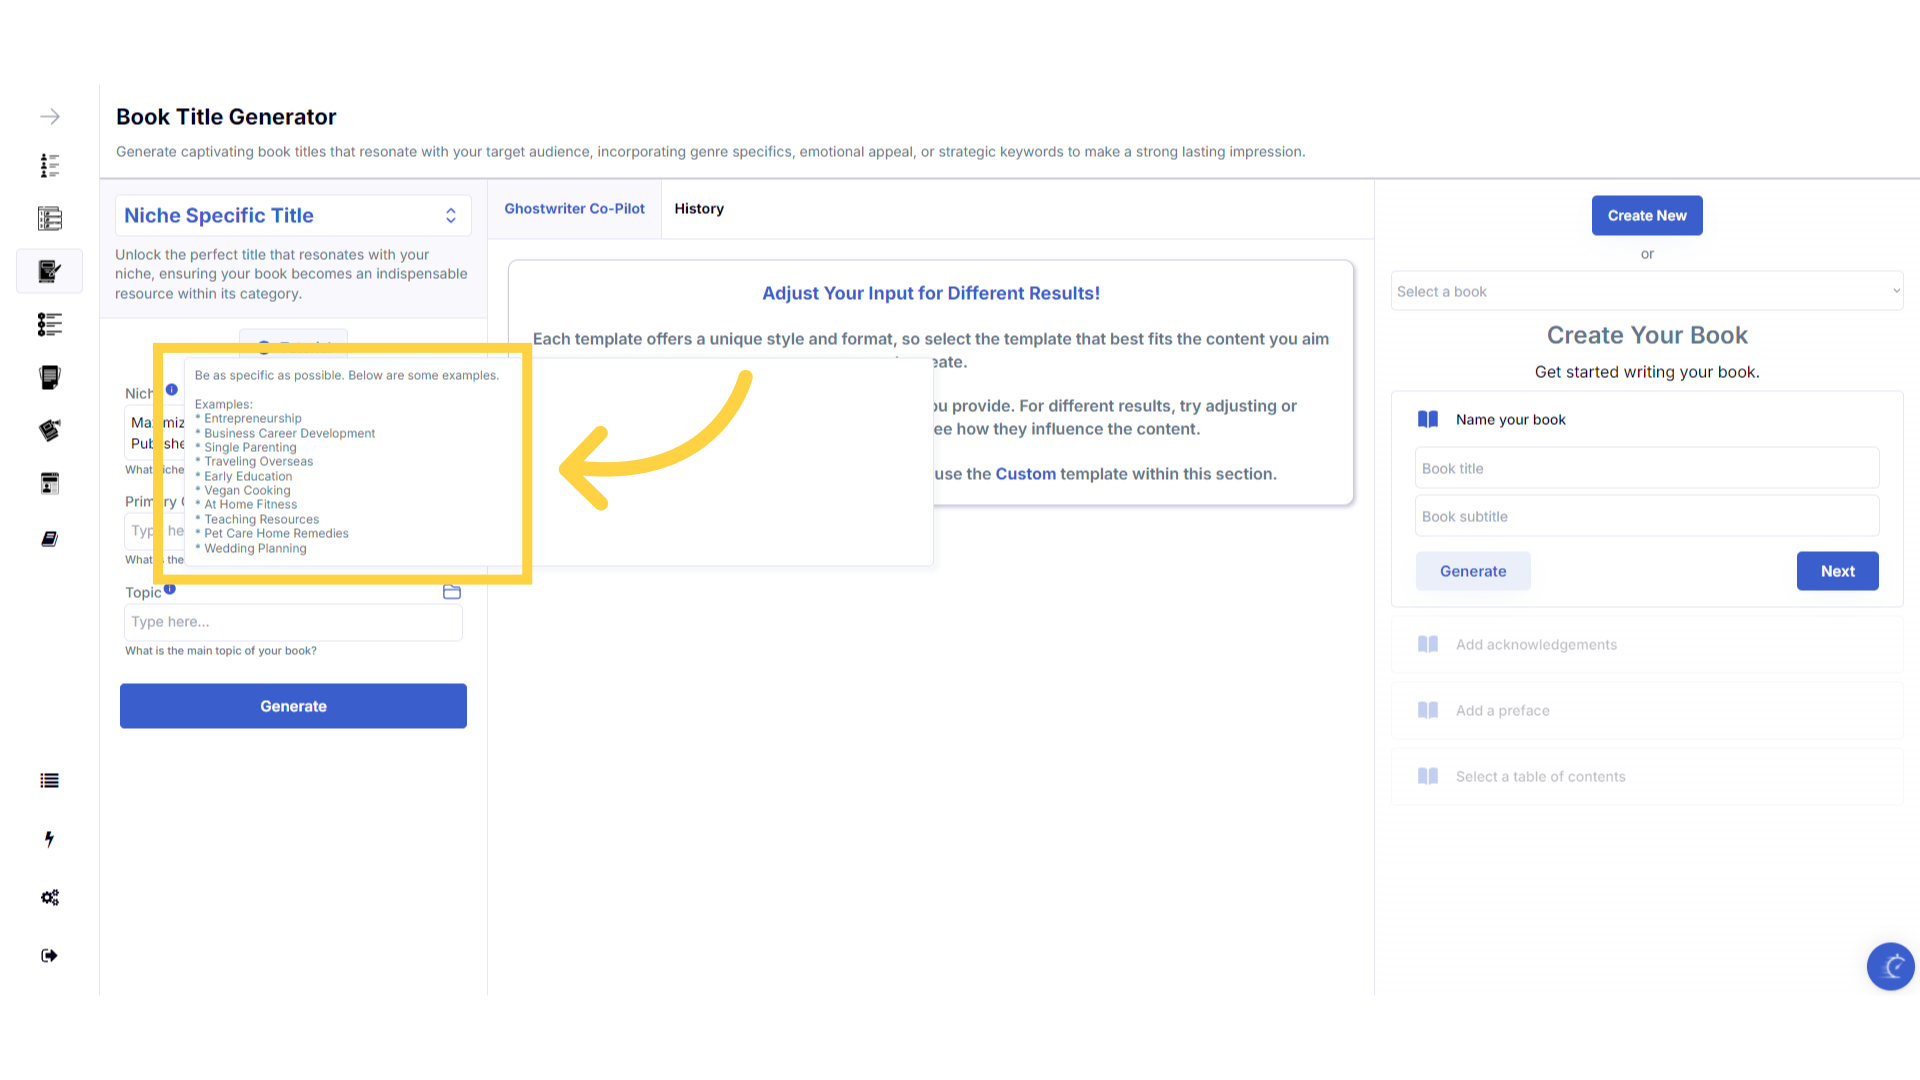
A pop up will display to help you understand what information you need to enter for that field.
A pop up will display with examples of the type of information required.
)
Once you've added information to a field, a folder will appear on the right that contains the history of the last 10 entries in this field.
Once you've added information to a field, a folder will appear on the right that contains the history of the last 10 entries in this field.
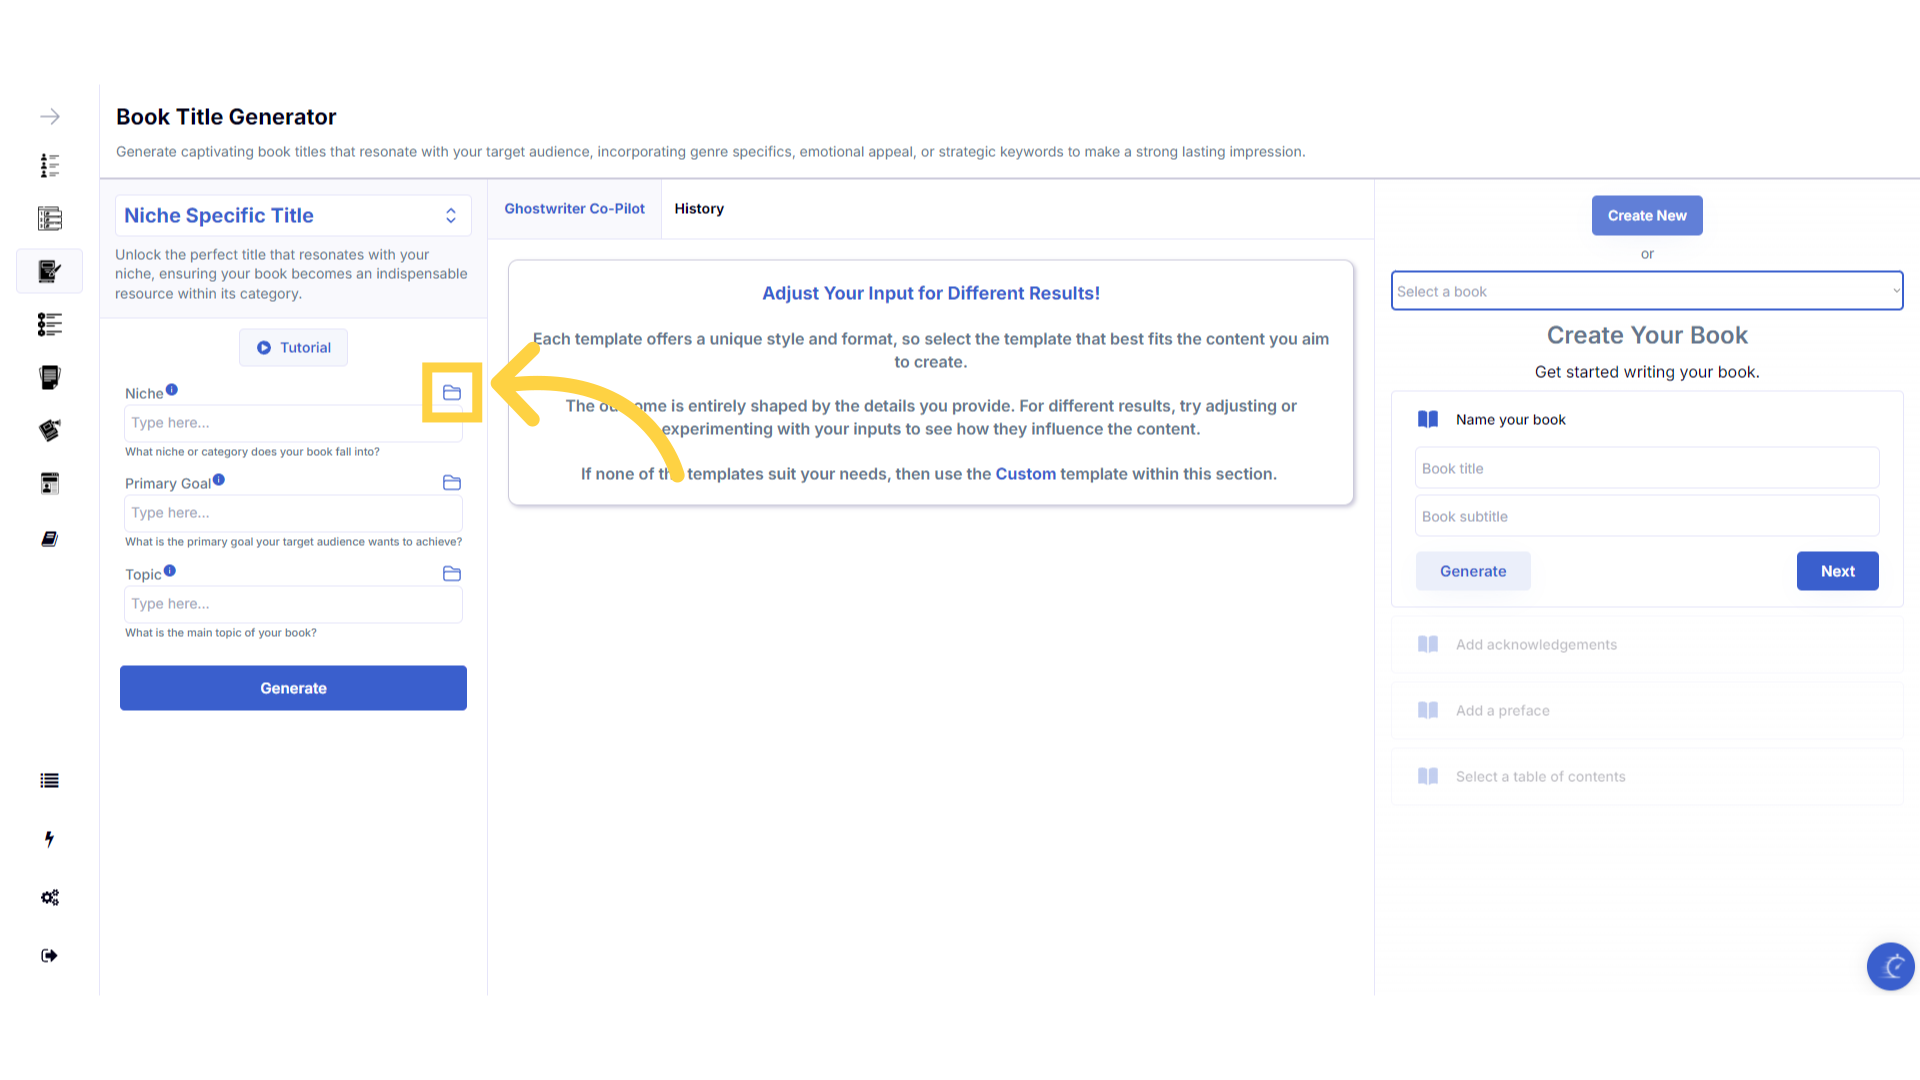)
Click on this folder to easily re-select information you've already entered, and add it to that field.
Click on this folder to easily re-select information you've already entered, and add it to that field.
)
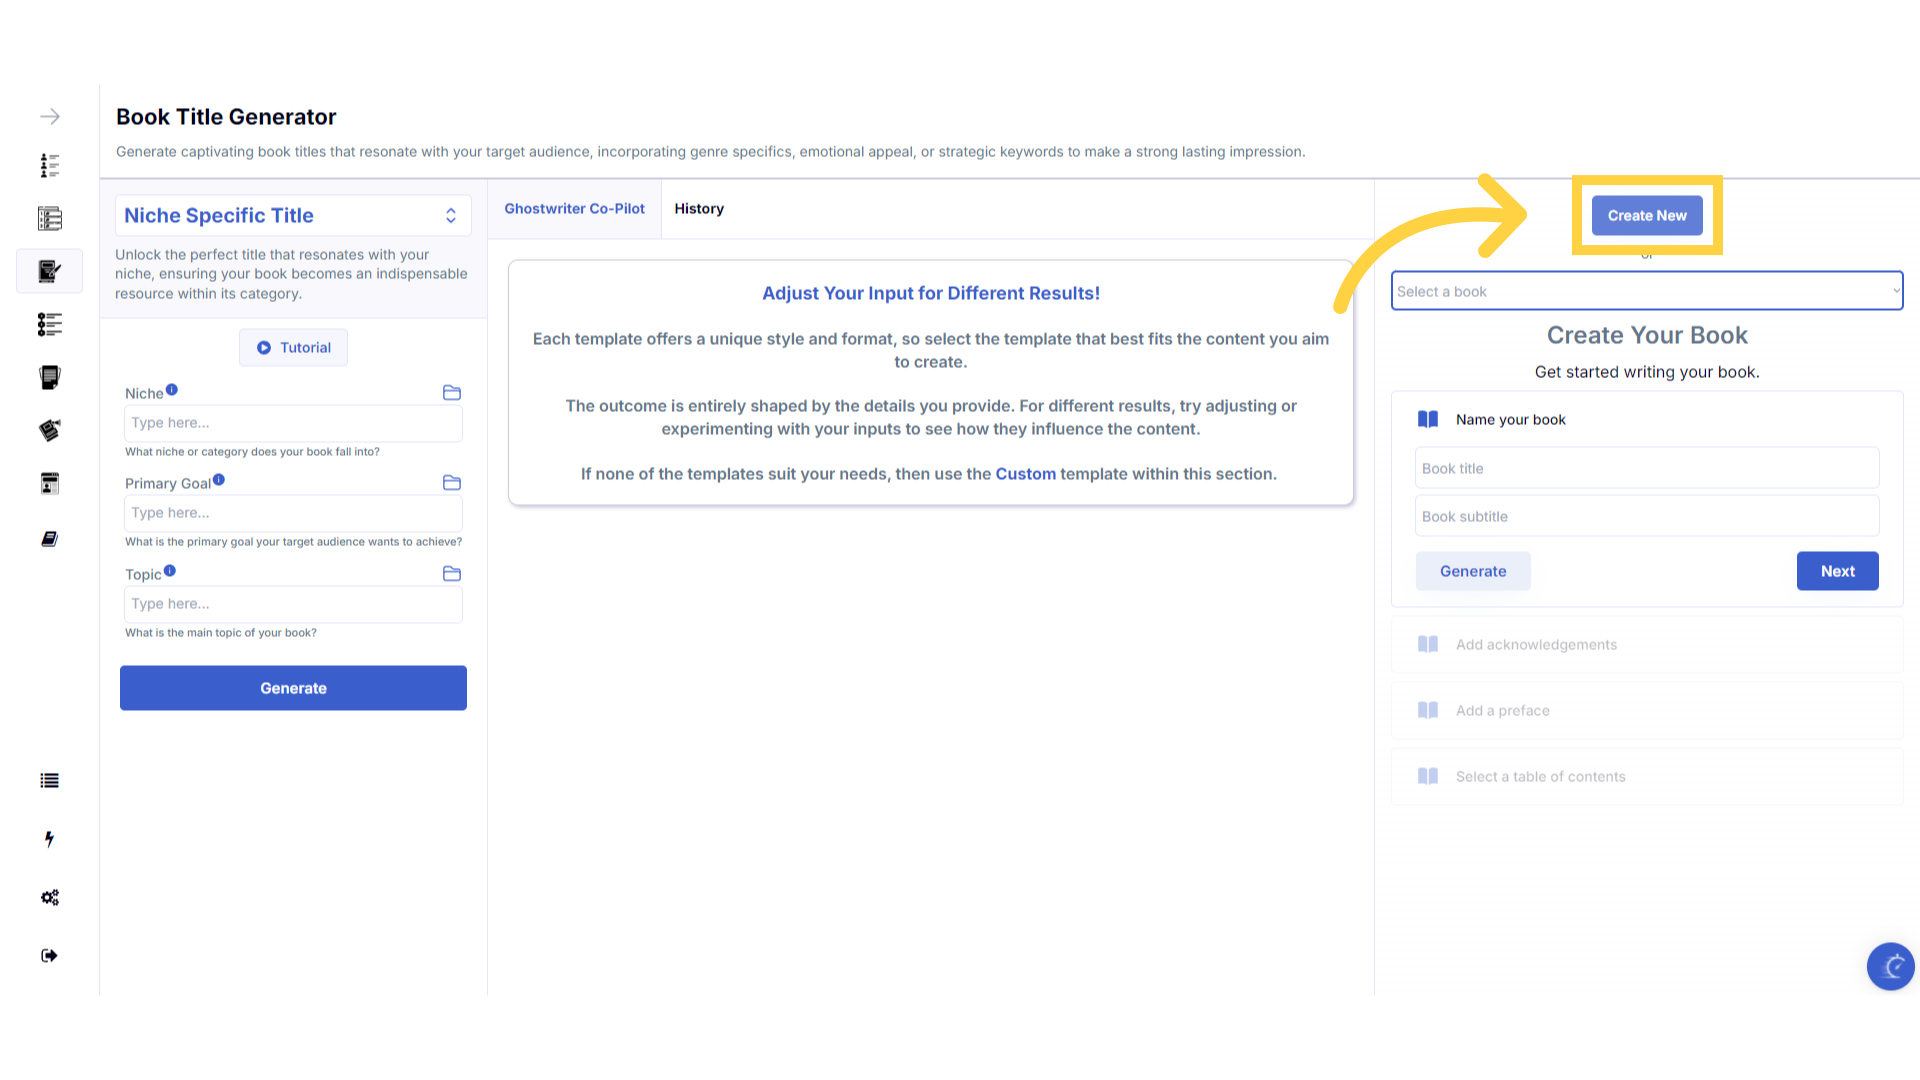
Enter the "Niche" your book is targeting.
Targeting a Niche allows you to craft specific and relevant content, that resonates with the right audience. You can be as specific or as broad as needed, to allow your book to match your readers expectations perfectly.
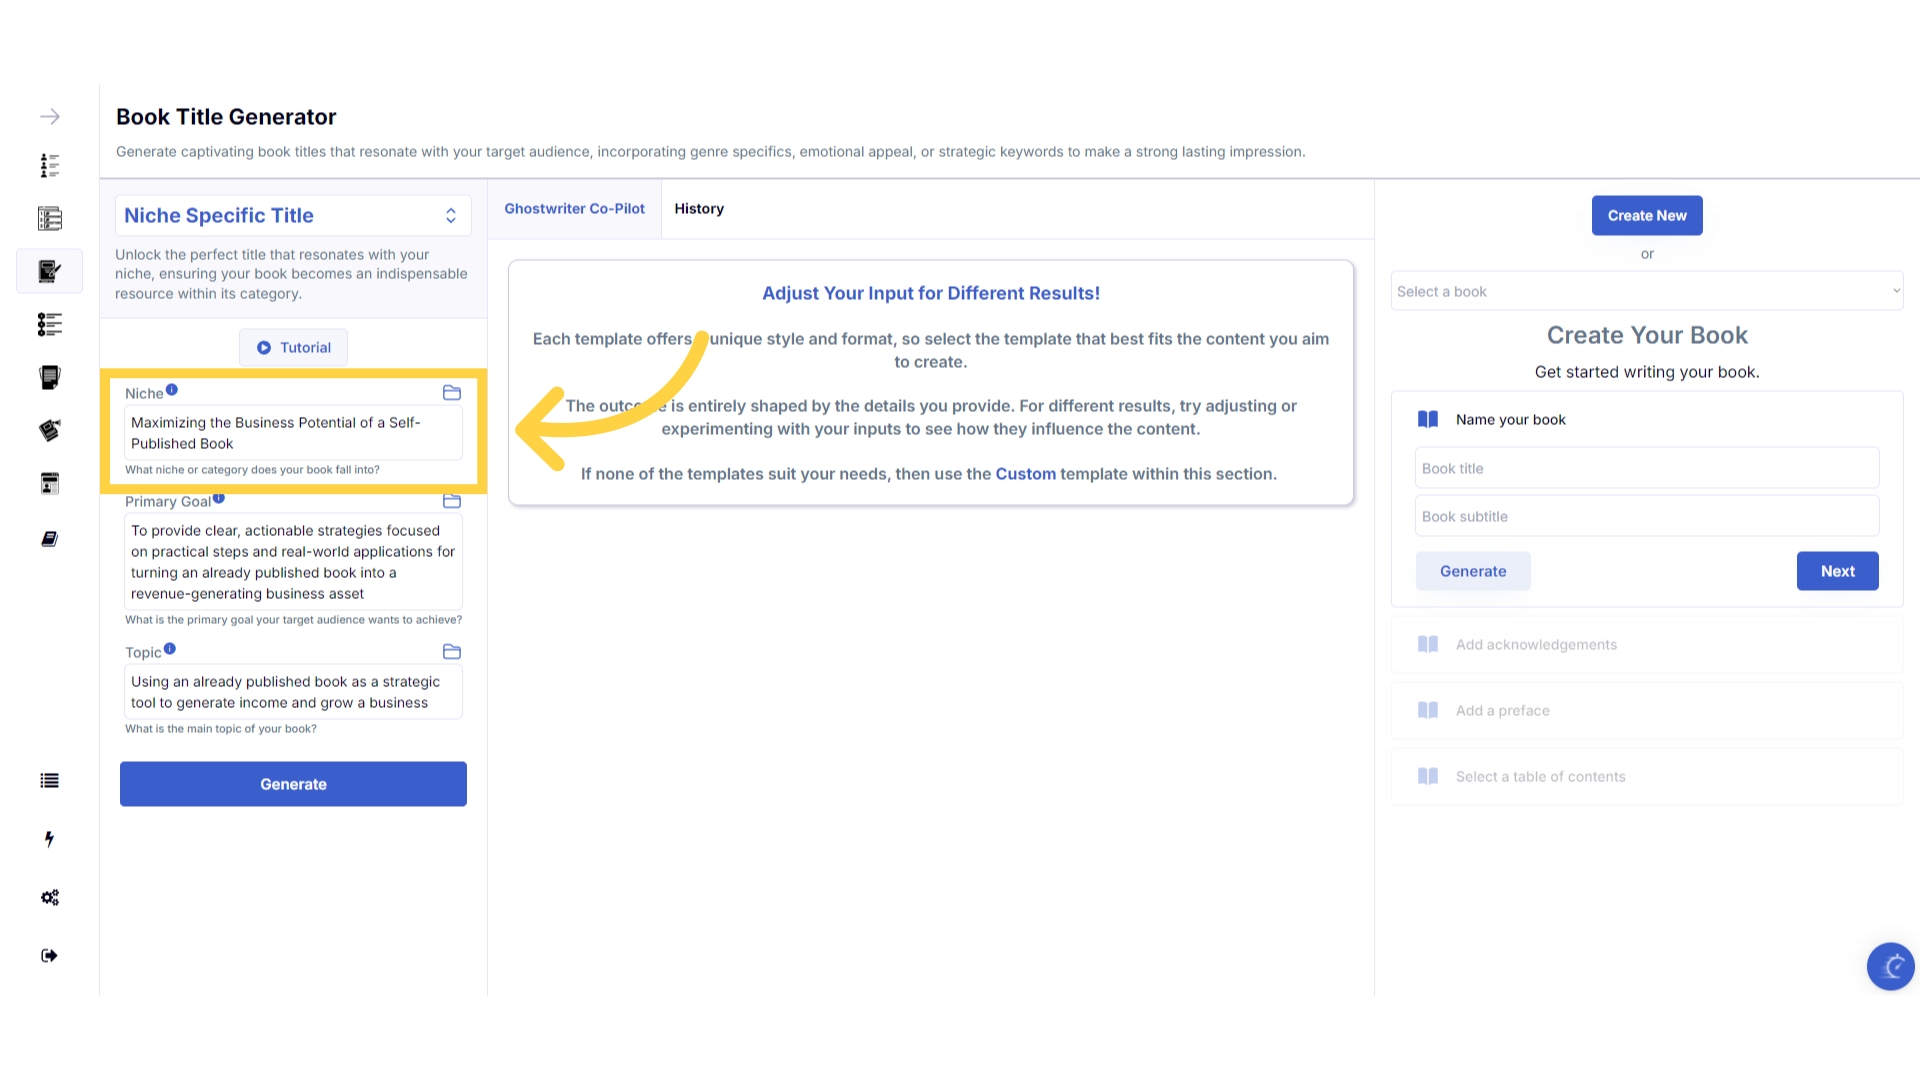)
Enter the "Primary Goal" of your book.
Outlining the Primary Goal, allows you to craft books that are tailored exactly to your readers needs. Whether specific goals or broad concepts, you can craft your book to achieve any goal.
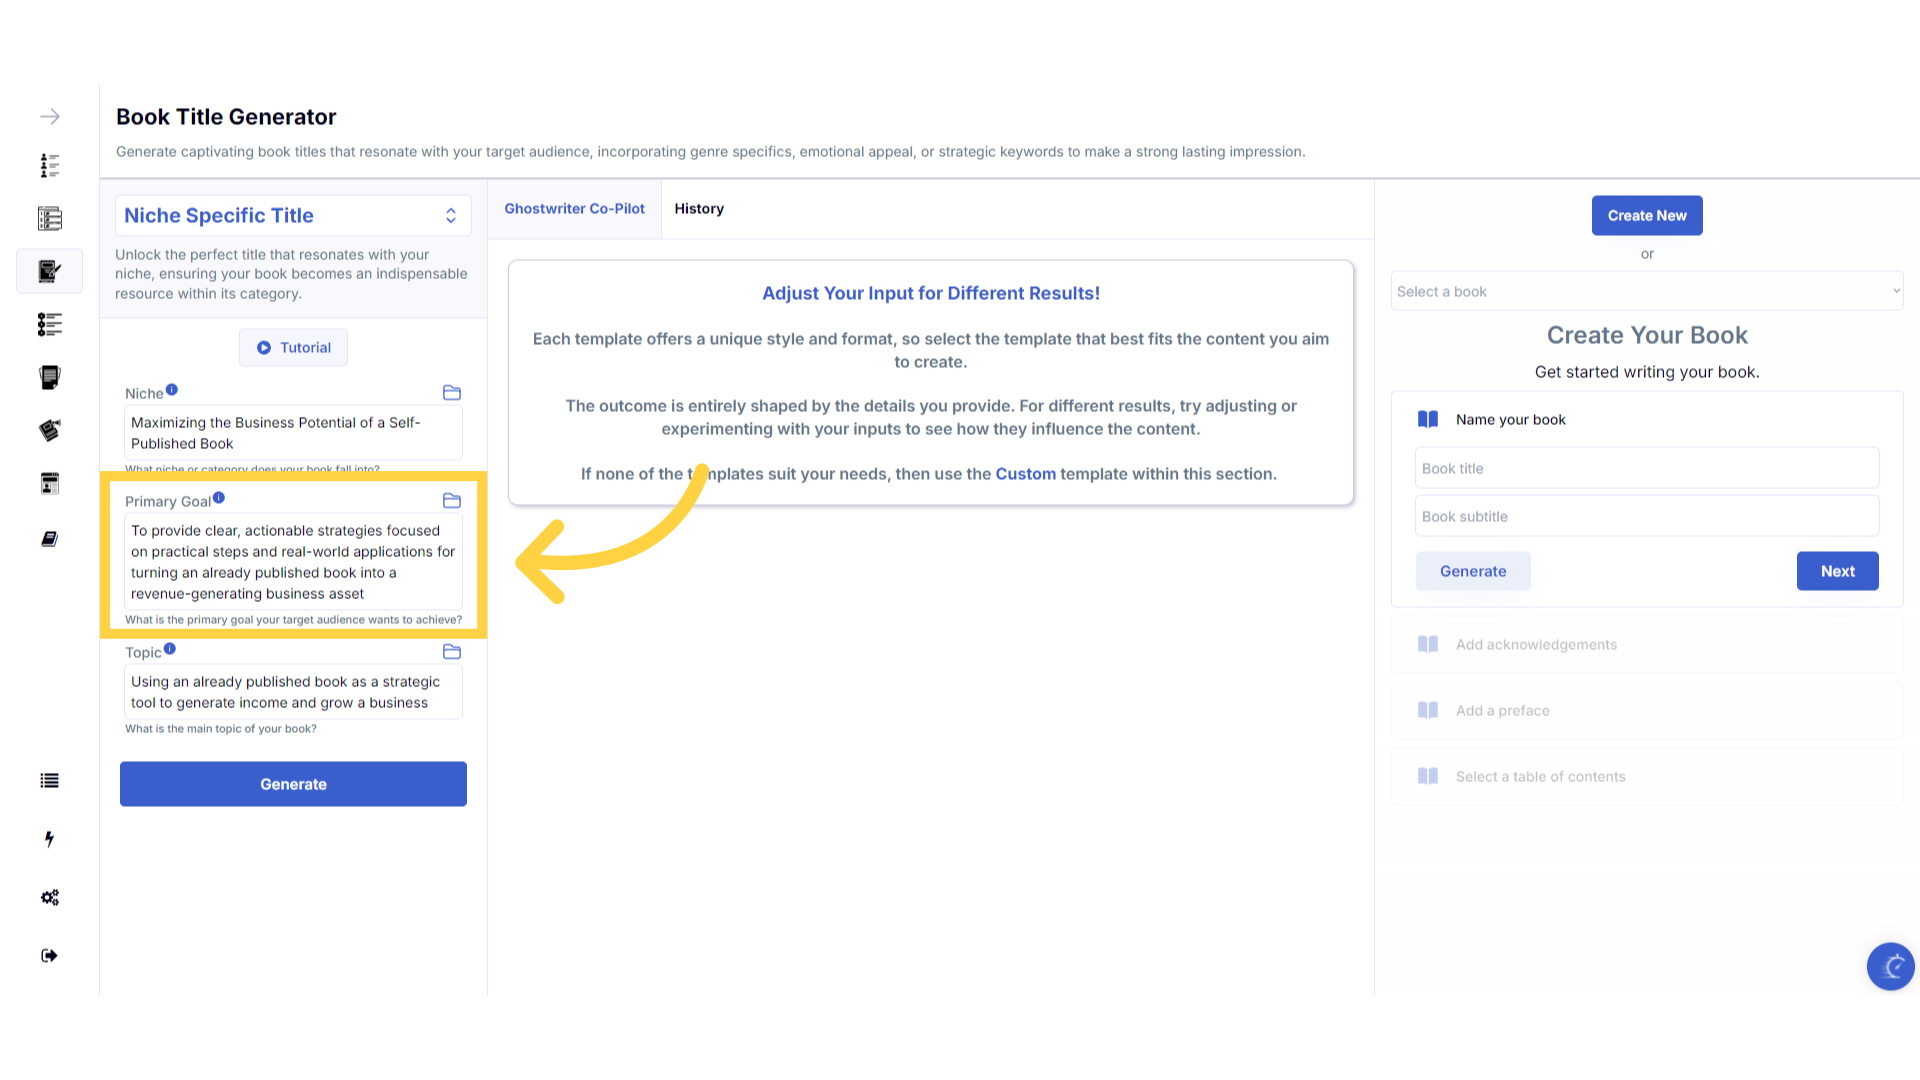)
Enter the "Topic" of your book.
To ensure your book is highly relevant to your niche, you can further refine your criteria, with a specific topic within your primary goal.
)
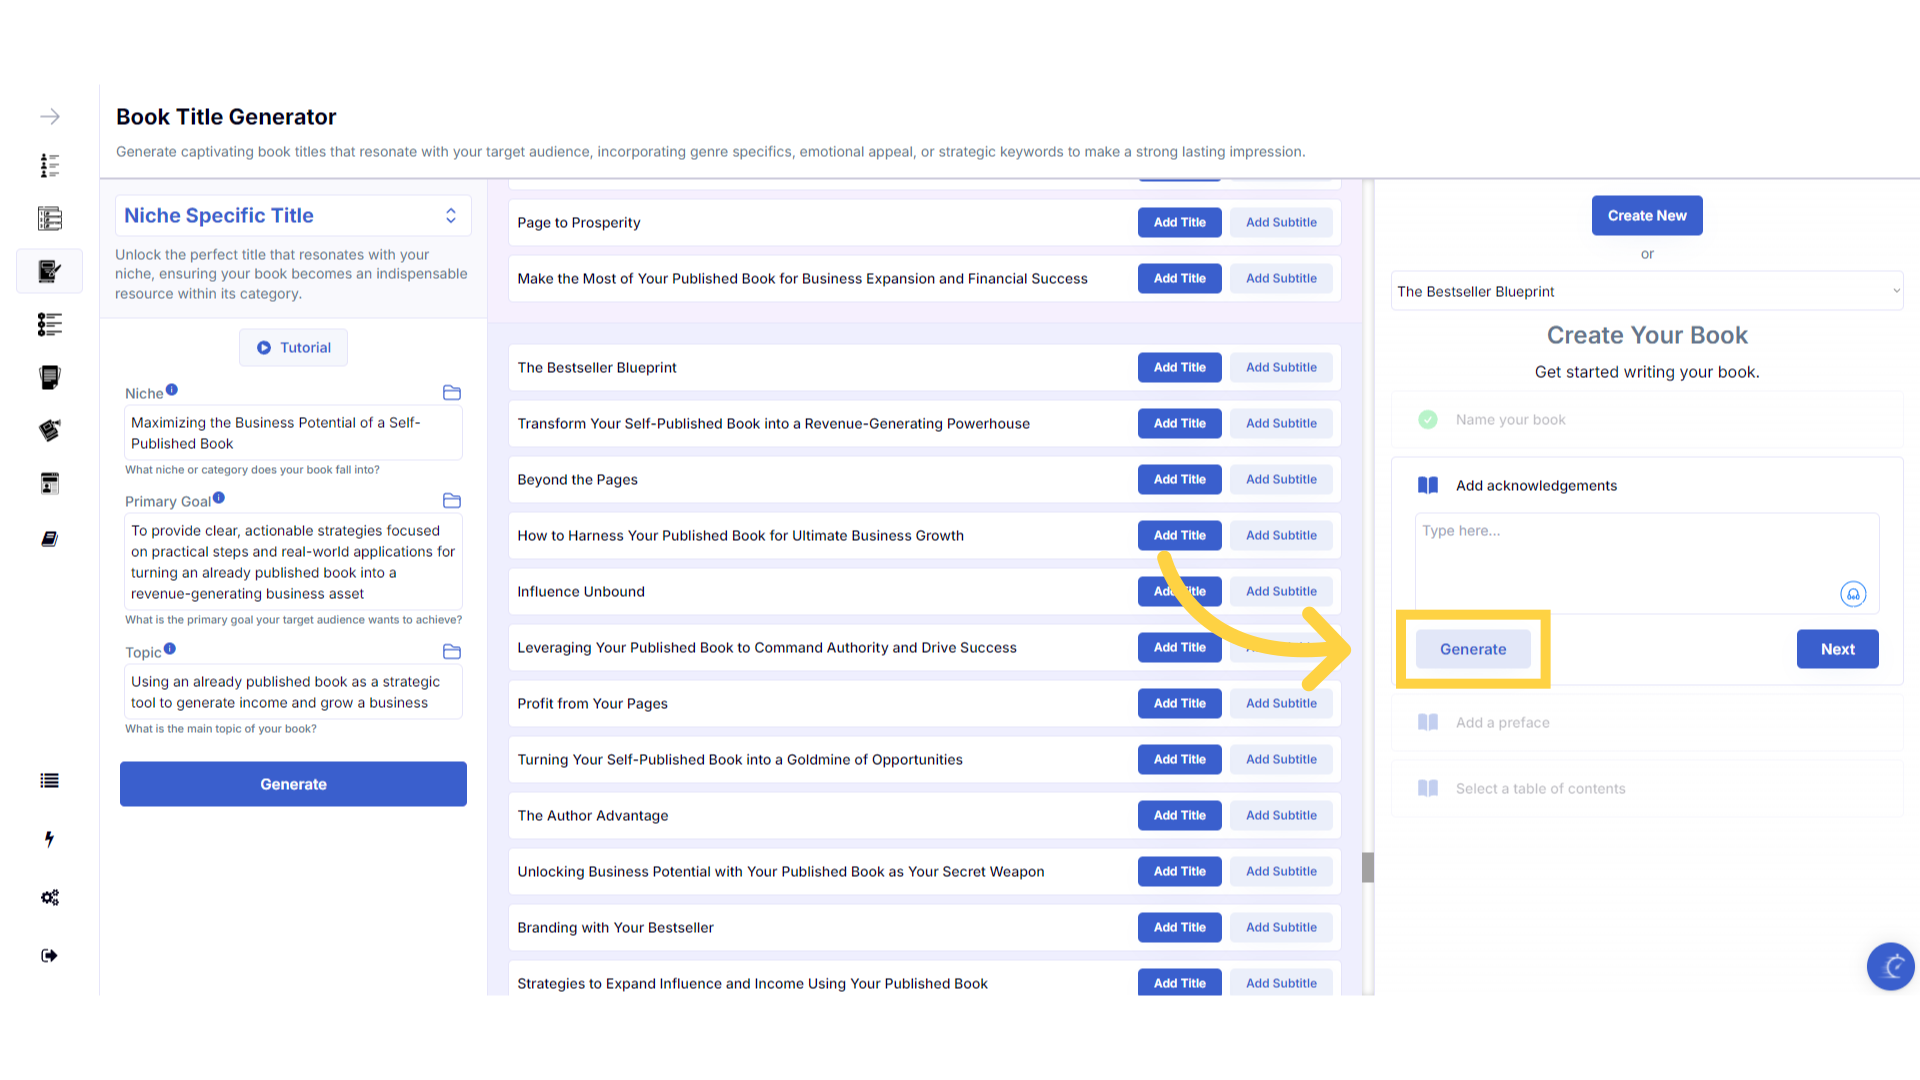
Click "Generate" to craft Book Titles based on your goals.
Once you've outlined your book, you can generate relevant book titles and subtitles.
)
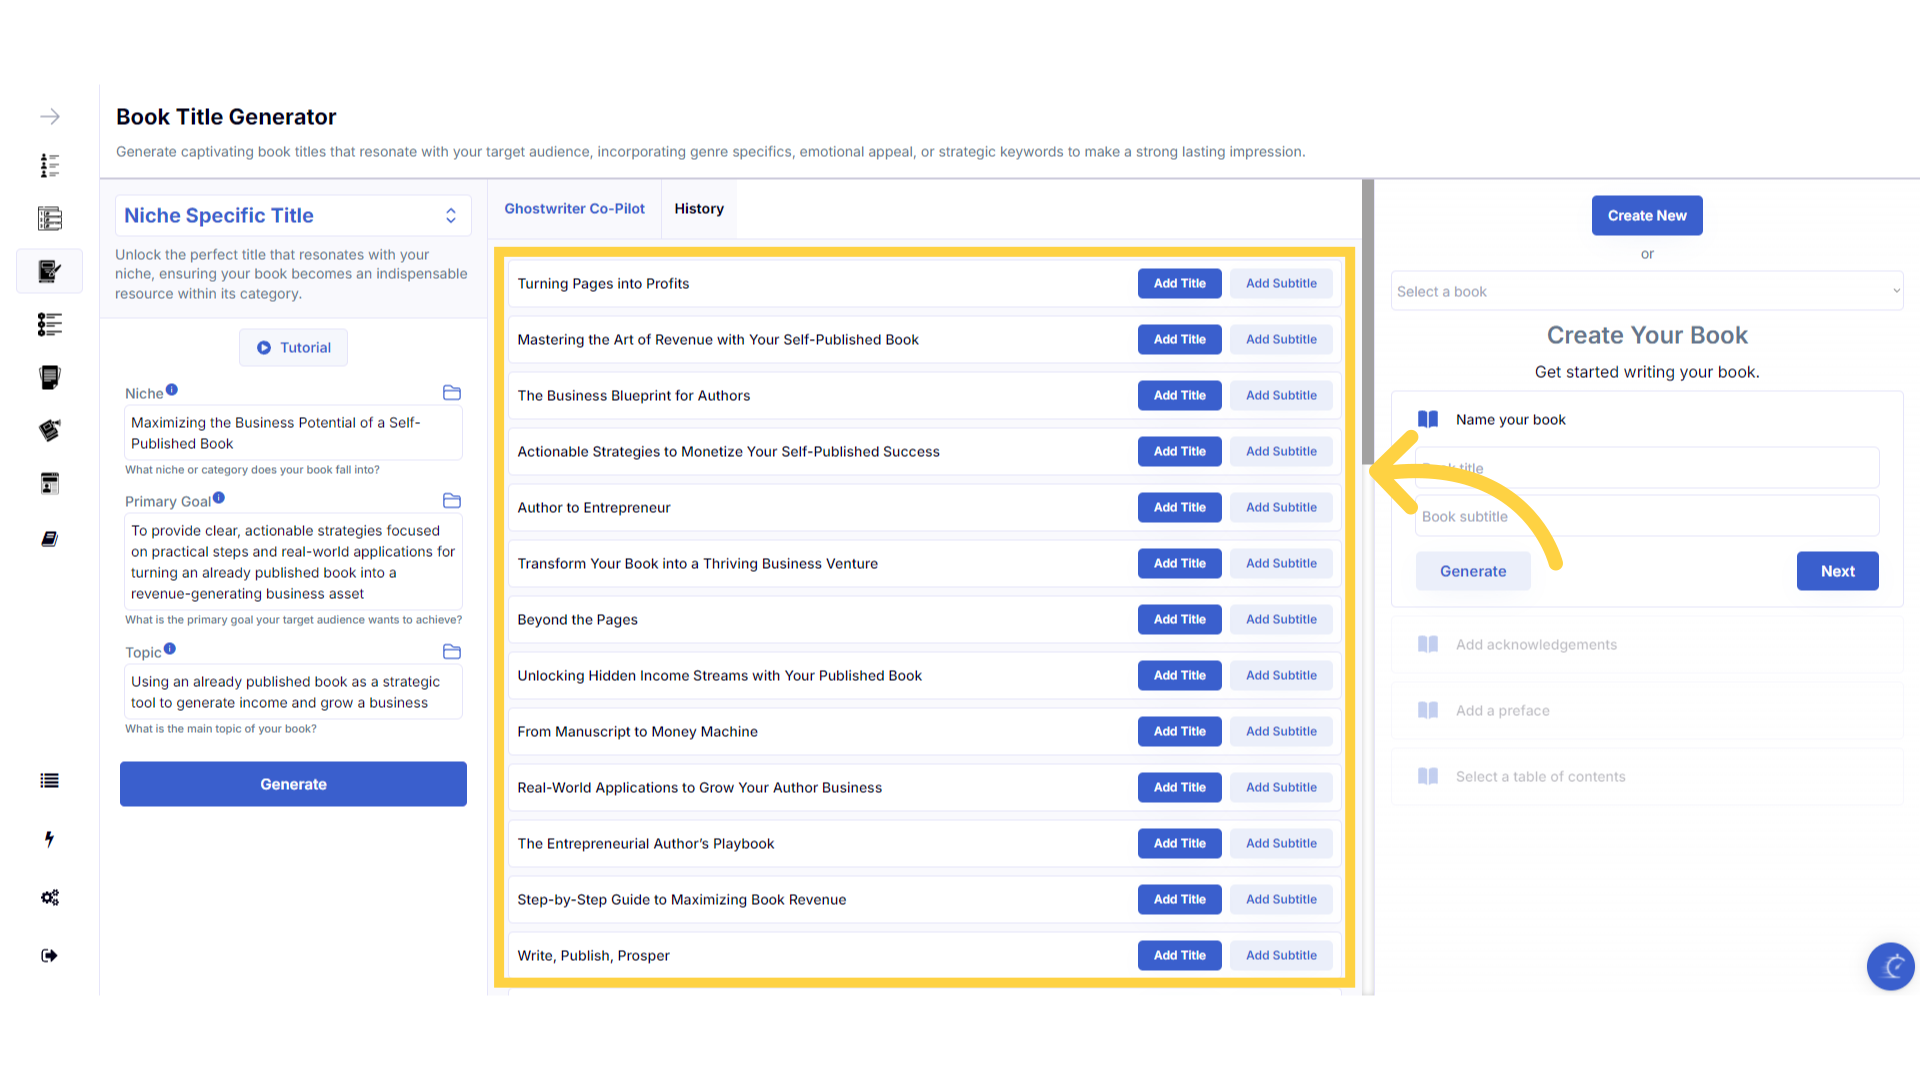
View the generated Book Titles.
Scroll through and choose your book title and subtitle. If the titles, aren't quite aligned with your needs, you can change the details you entered, and generate new titles. Or, you can mix and match and type the title in manually.
)
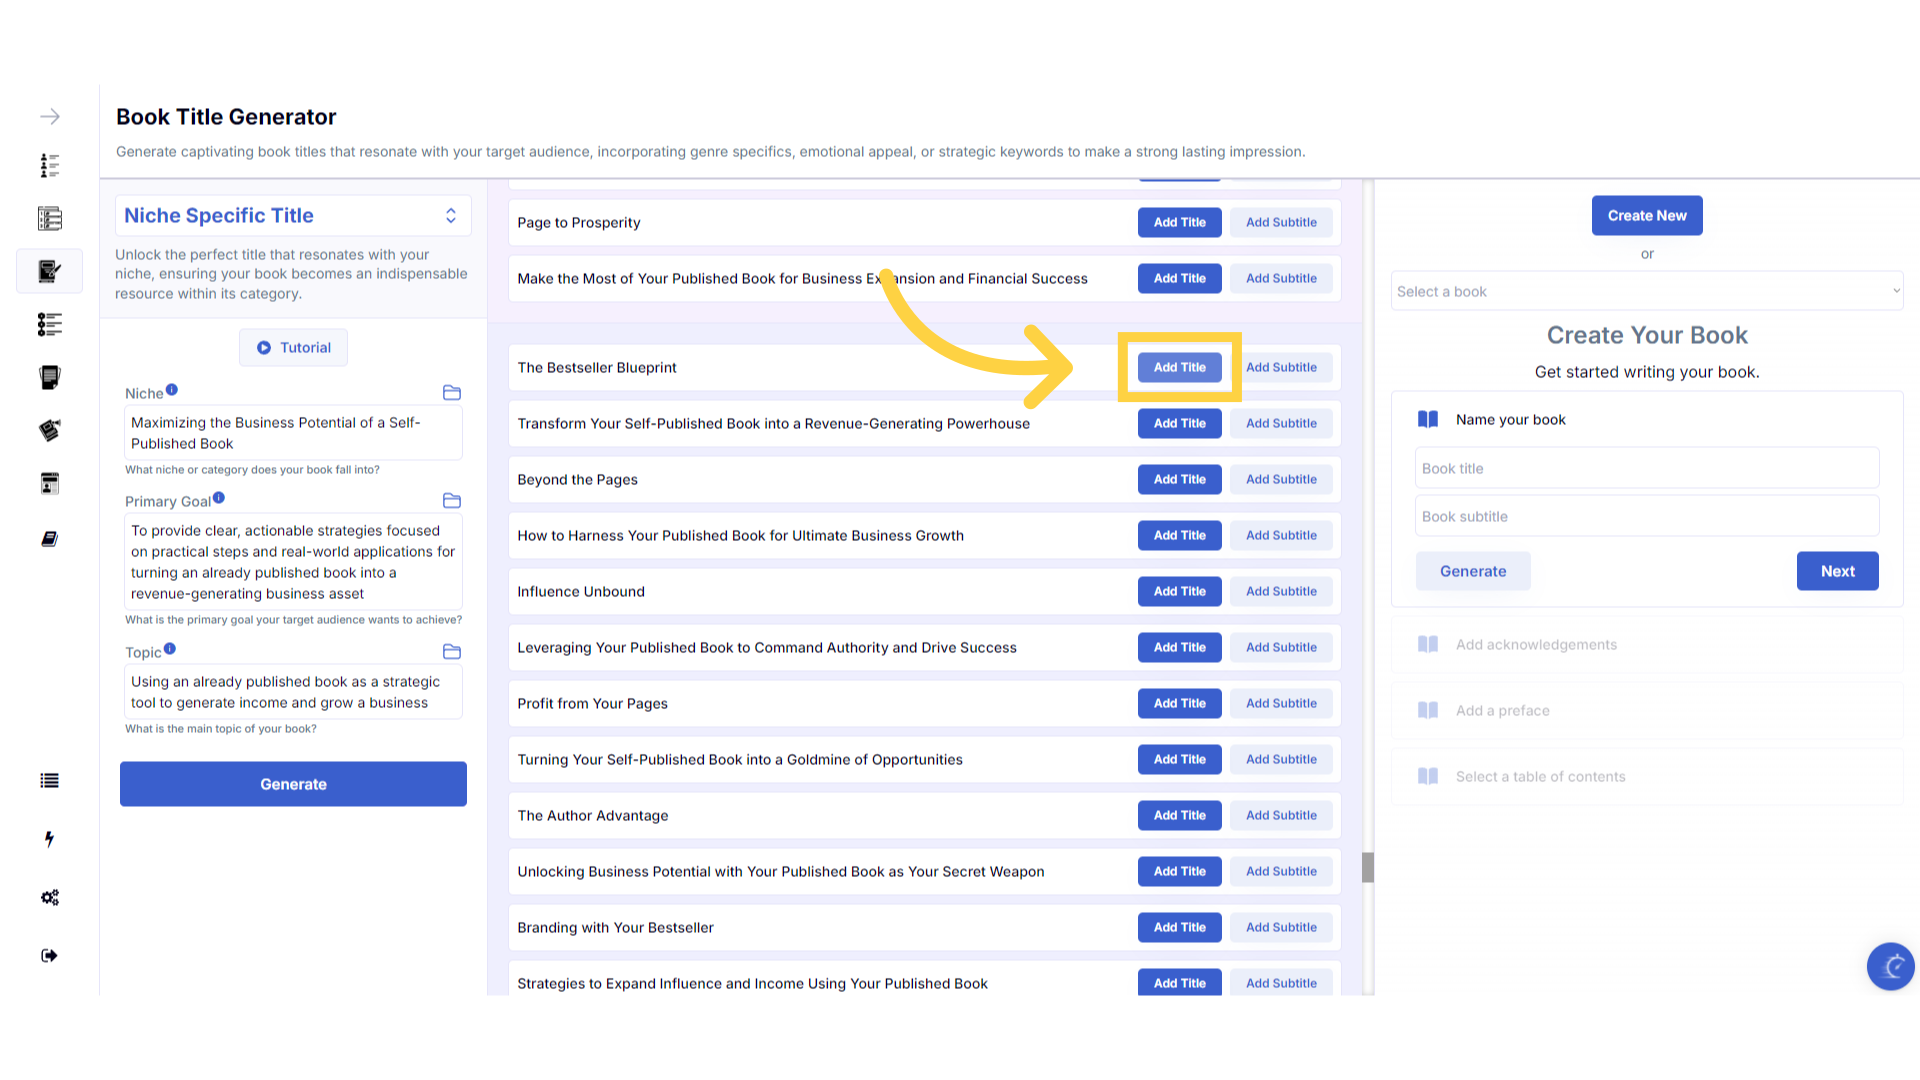
Choose your Book Title and click "Add Title".
Once you've chosen your title, you can click the add title button to add it to your Book Builder. Alternatively, if you already have a title you can just type it in.
)
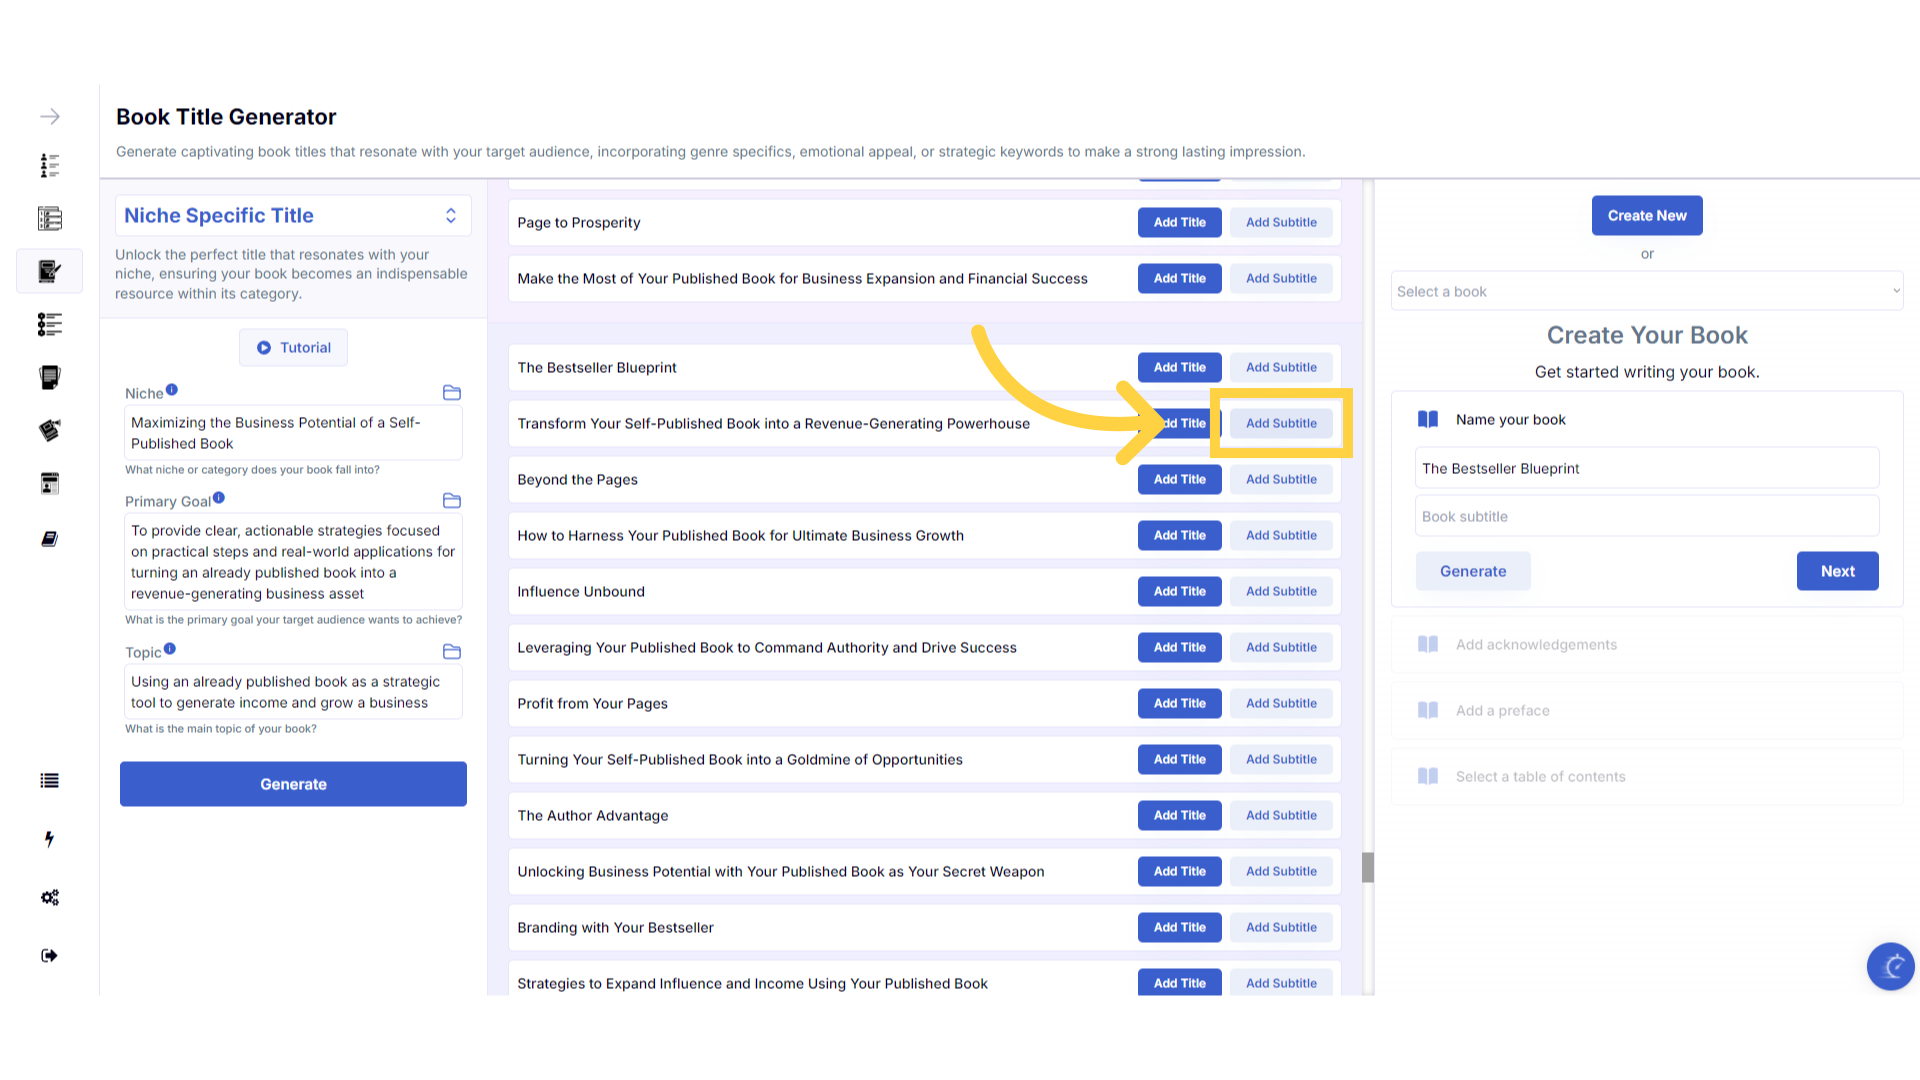
Choose your Book Sub-Title and click "Add Subtitle".
You can also add your book subtitle by clicking the add subtitle button. It's important to have a subtitle to generate relevant content. If you don't want a subtitle displayed on your book, you can remove it from your book after you export it.
)
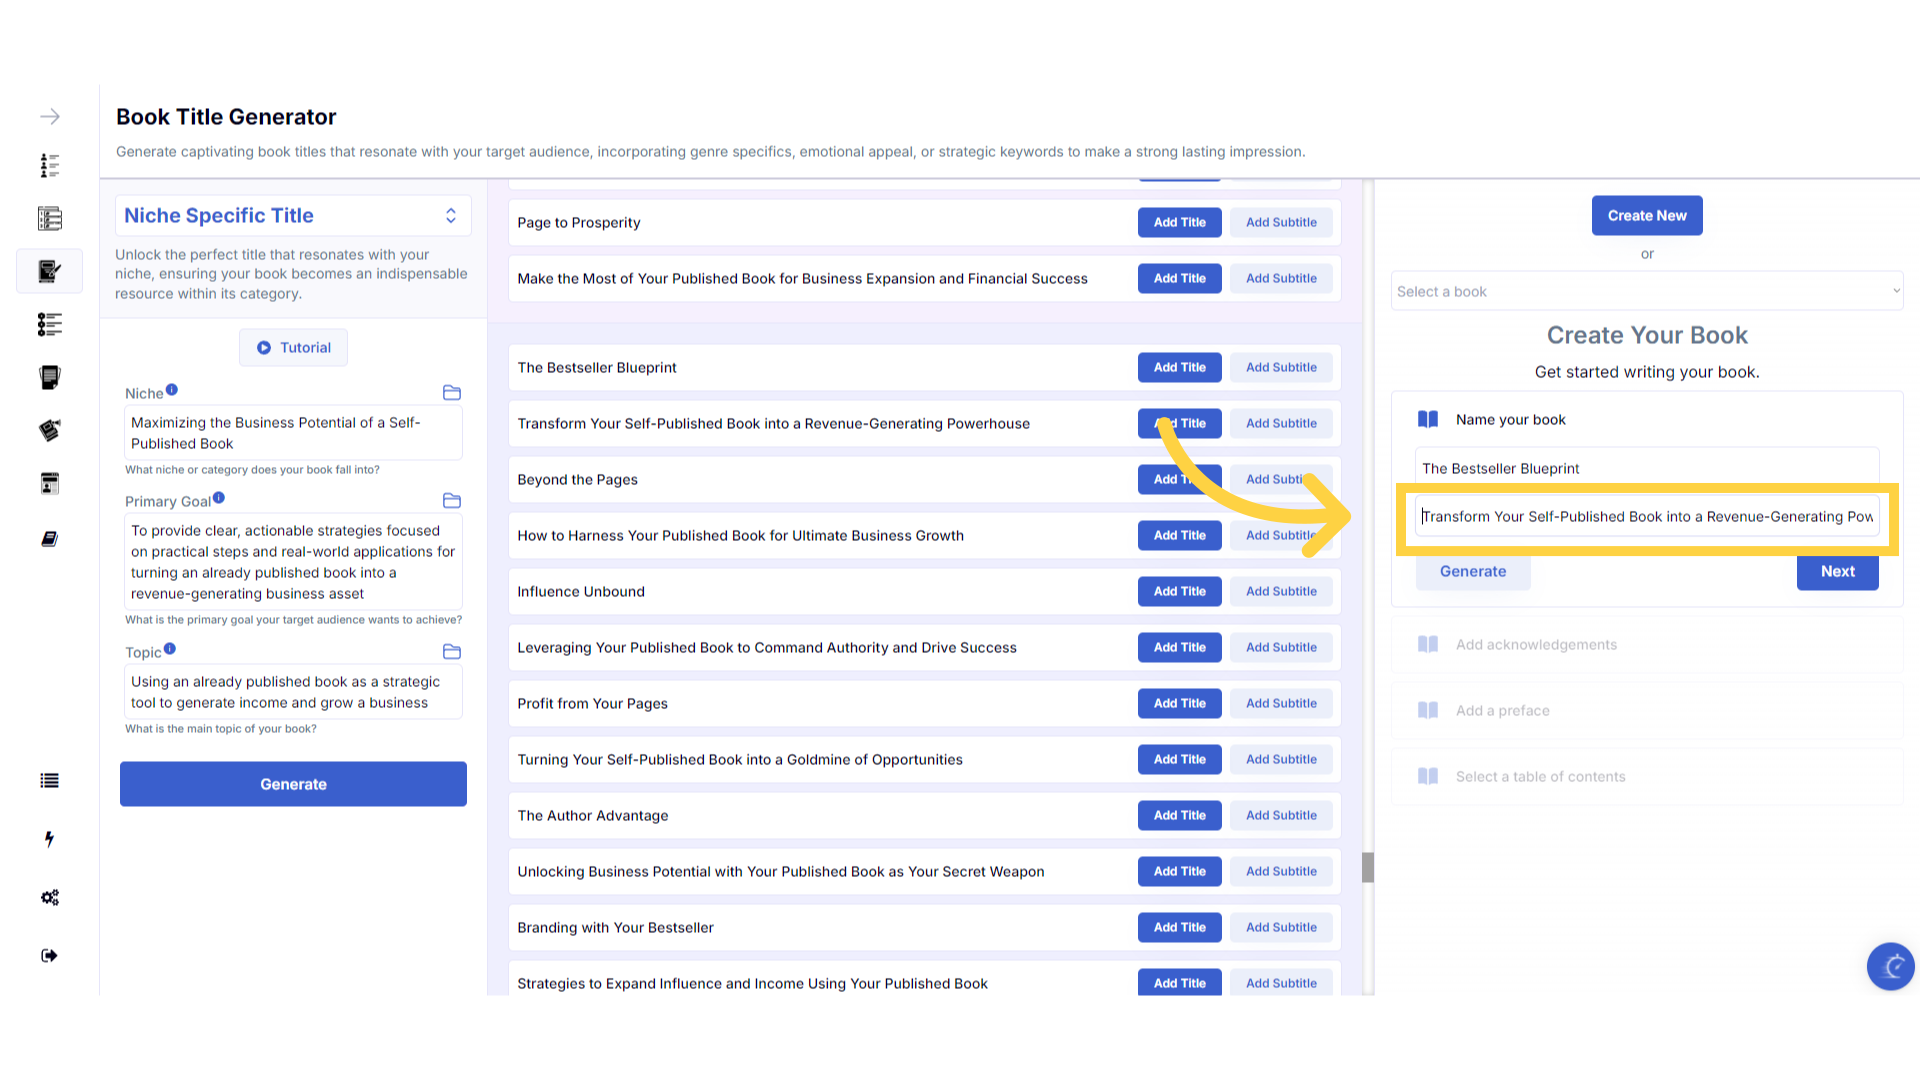
Copy your Subtitle and Save it for the next steps.
Before moving on to the next step, highlight and copy your subtitle, or write it down, so you have it available when you are ready to create your table of contents.
)
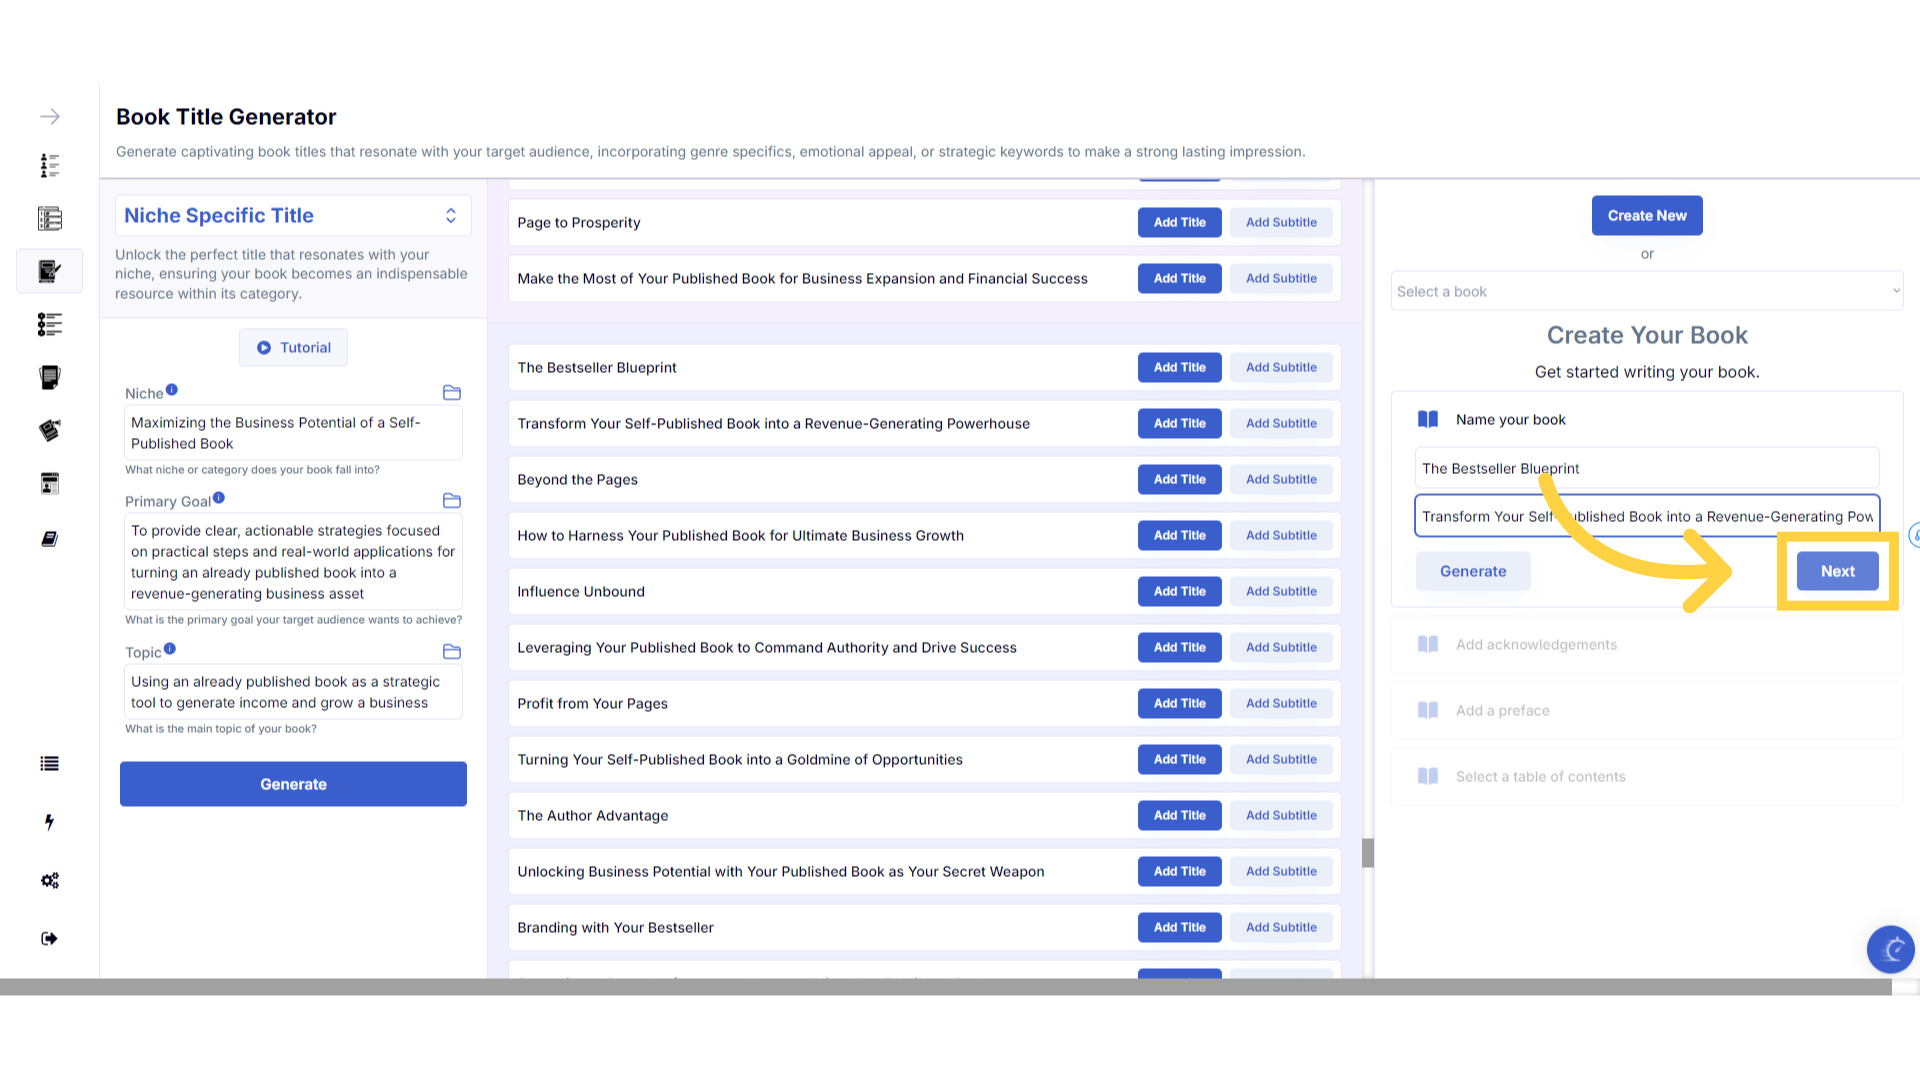
Click "Next". This creates your book in the Book Builder.
Click next to create your book, and be taken through the steps to generate your acknowledgments, preface and table of contents.
)
Click "Generate" to be taken to the Acknowledgment writer. If you don't want Acknowledgments, simply click next to leave it blank.
Click generate to be taken to the Acknowledgment writer. If you don't want acknowledgments simply click next to leave it blank.
)
Enter the details of those you wish to acknowledge.
Add the people that you would like to acknowledge in the opening of your book. Enter their names and how they have supported you, to craft a heartfelt acknowledgment.
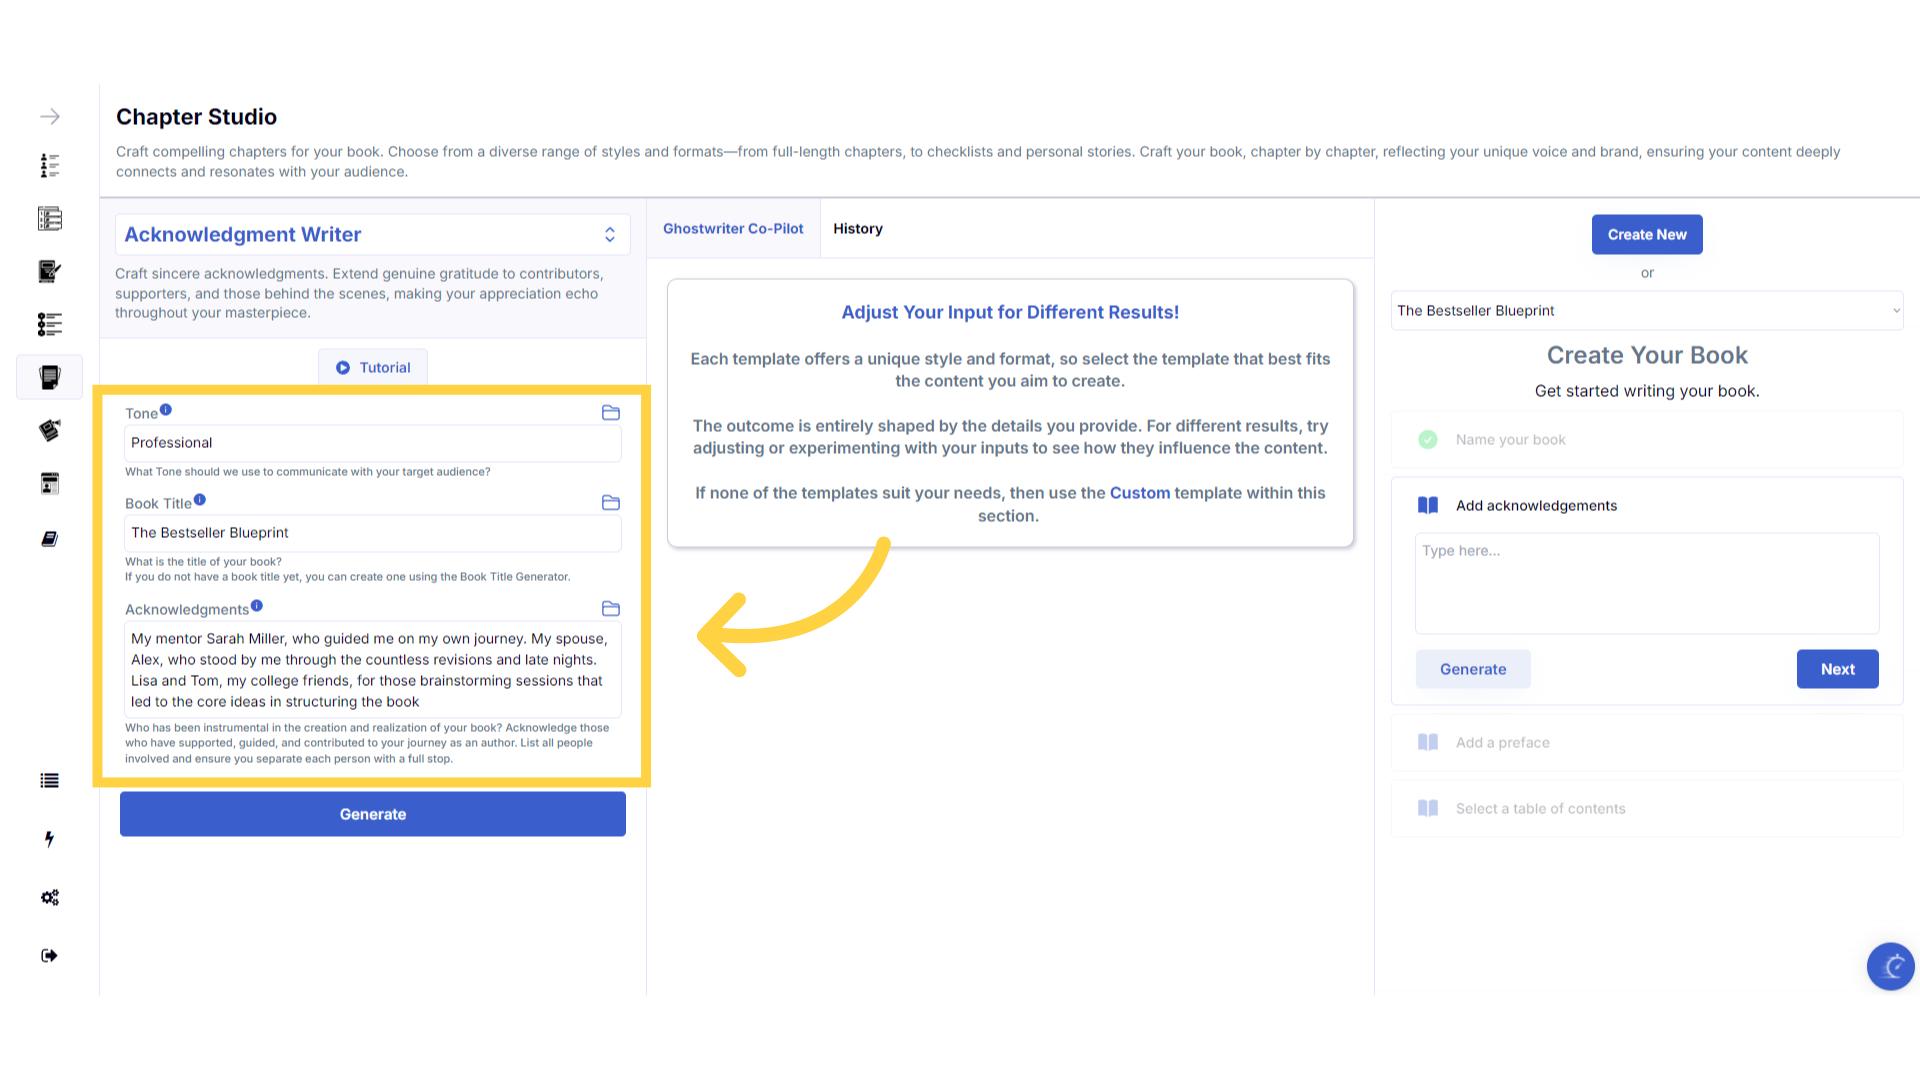)
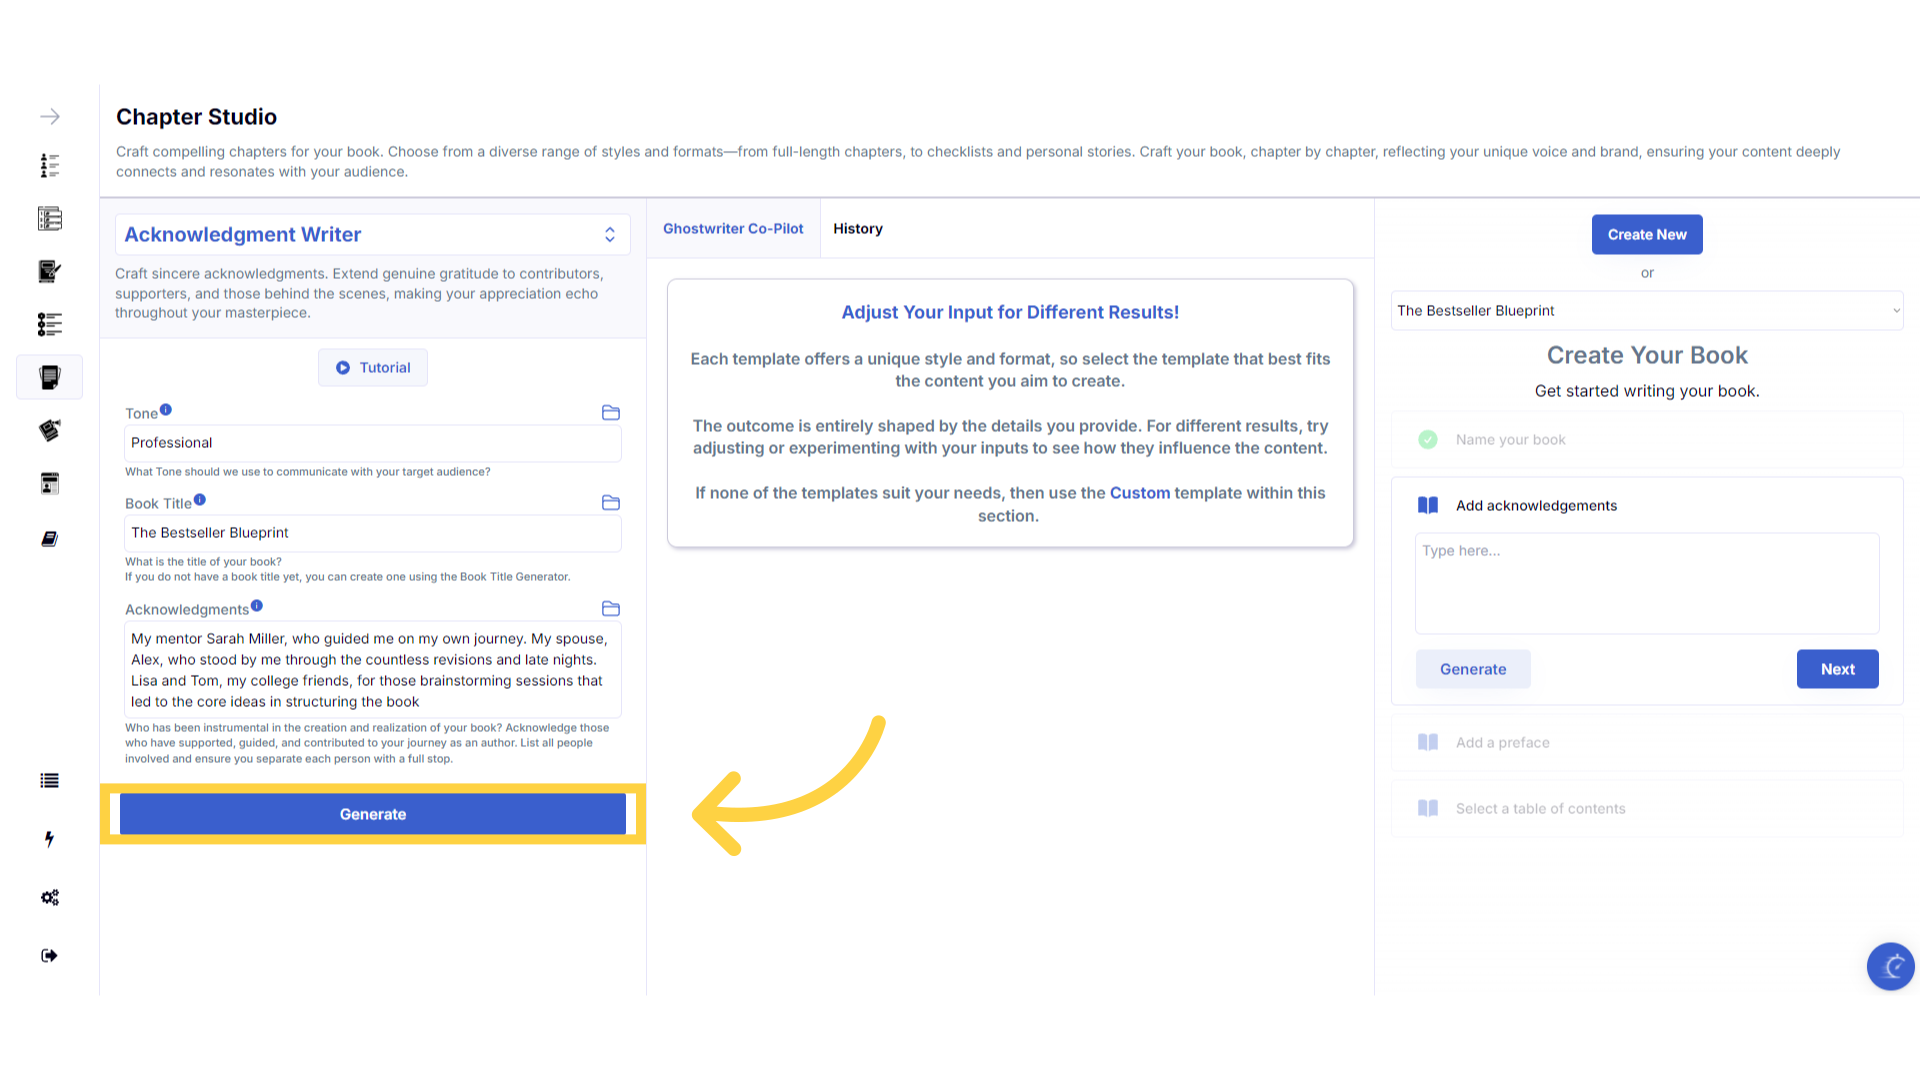
Click "Generate" to craft your acknowledgment.
You can change the information you enter, to generate different versions.
)
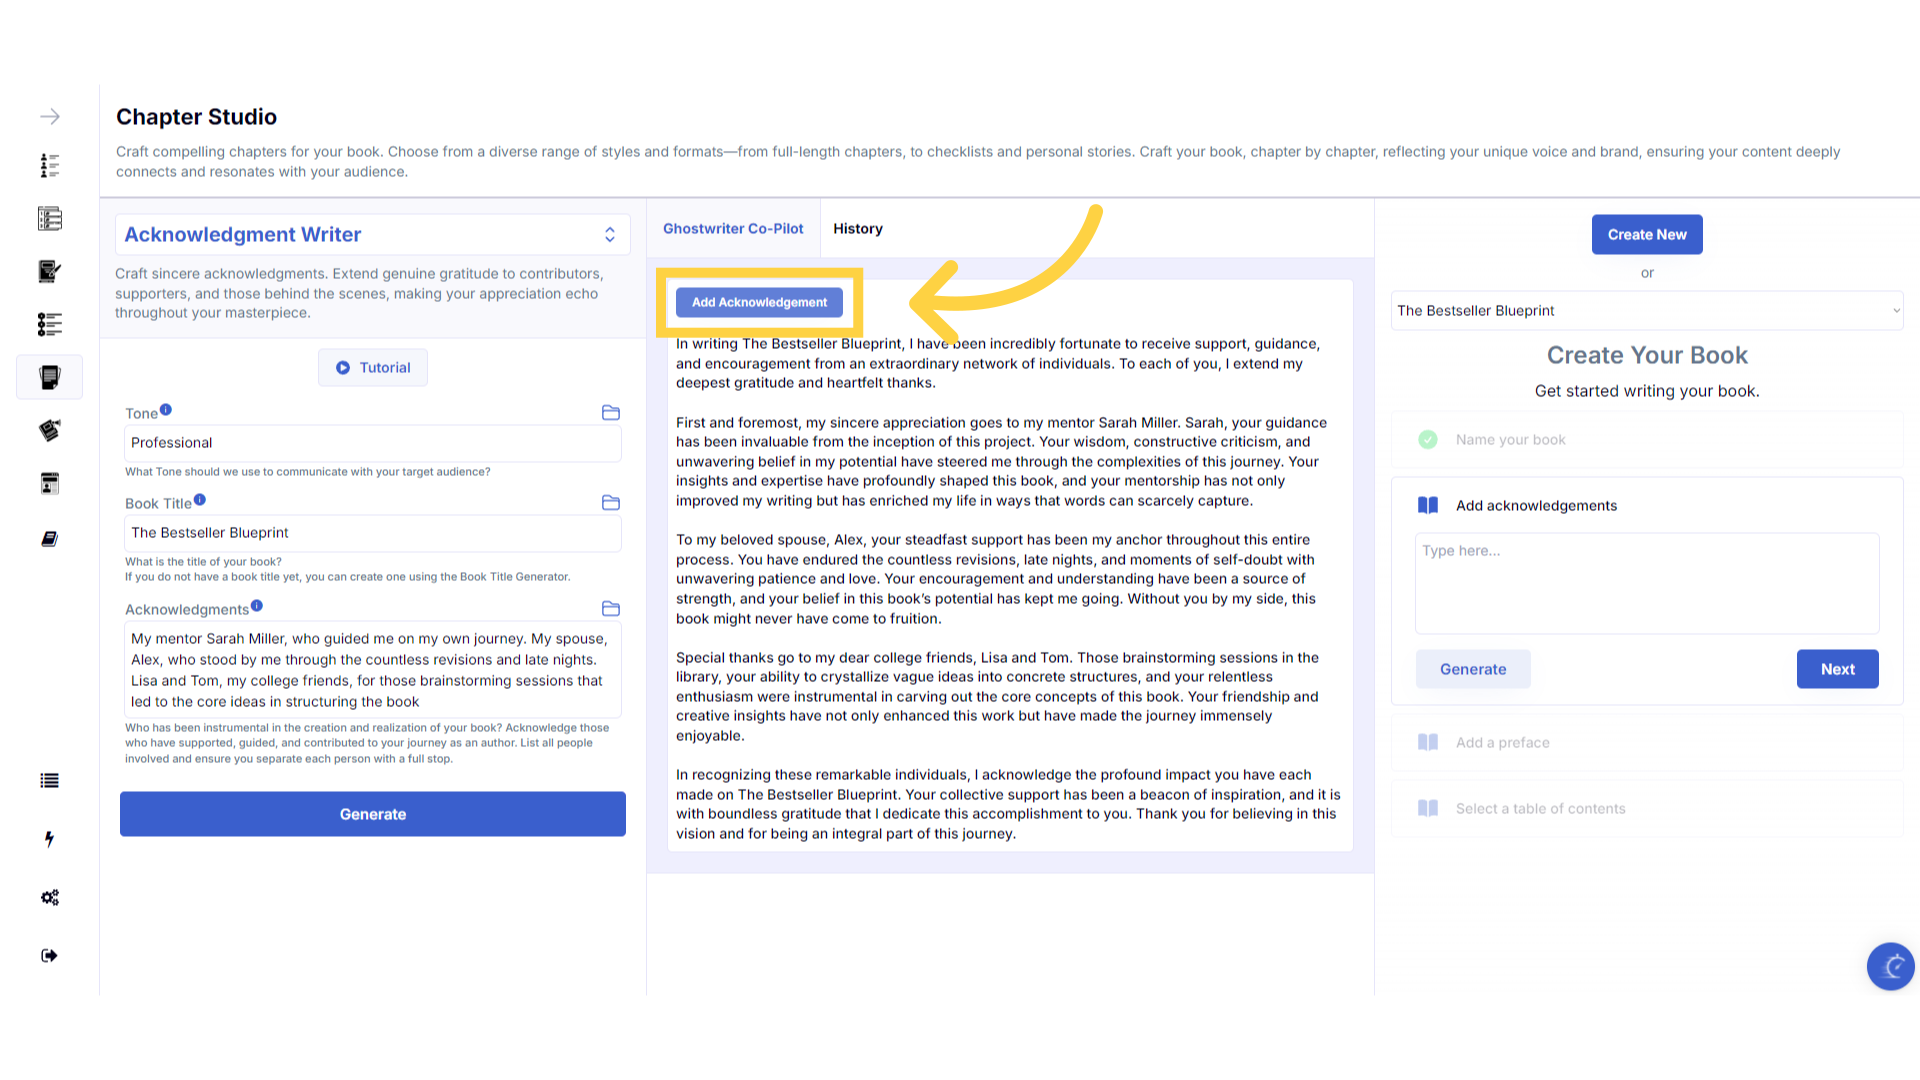
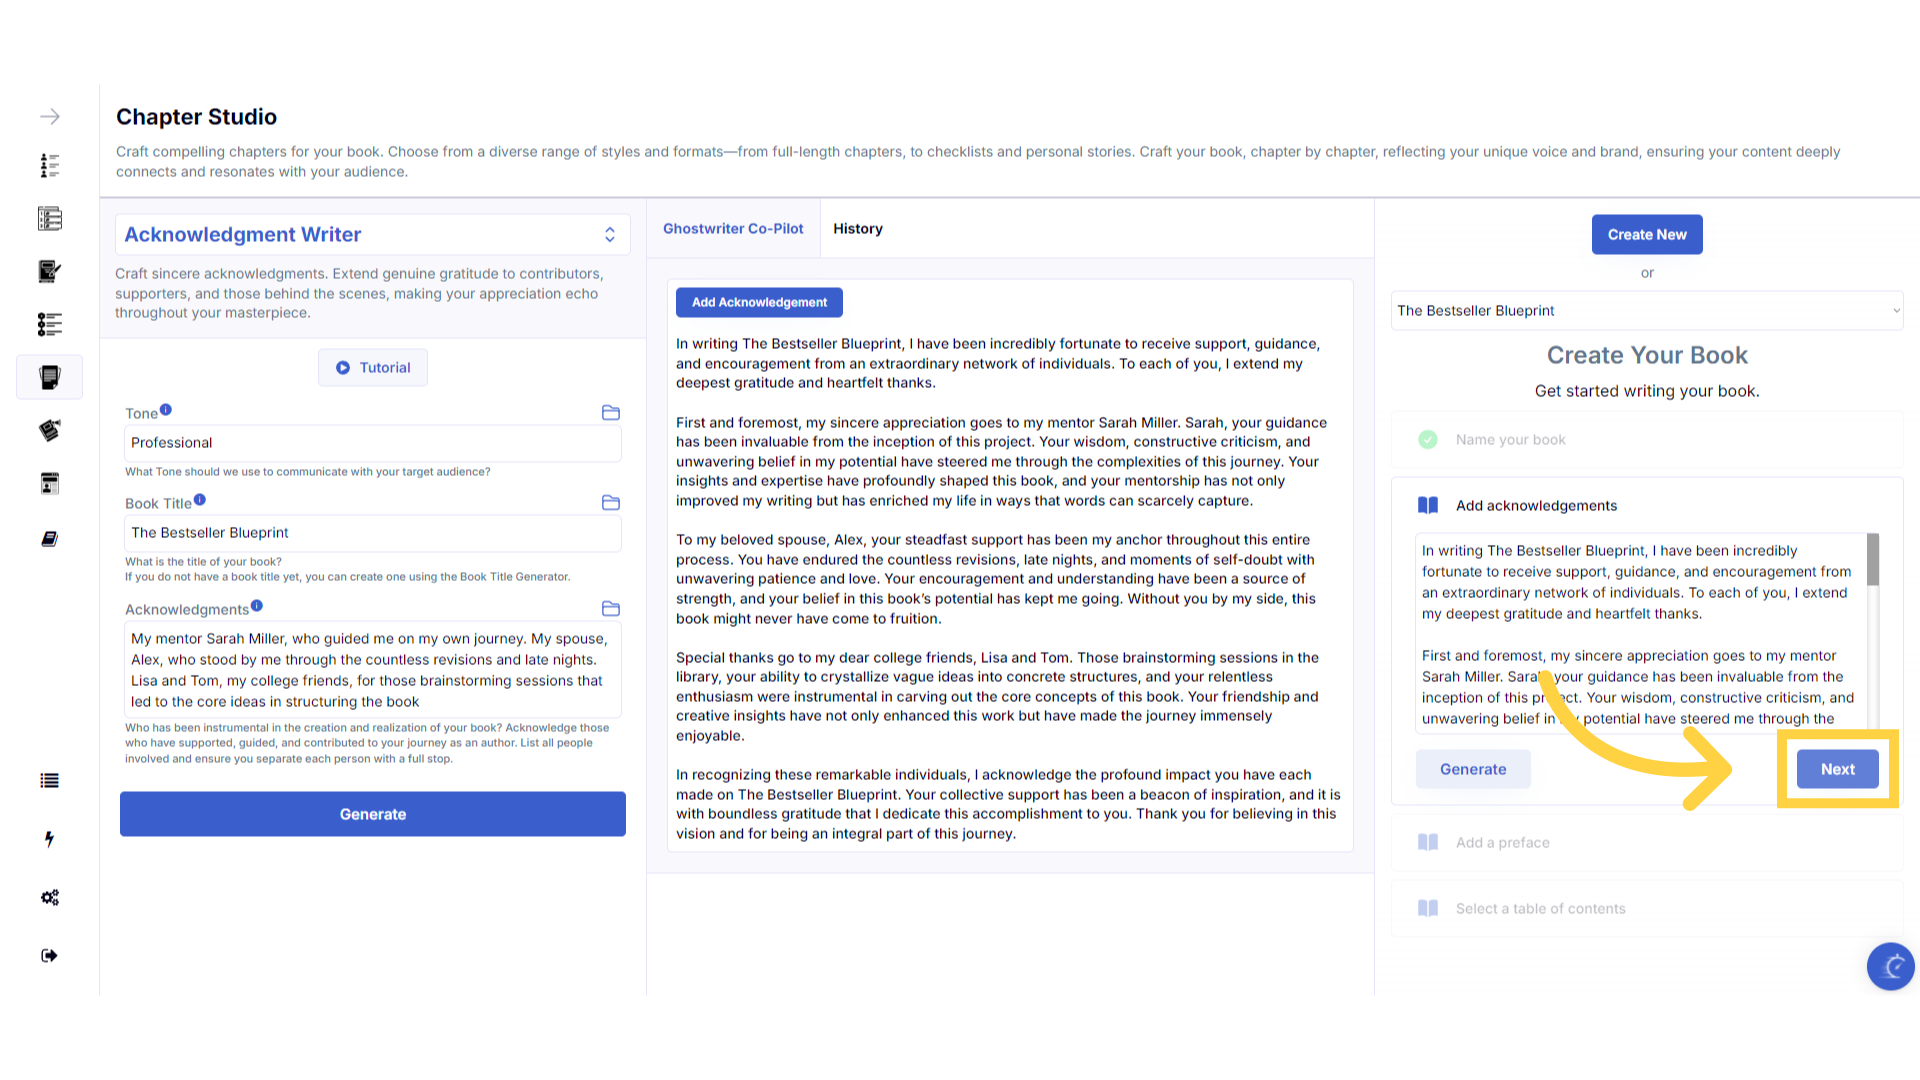
Click "Add Acknowledgment" to add the Acknowledgment to your book.
Click the add acknowledgment button to add it to your book. You can always, edit this later.
)
Click "Next" to Continue.
Let's move on to the Preface.
)
Click "Generate"
Click generate to be taken to the preface writer. If you don't want a preface, simply click next to leave it blank.
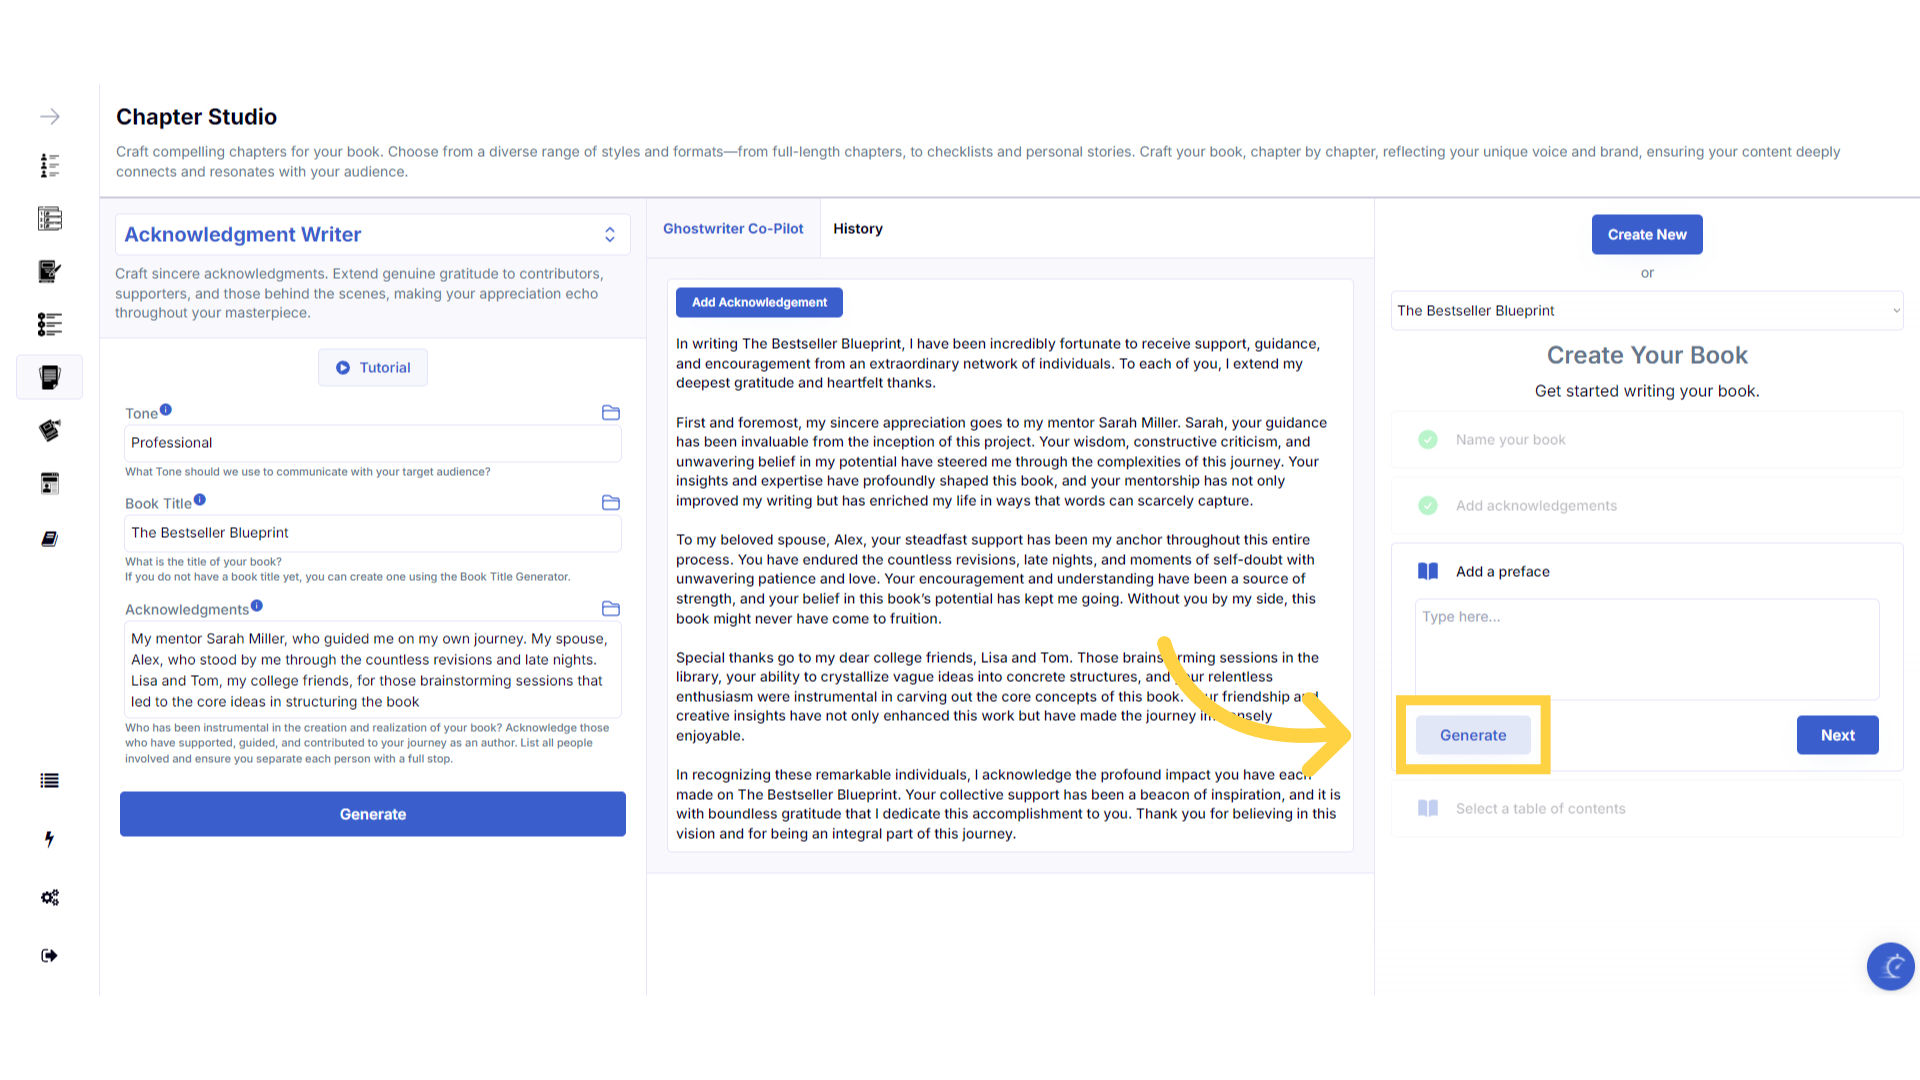)
Enter the required information to create the Preface.
Outline your book and what led you to want to write it, along with your vision. Your input will be transformed into a captivating preface, setting the context of your book.
)
Click "Generate" to craft the Preface.
You can change the information and regenerate your preface until you find a version that fits perfectly.
)
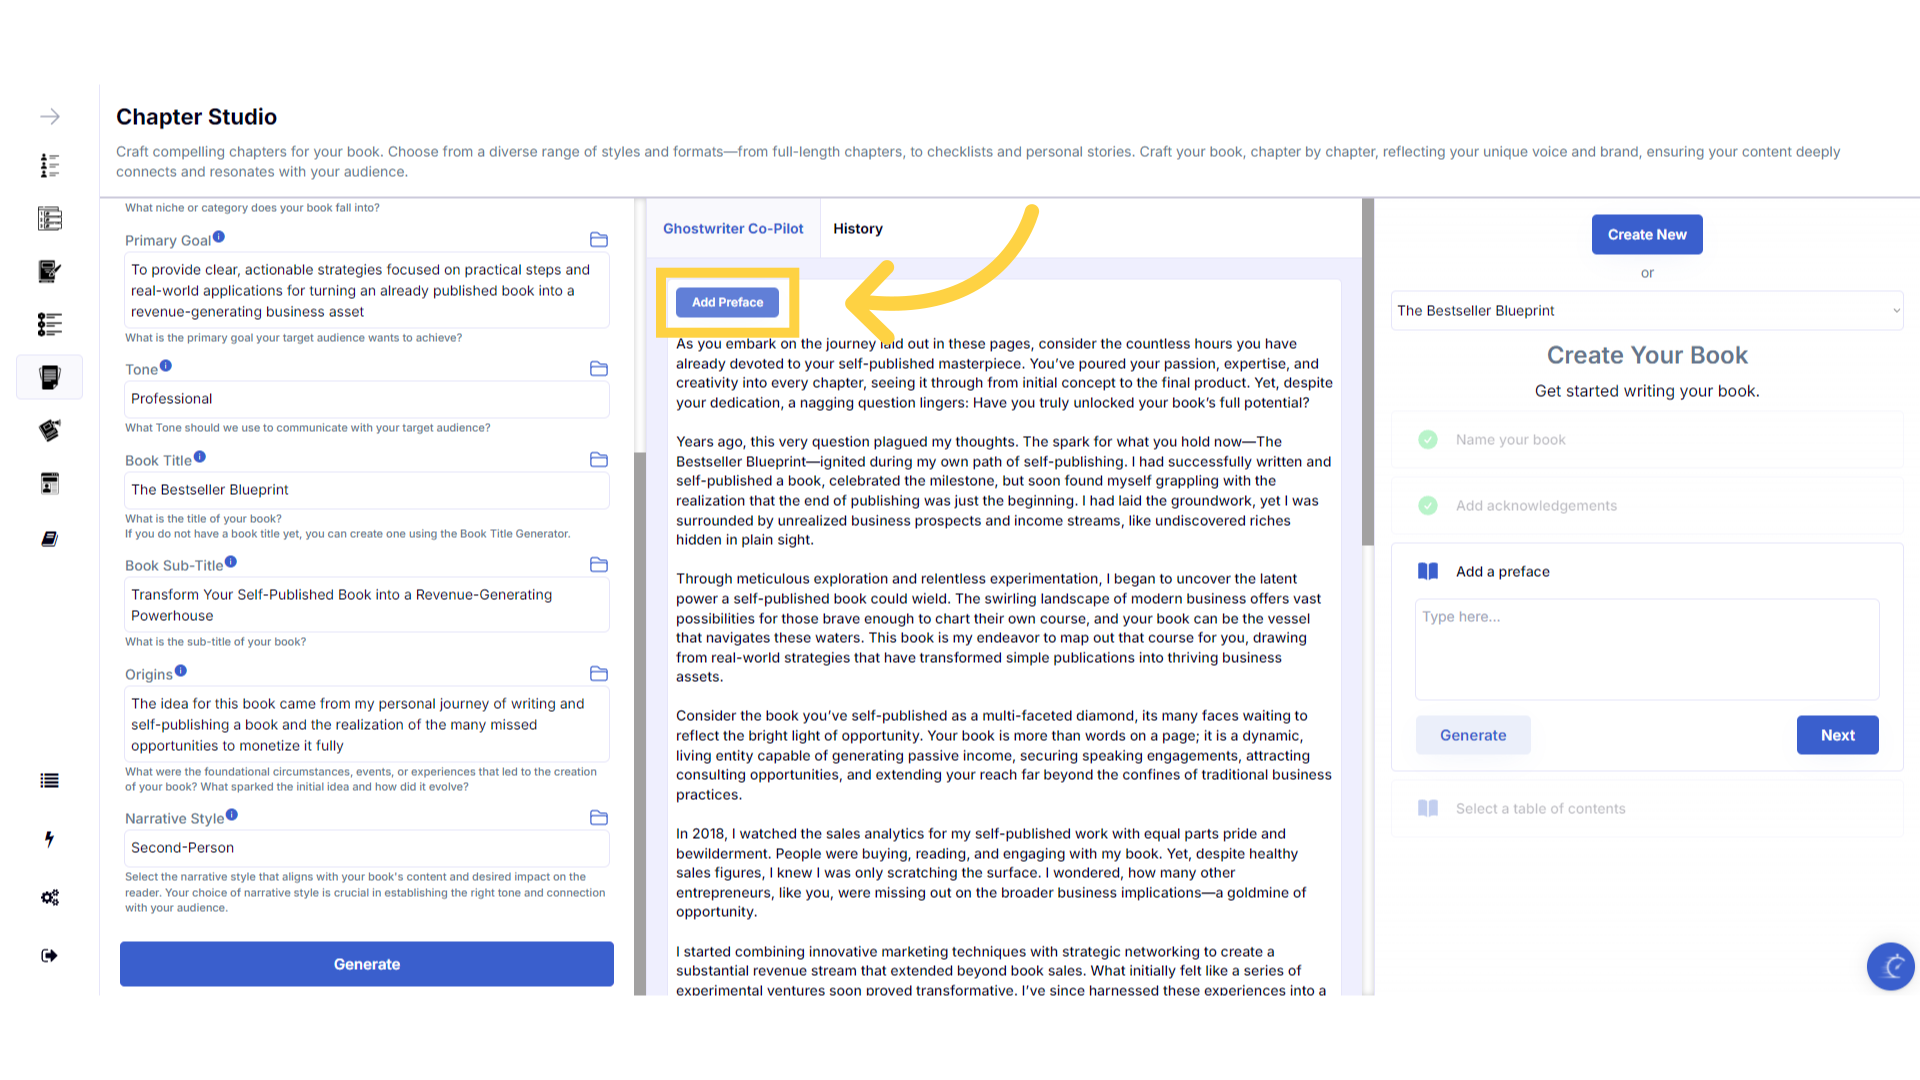
Click "Add Preface" to add the Preface to your book.
Click add preface to add it to your book. You can always edit this later.
)
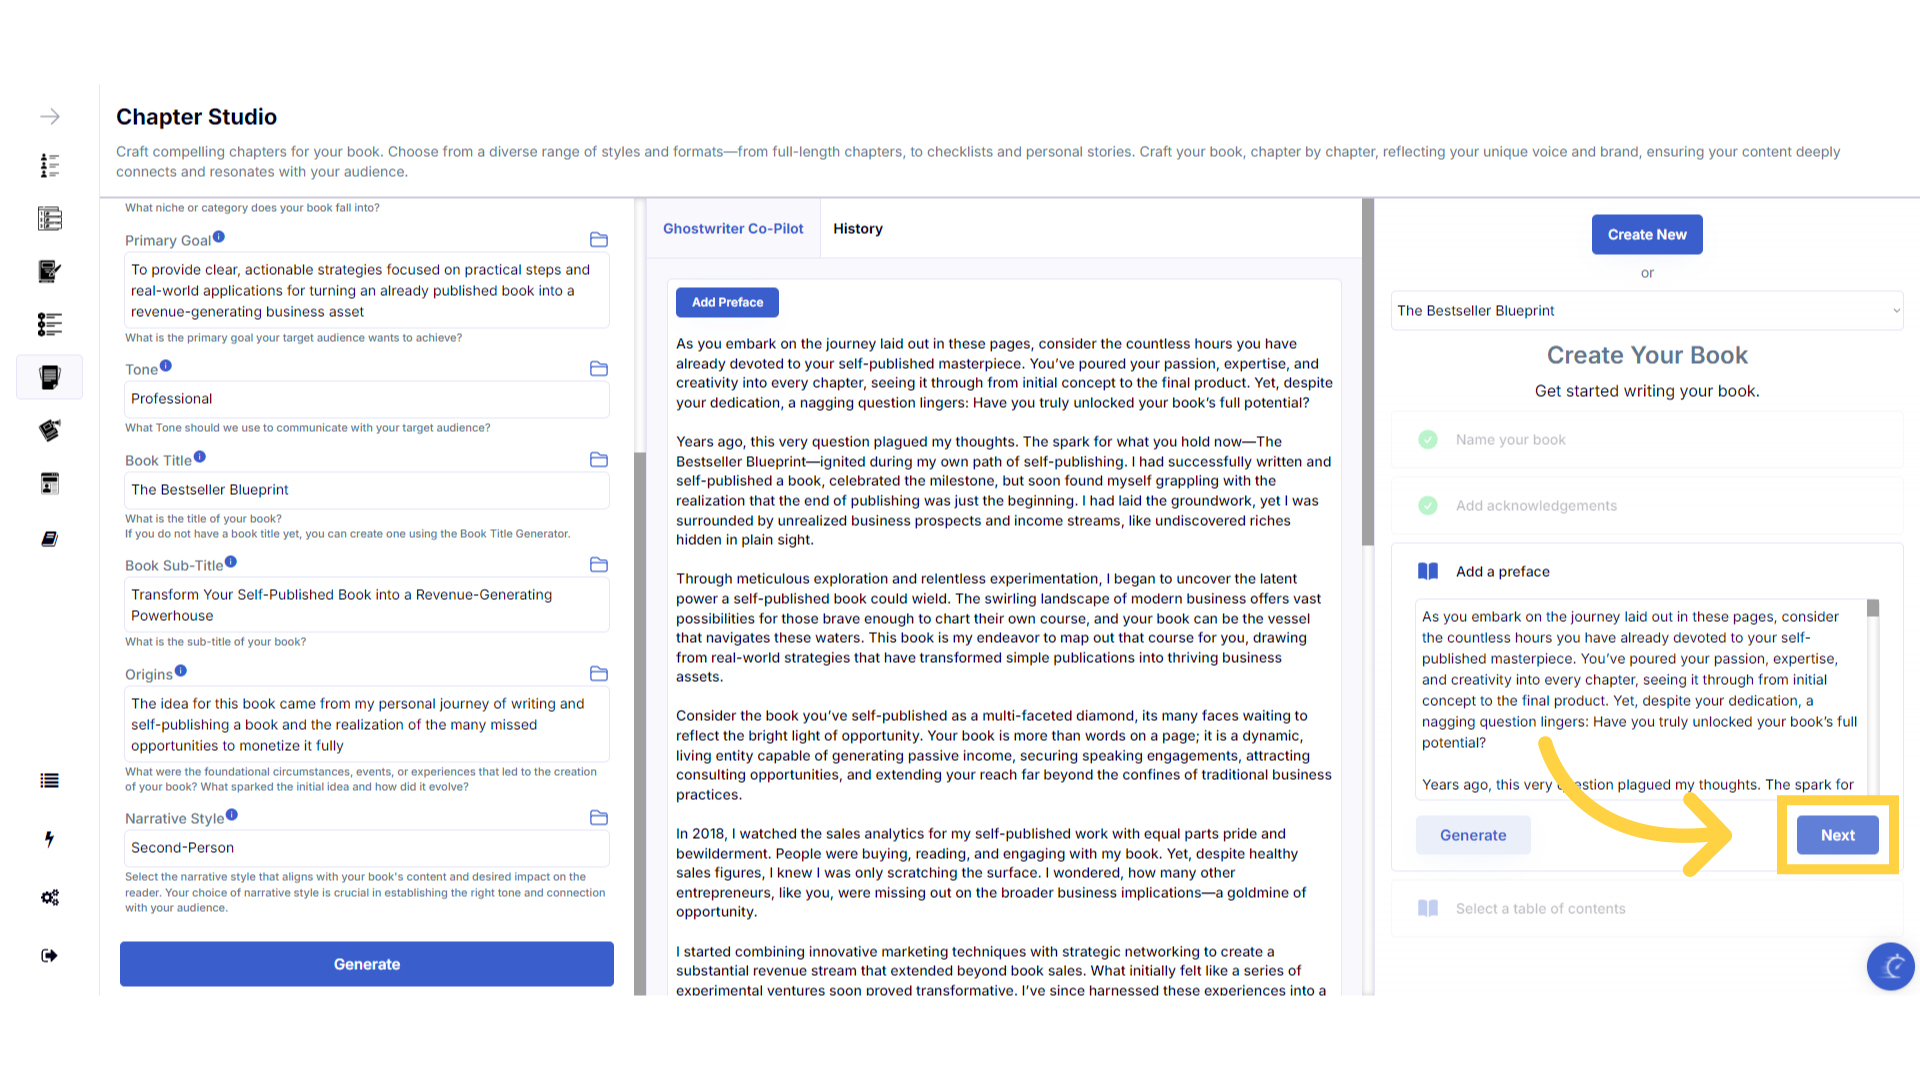
Click "Next" to Continue.
Let's move on and create the table of contents.
)
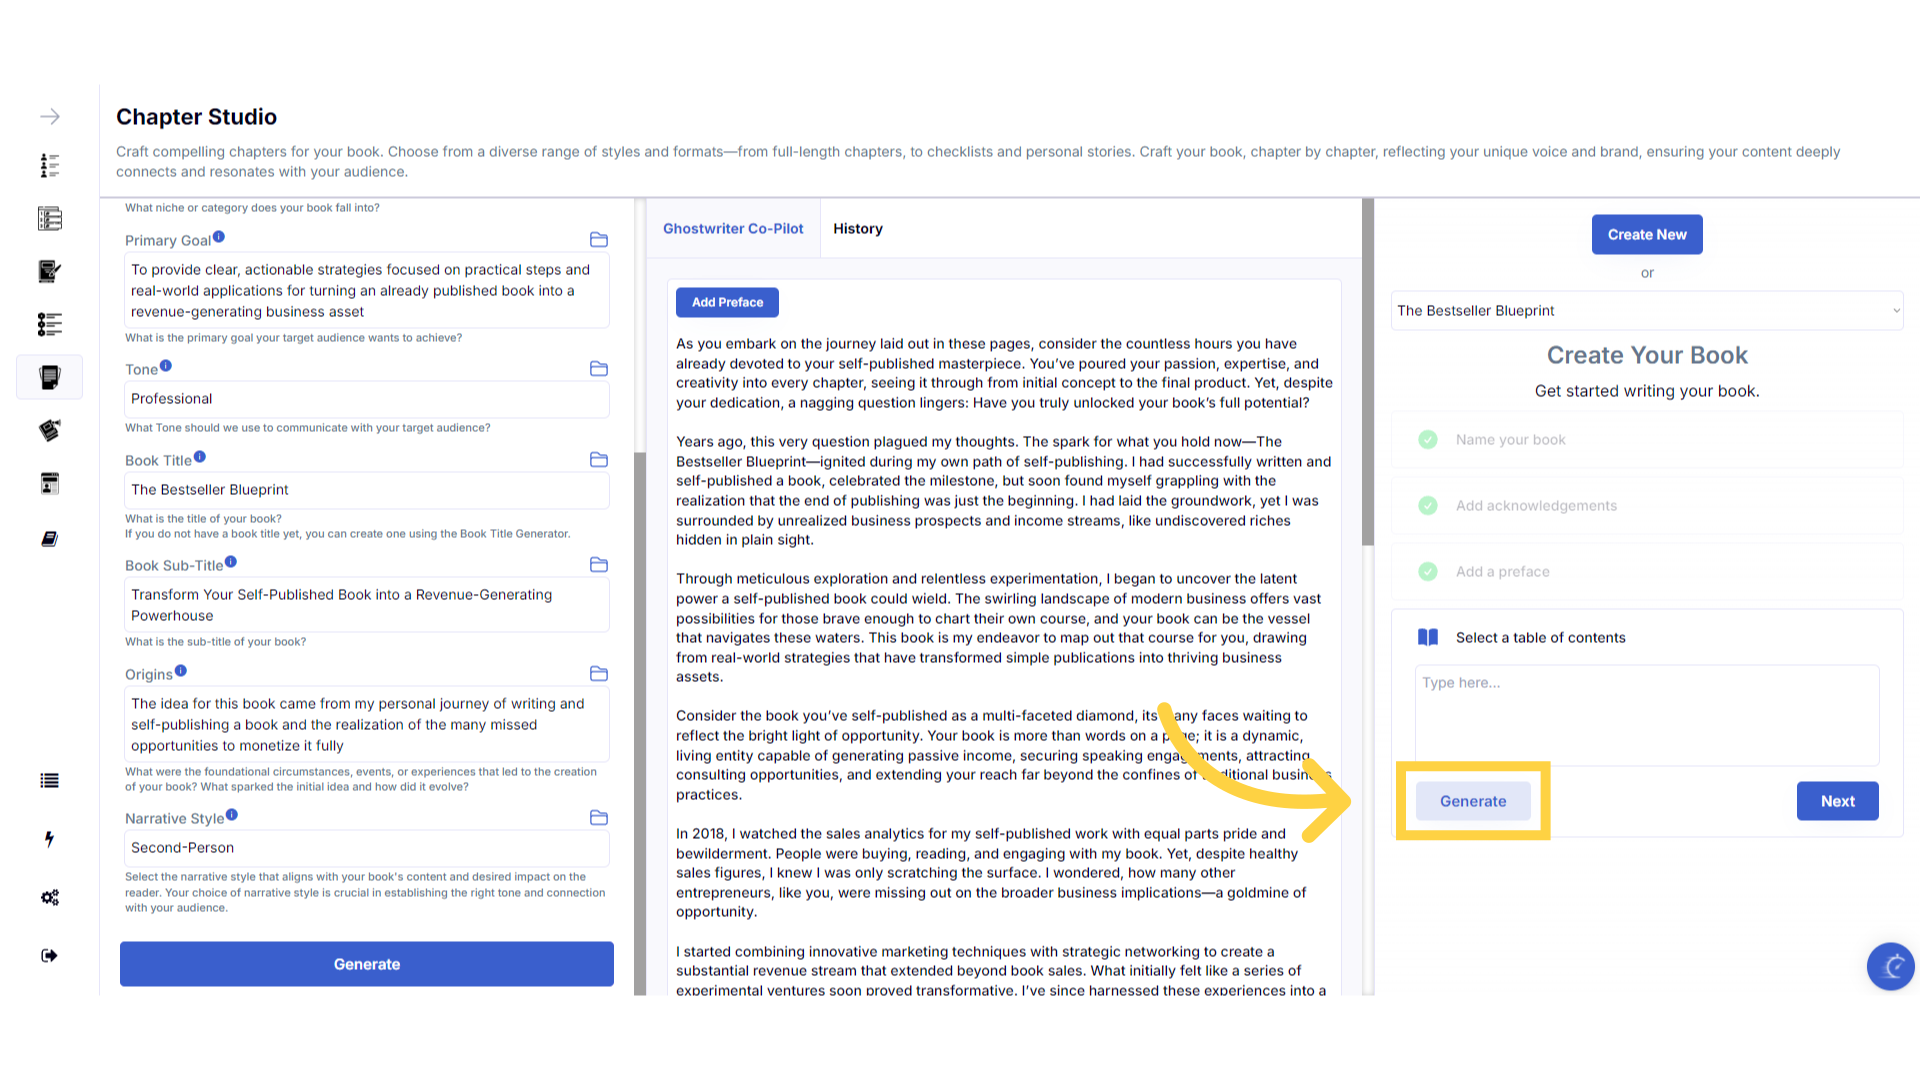
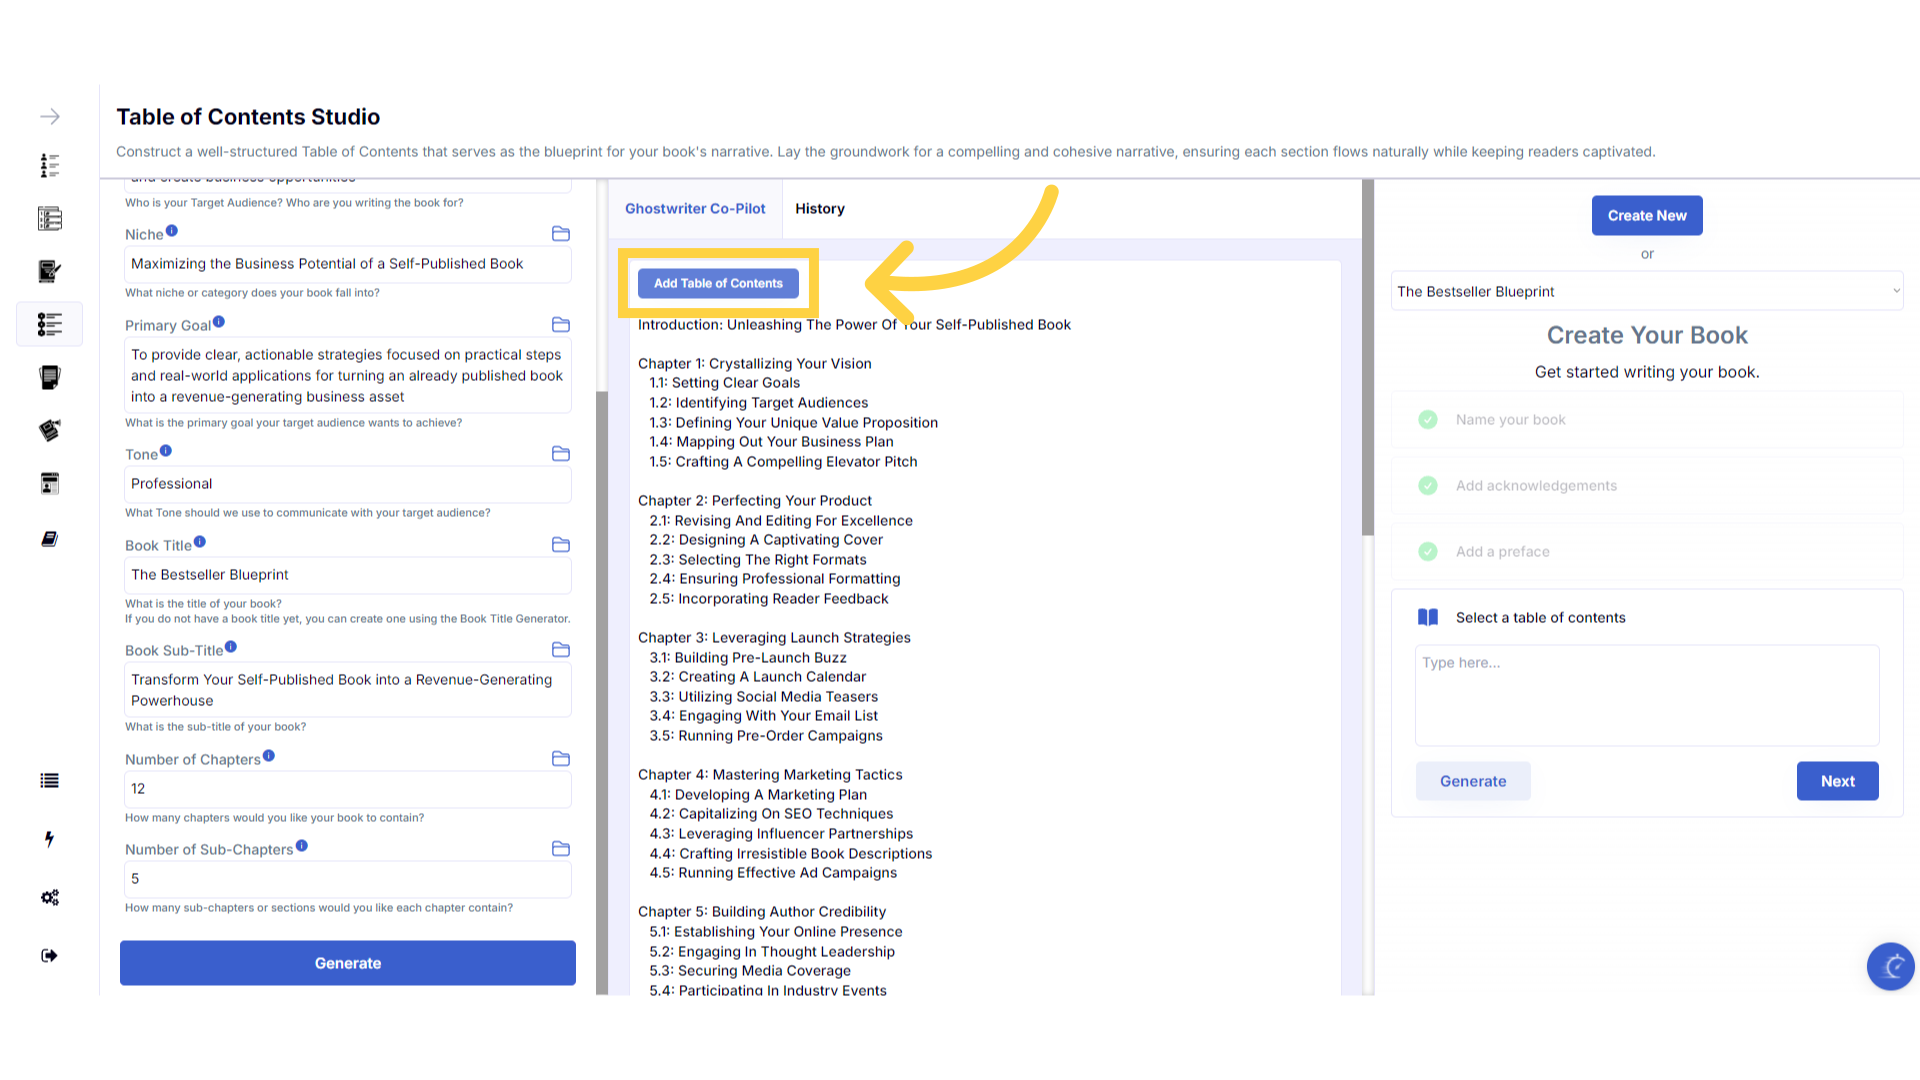
Click "Generate" to be taken to the Table of Contents Studio.
Click generate to be taken to the table of contents studio.
)
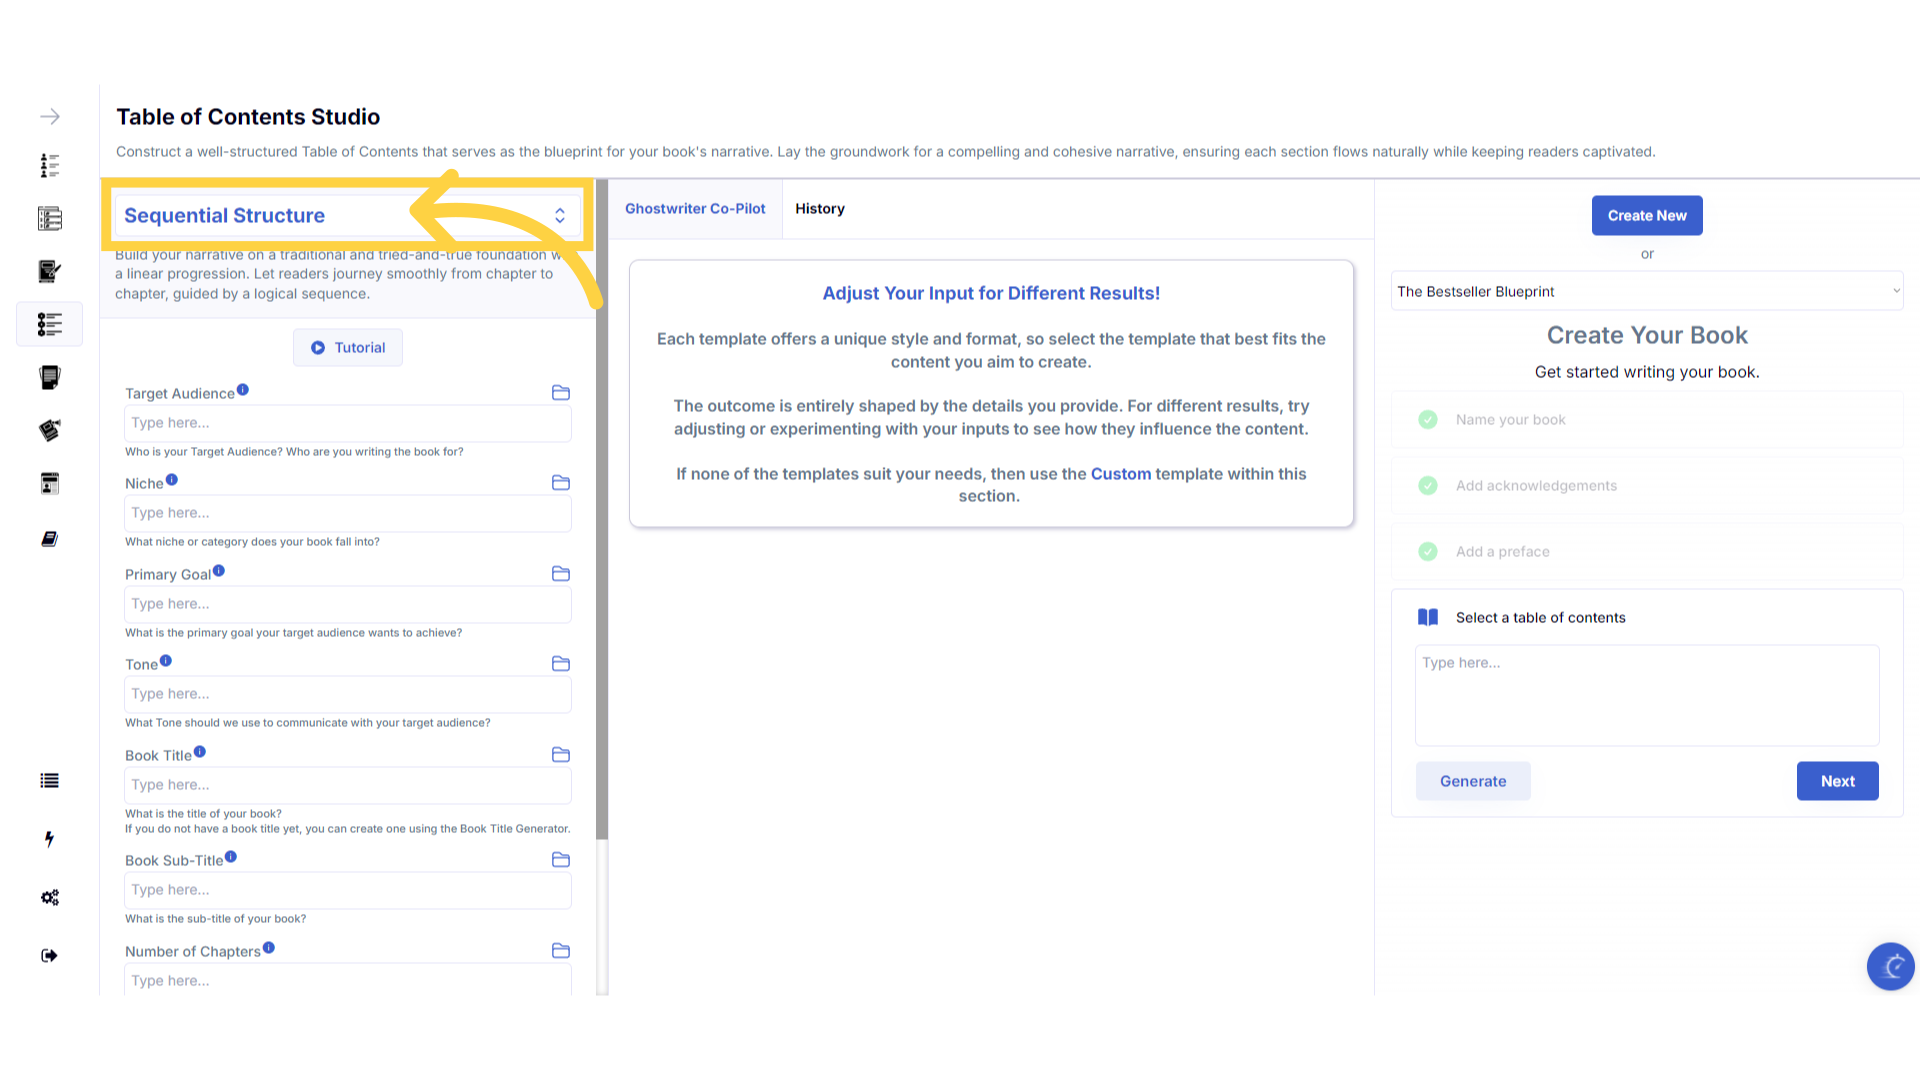
Choose the Table of Contents Style from the menu.
Remember, you can change the table of contents style by clicking on the template name and selecting a different template.
)
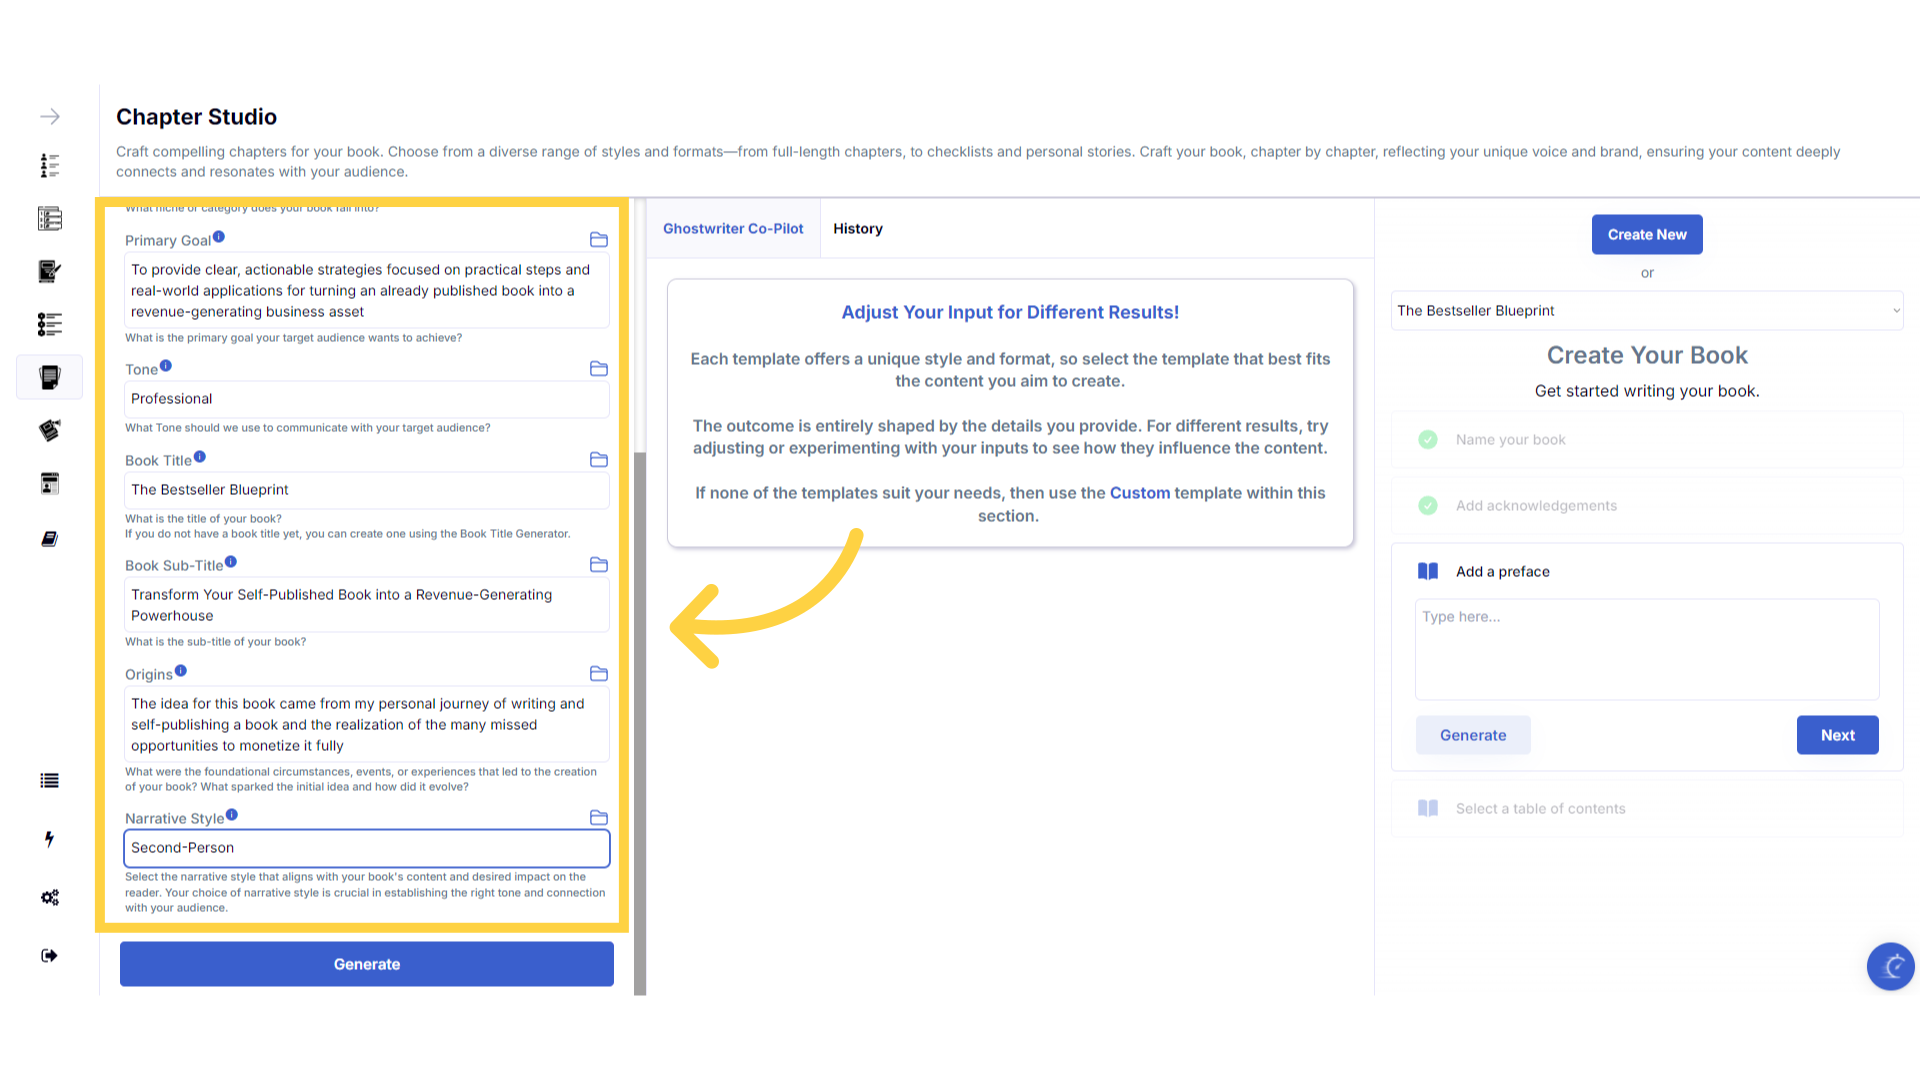
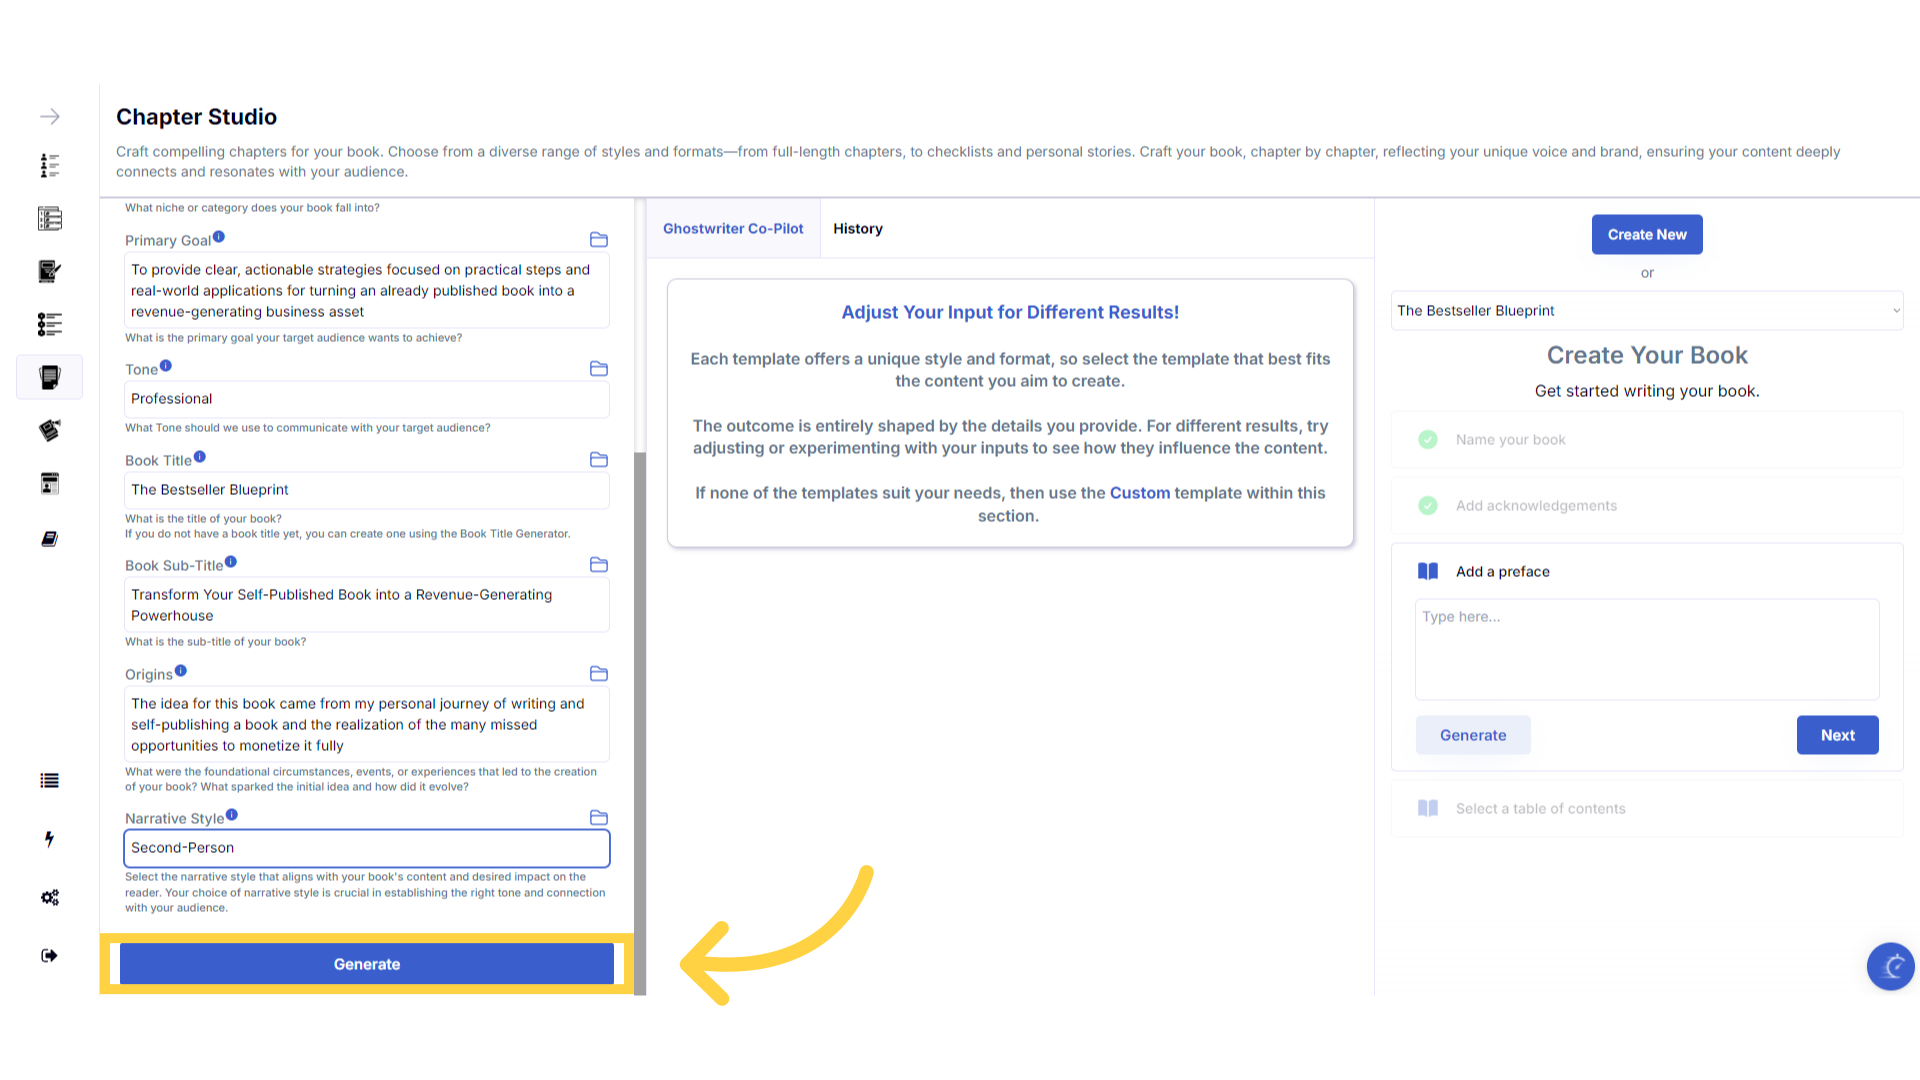
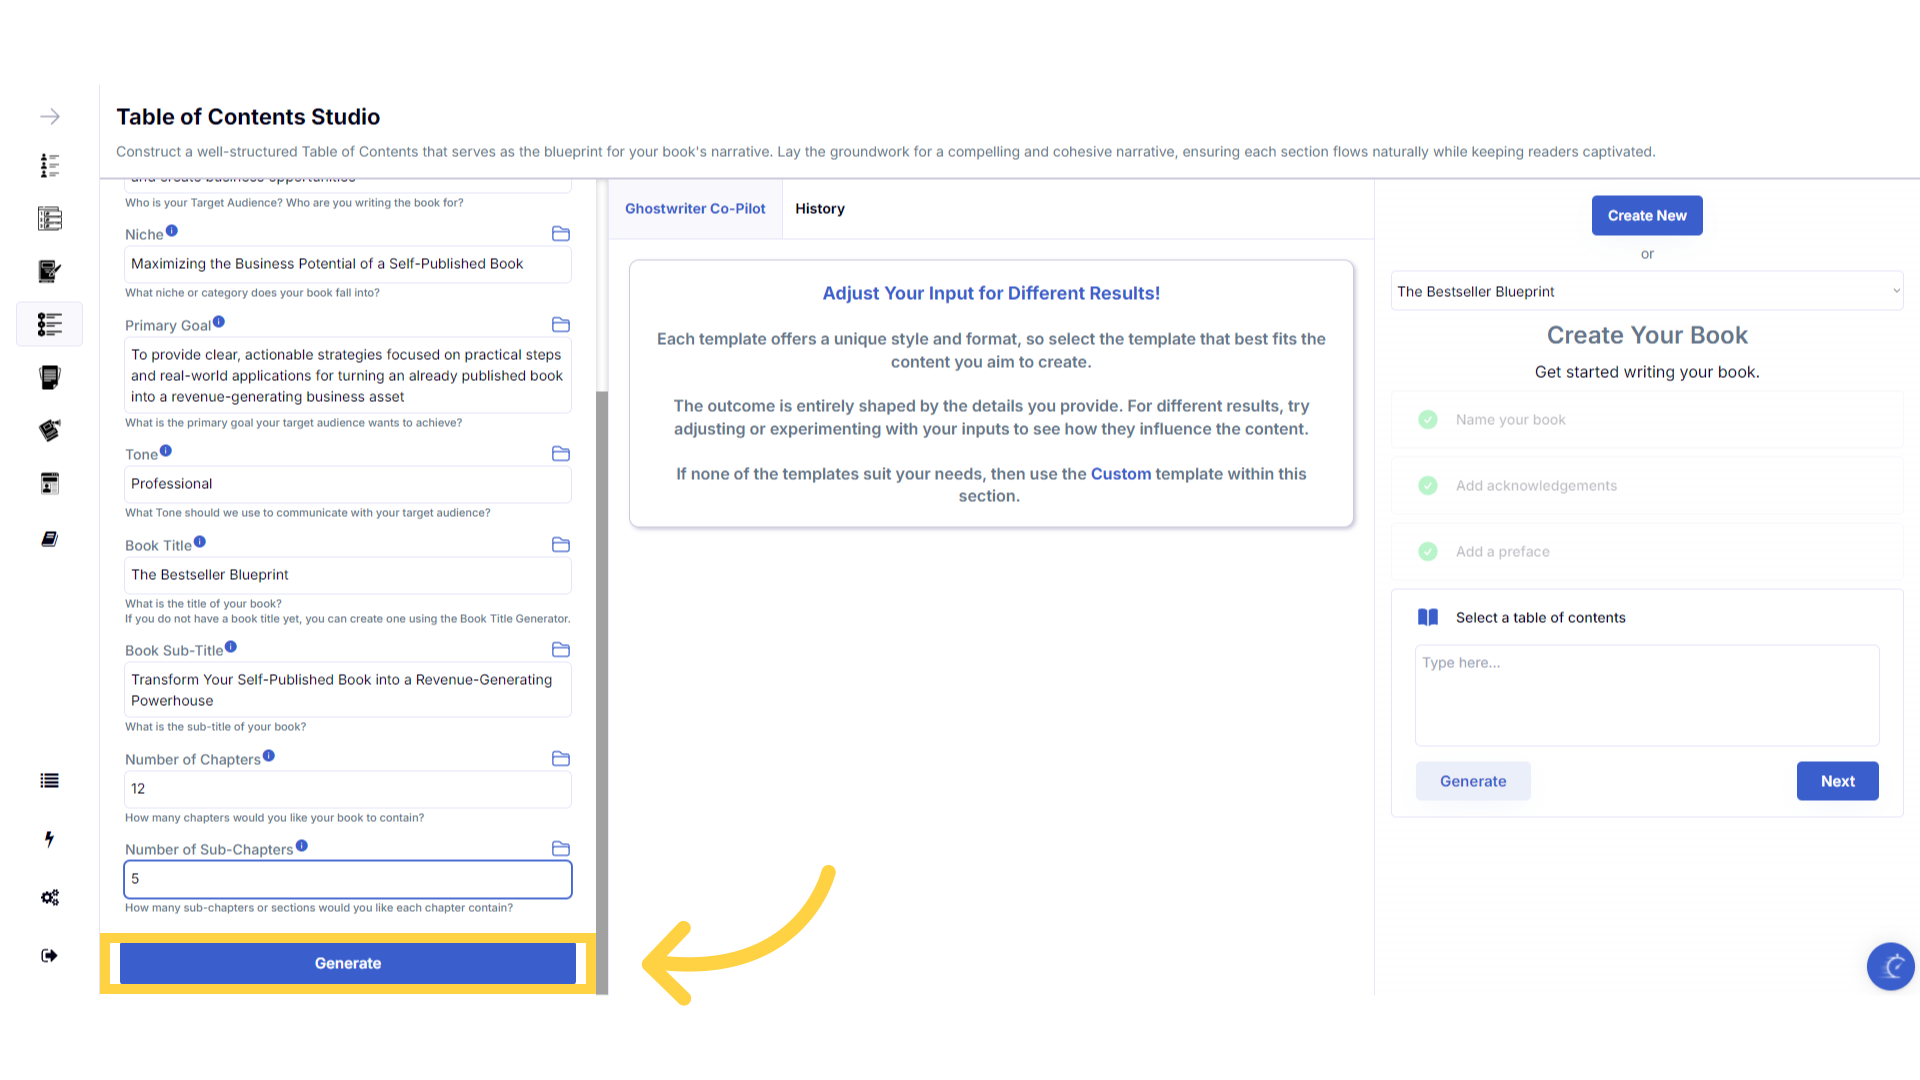
Enter the required information to create the Table of Contents.
Outline exactly how you envision your book. The information you enter will be used to craft a perfectly aligned table of contents, creating the structure of your book, so you can easily generate and add chapters. Create as many chapters and subchapters as you need. Keep in mind that each subchapter will be around 900 words. So if you require information in each chapter to be extensive, add more subchapters.
)
Click "Generate" to craft the Table of Contents.
You can change the information you provide, and regenerate the content as many times as you need, to build the perfect outline for your book.
)
Click "Add Table of Contents" to add the Table of Contents to your book.
Click add table of contents to add it to your book. You can manually change the chapter and subchapter titles in the next section of the book builder.
)
Click "Next" to start crafting Chapters.
Click next. The structure of your book is now being built, and you will be taken to the chapter studio to craft chapters and subchapters.
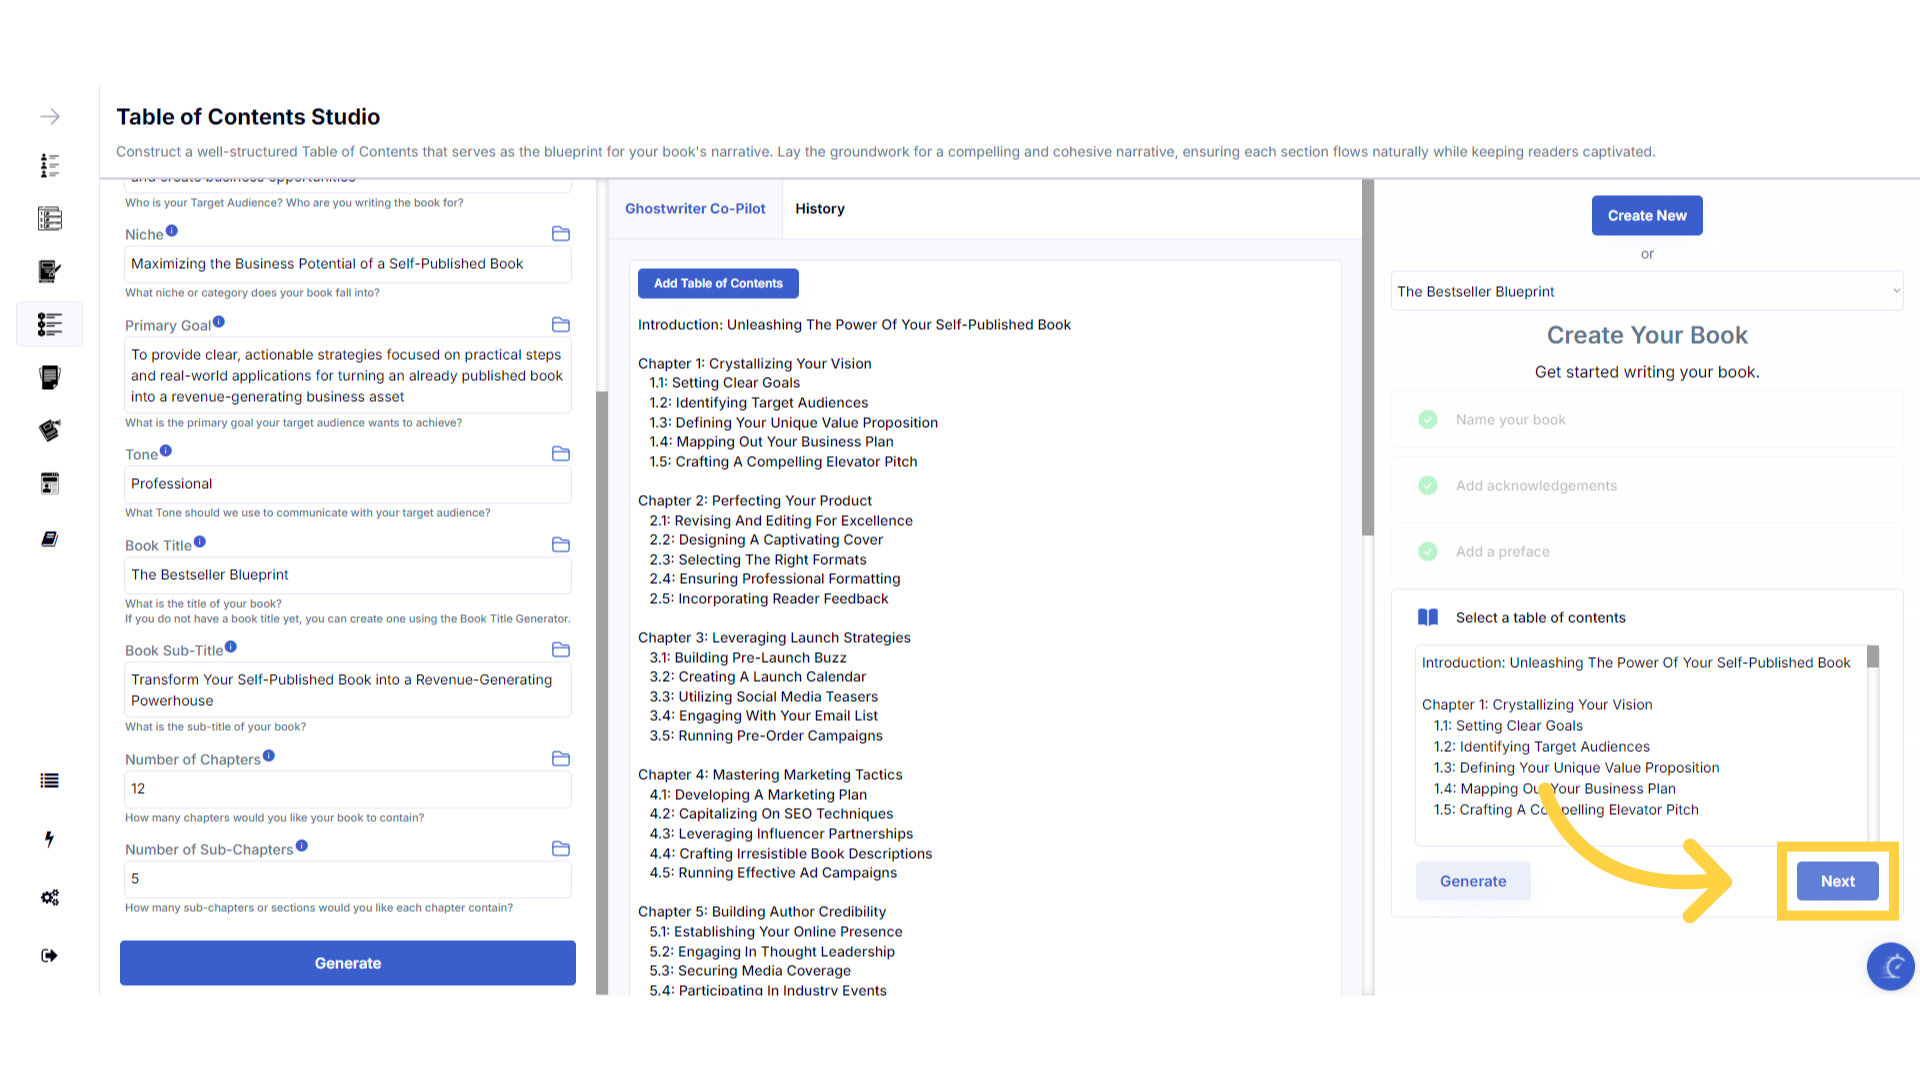)
Your table of contents is now ready.
Your table of contents will now display on the right, and you are ready to start crafting and adding content to your chapters and subchapters. You can manually edit any of the titles by clicking on them and typing.
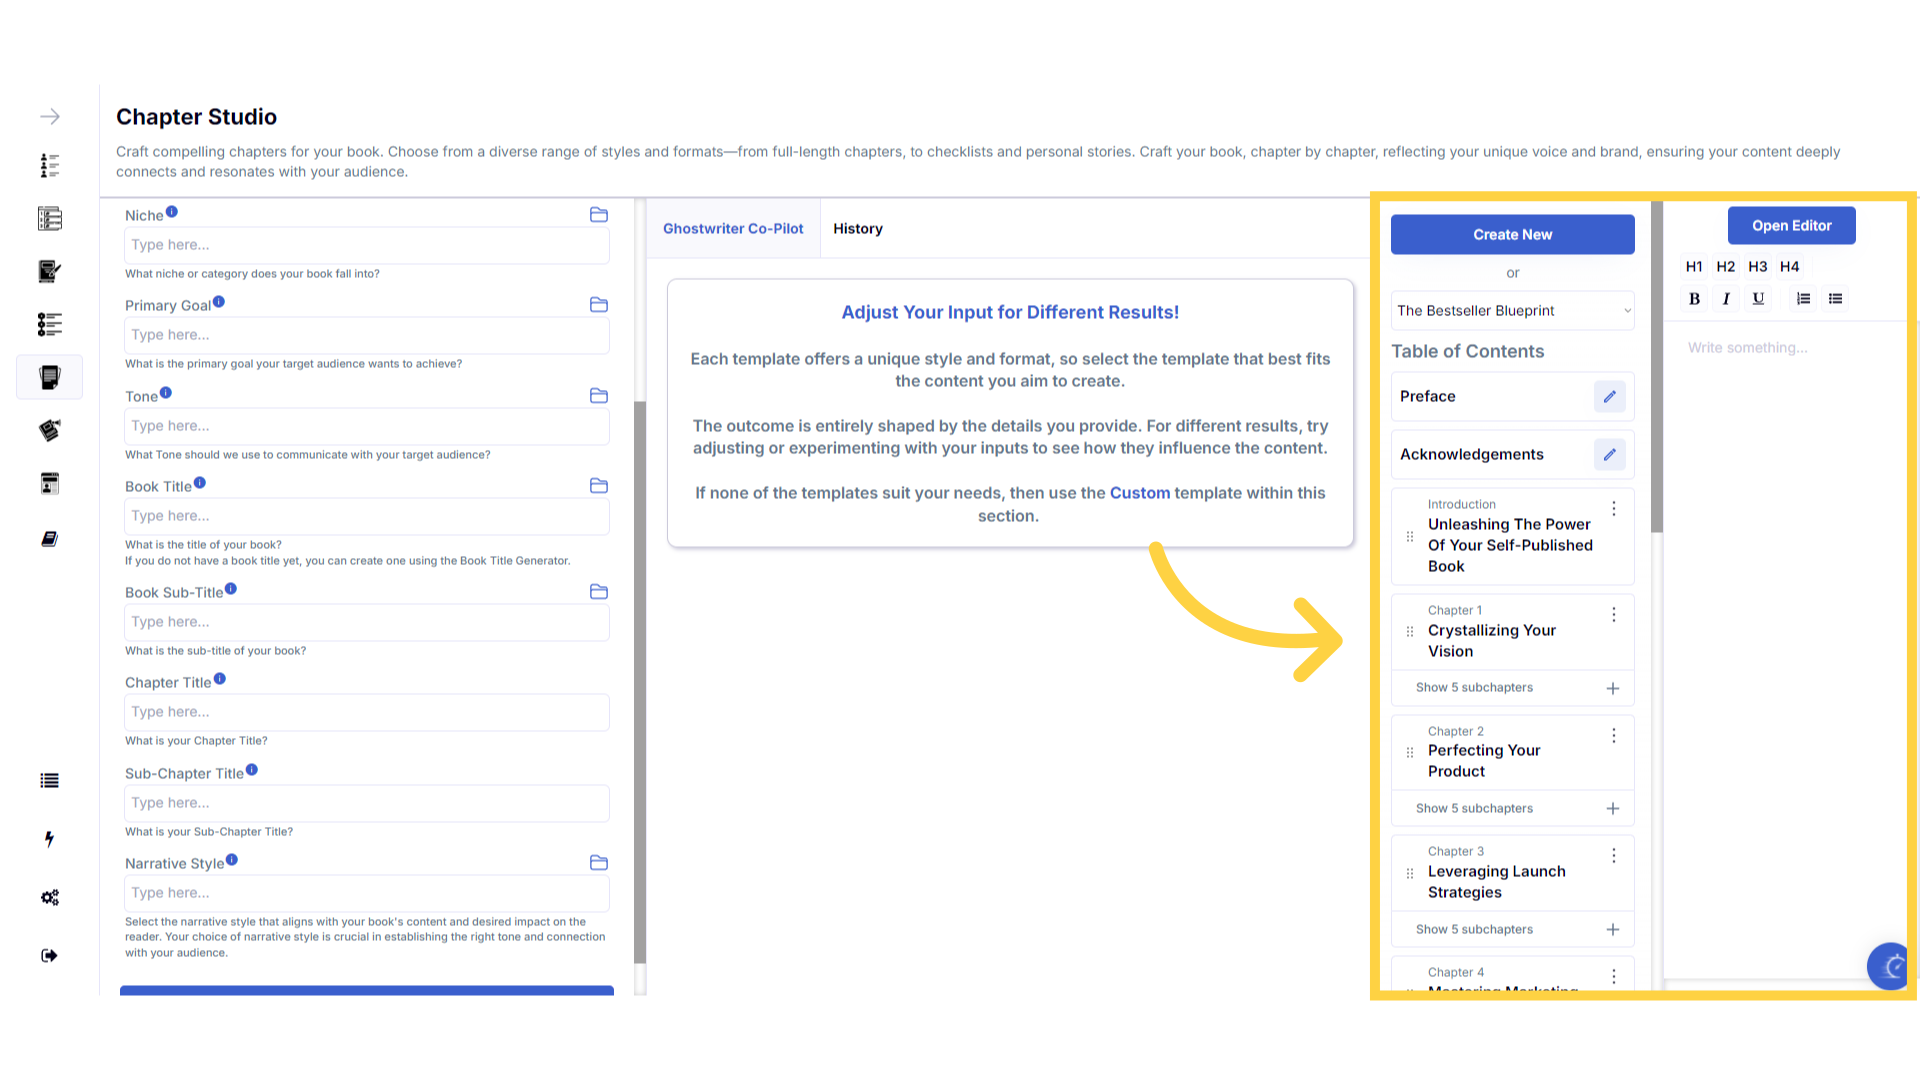)
Click on the Chapter title to highlight it ready to add content
To add content to chapters, simply highlight the chapter you would like to add content too by clicking on it.
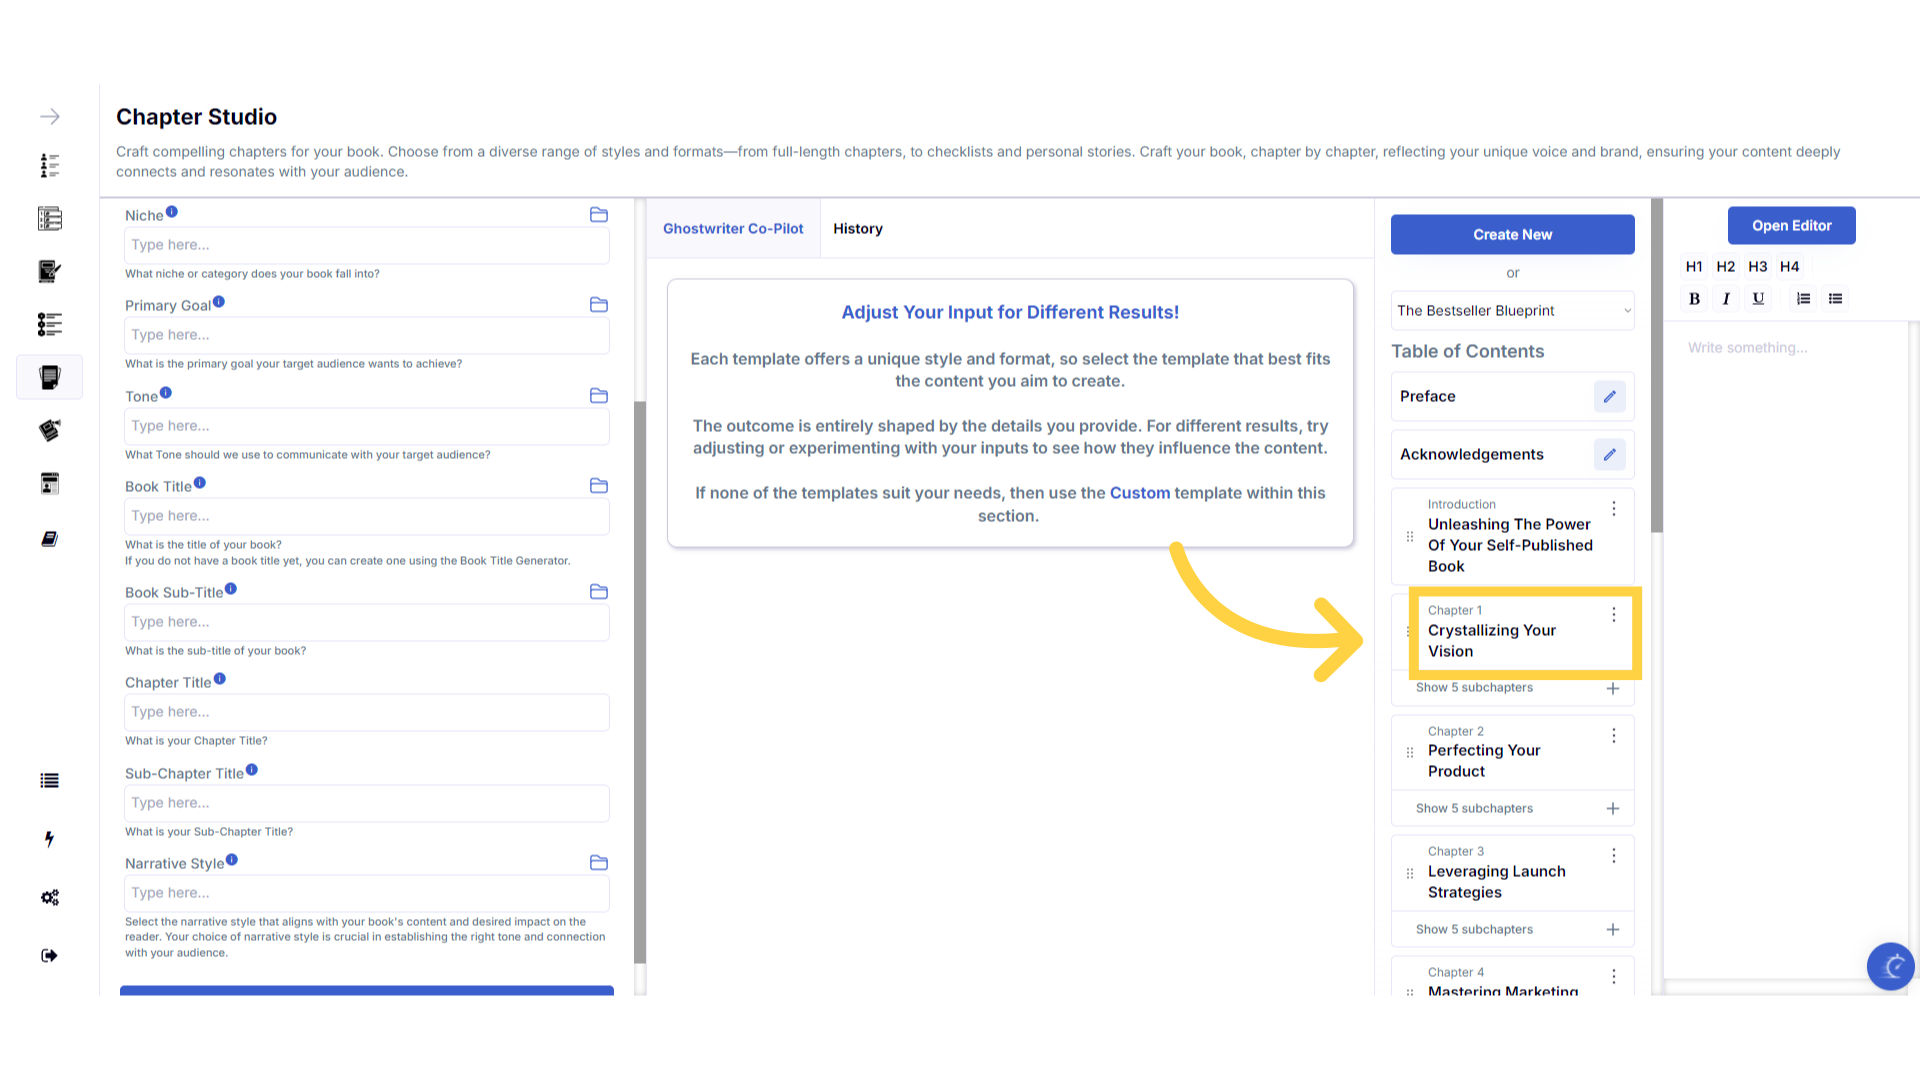)
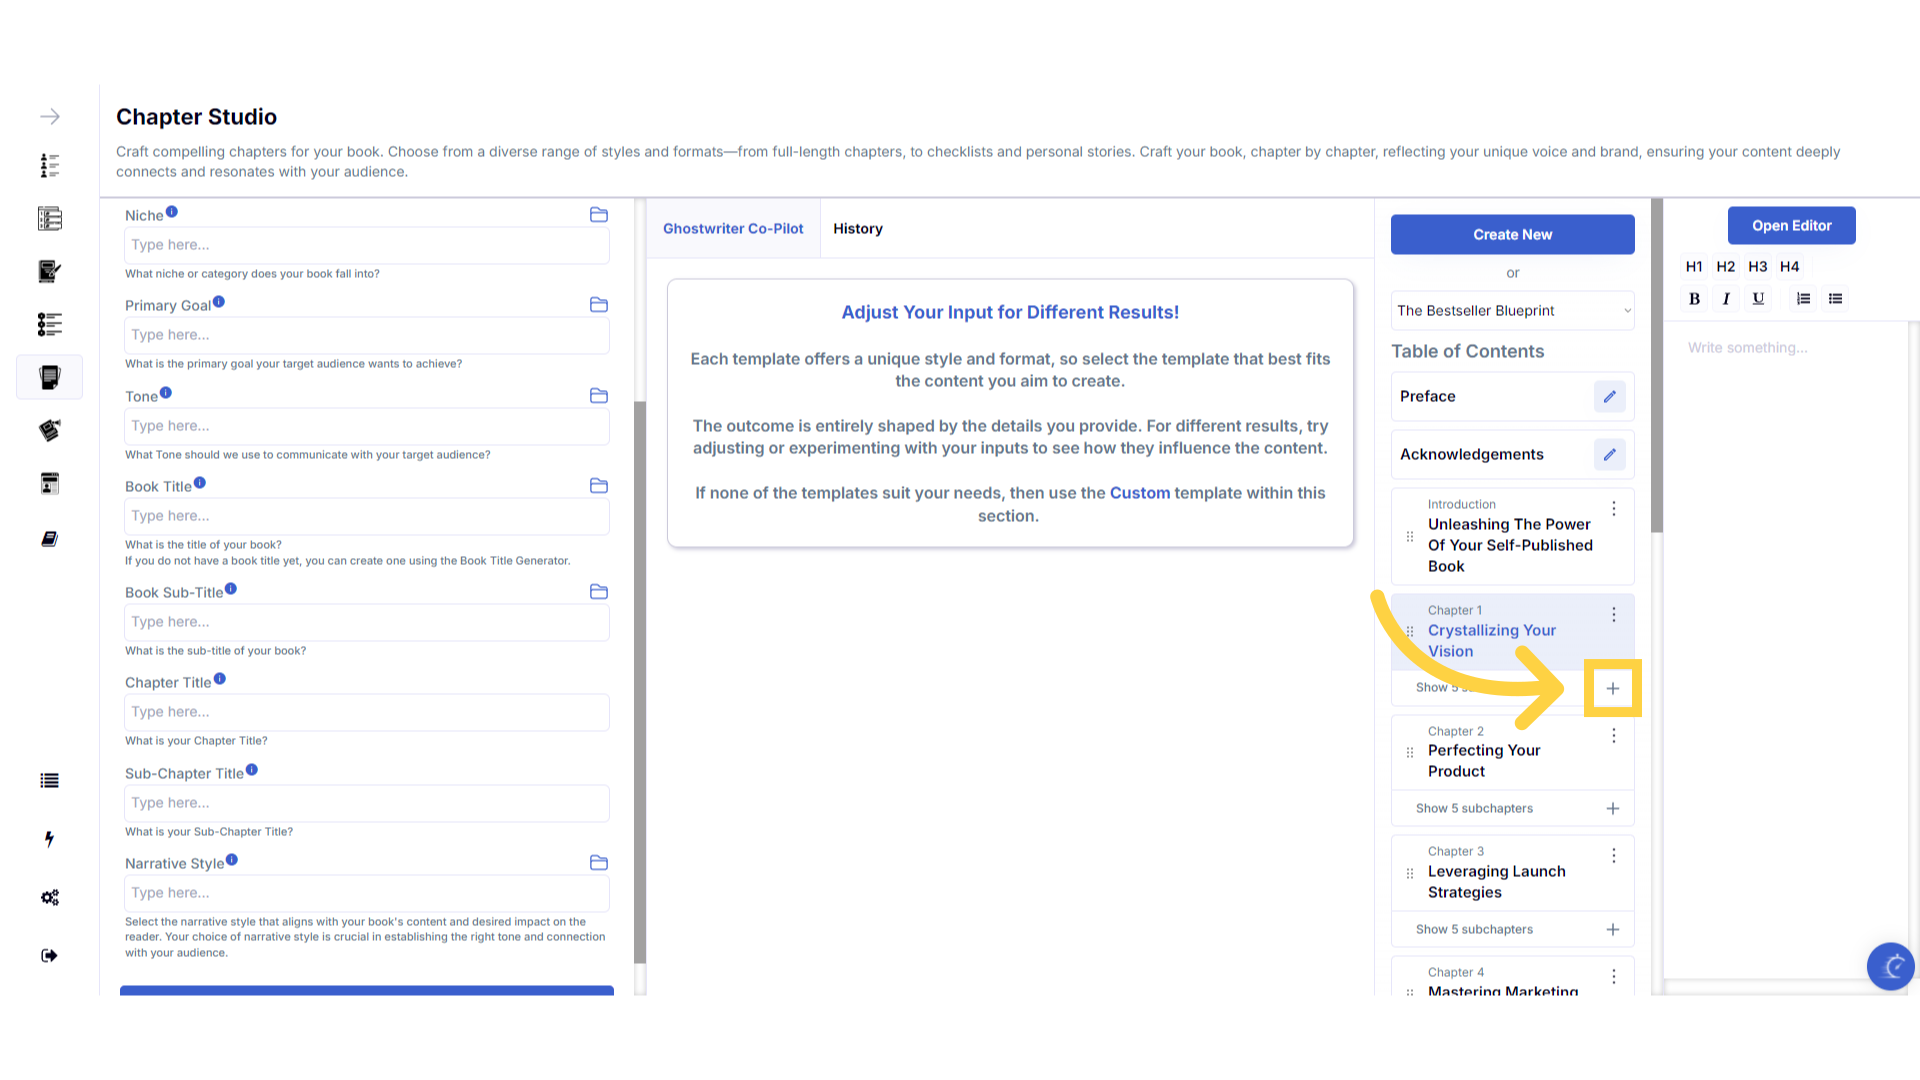
Click the plus symbol below the Chapter Title to open your subchapters and add content
To add content to a subchapter, click the plus symbol below the chapter title. This will expand the chapter content to display the subchapters.
)
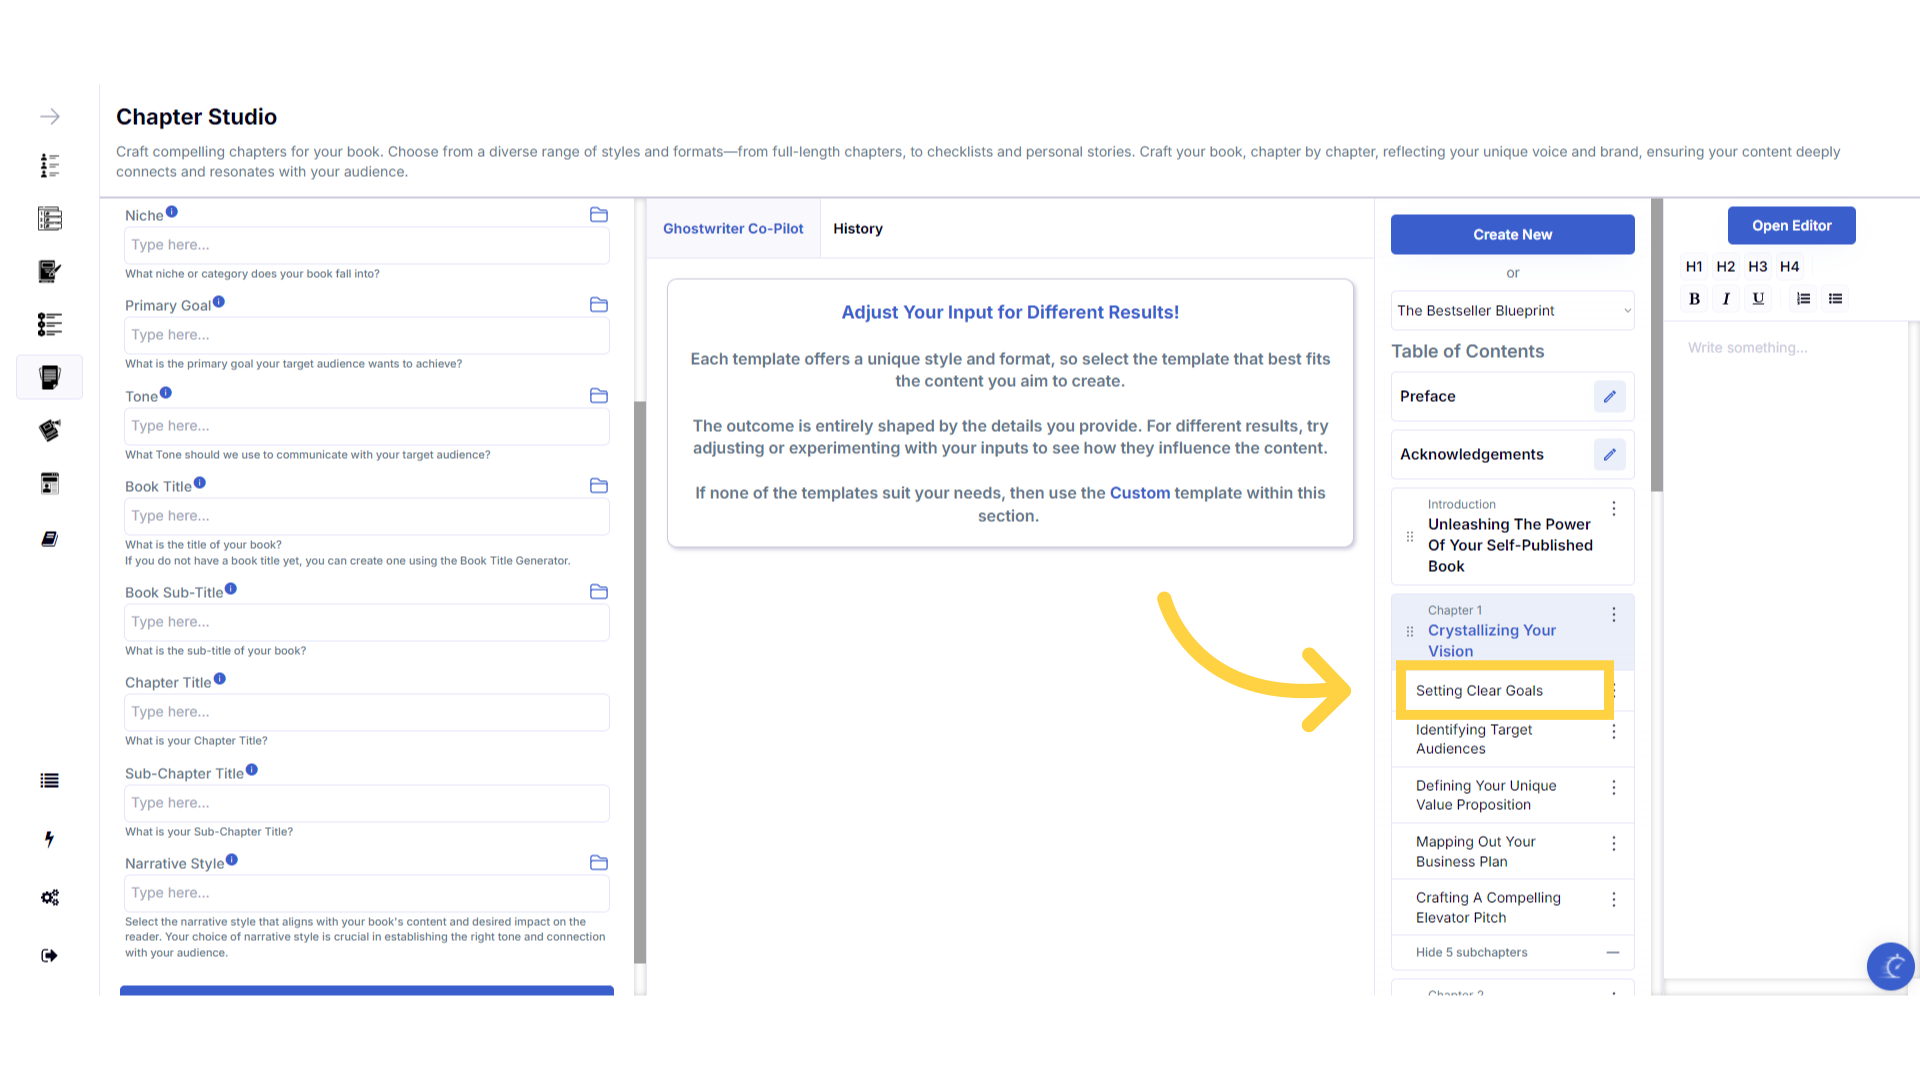
Click the subchapter title to highlight it.
Then click on the subchapter title to highlight it, ready to add content.
)
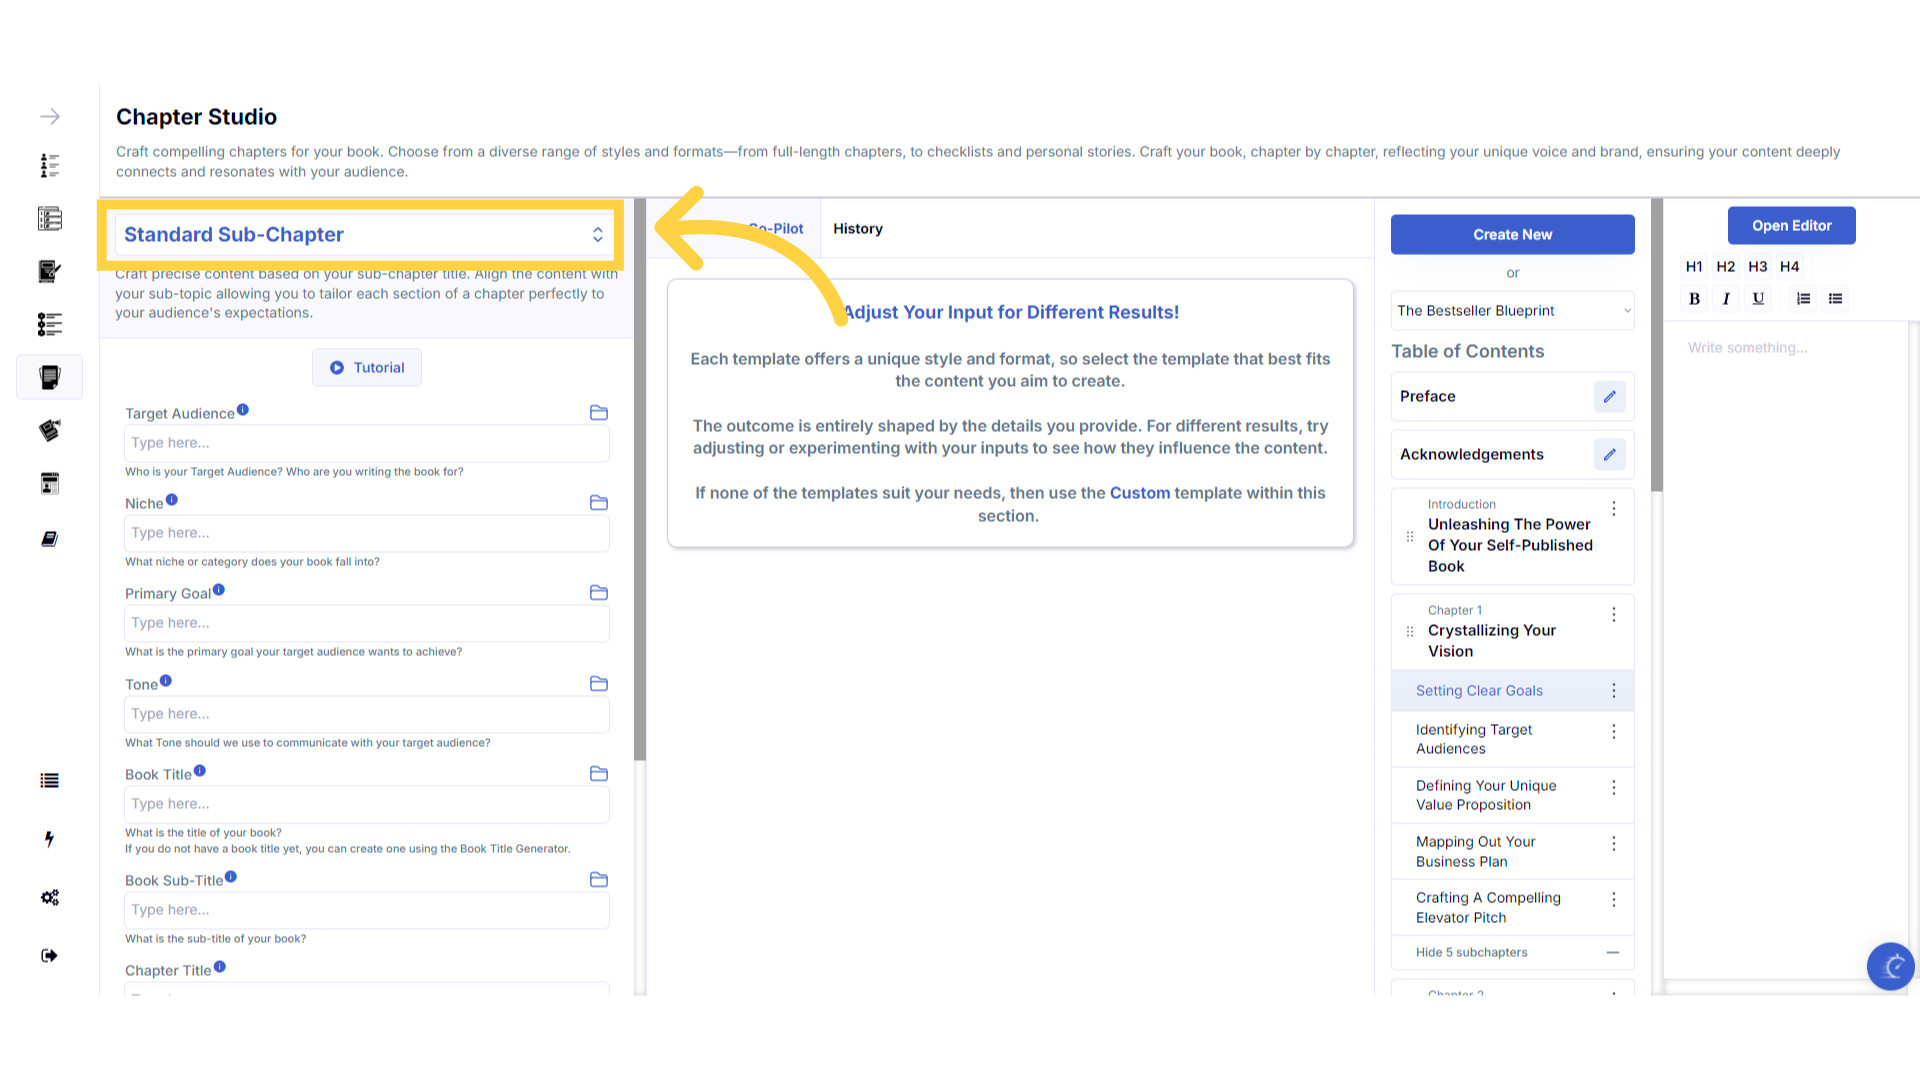
You can switch between templates in the dropdown menu.
Remember, you can change the chapter style by clicking on the template name and selecting a different template. Choose from the many different template styles in the dropdown menu, to find a template that will generate the chapter style that suits your book.
)
Enter the required information to craft your Chapter.
Enter the chapter and subchapter titles from the table of contents on the right, along with your niche, target audience, primary goal and other relevant information. You can choose the narration style and tone, to match your own unique voice and style.
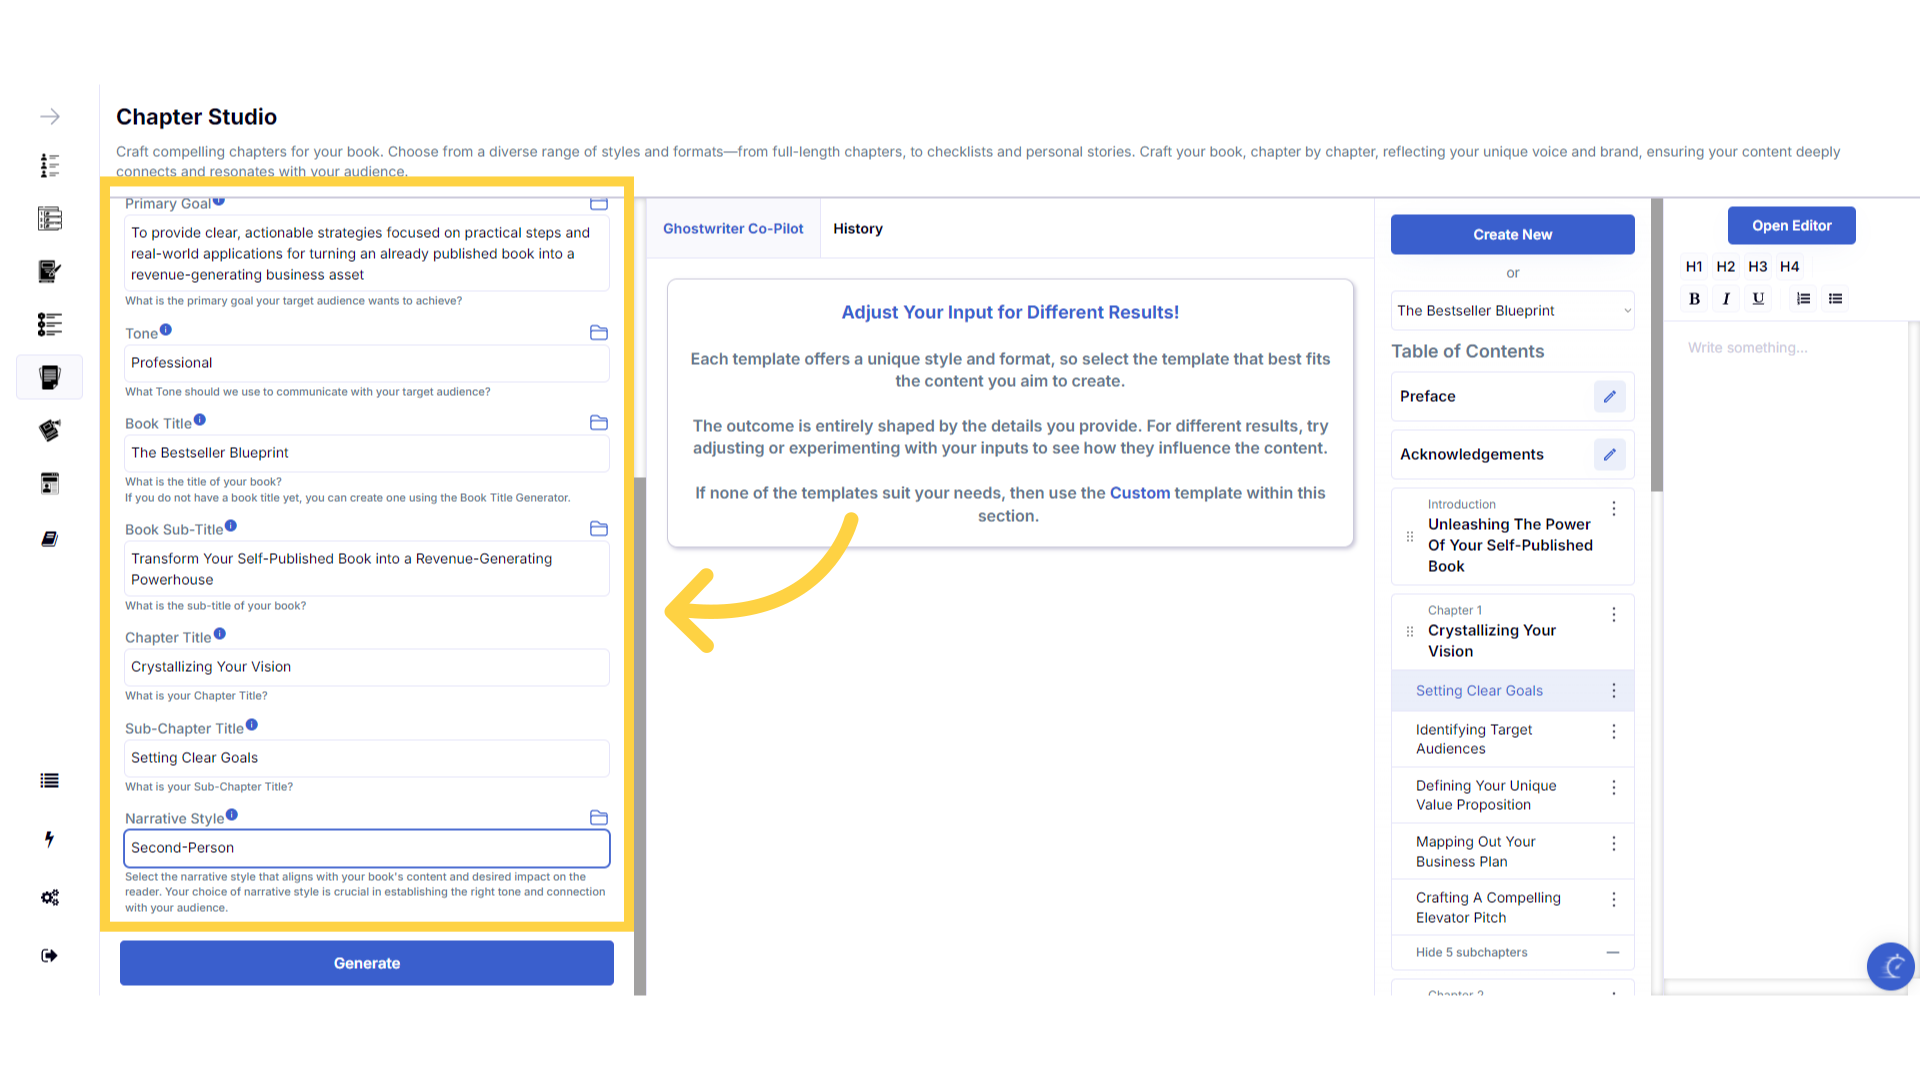)
Click "Generate" to craft your chapter.
You can change the information you provide, and regenerate the content as many times as you need, to craft perfect chapters for your book. You can also manually edit the chapters and subchapters in the far right panel, or later in the book editor.
)
Click "Add to Chapter" to add the chapter to your book.
Remember to make sure the correct chapter or subchapter is highlighted in the table of contents on the right, by clicking on it. Then click add to chapter, to add the generated content to the highlighted chapter of your book.
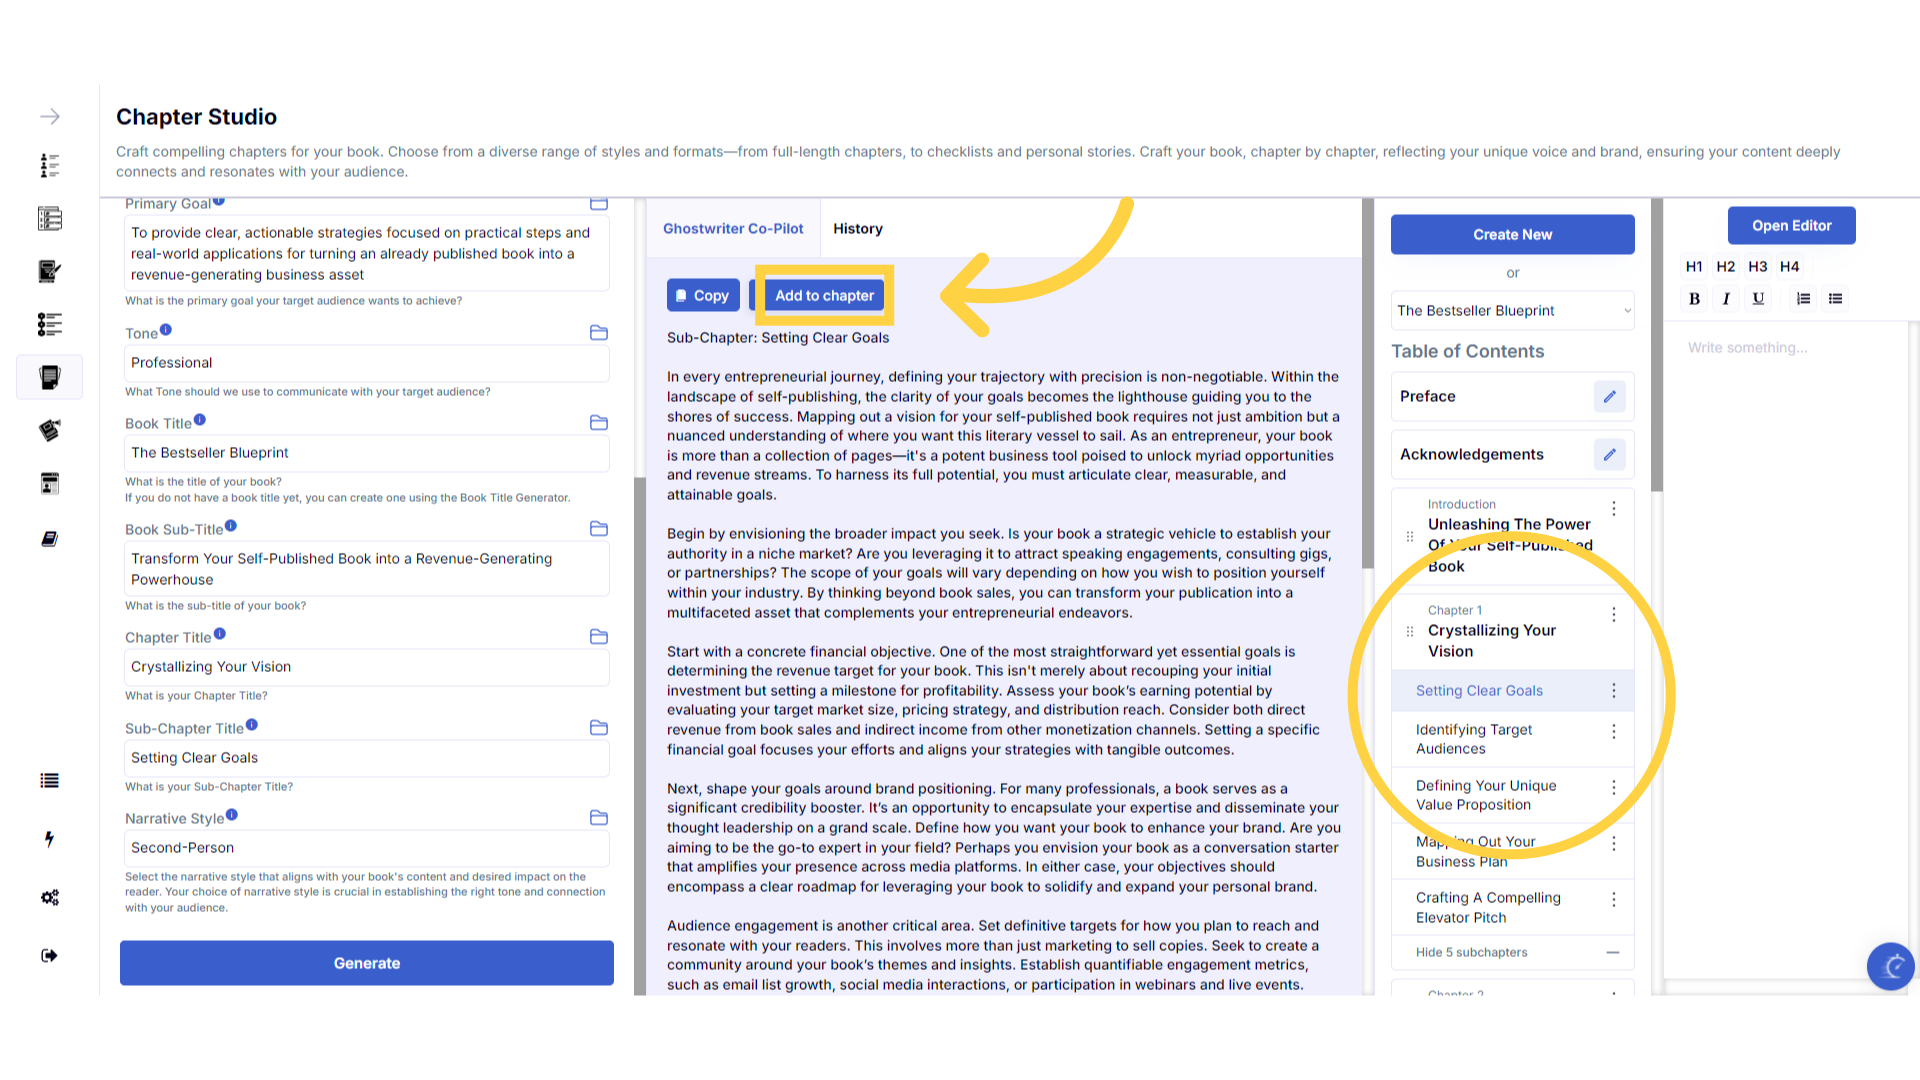)
The chapter is now added into your book.
The content is now added into your highlighted chapter or subchapter. You can click into the chapter editor on the far right to edit it, or open the book editor for full screen editing mode.
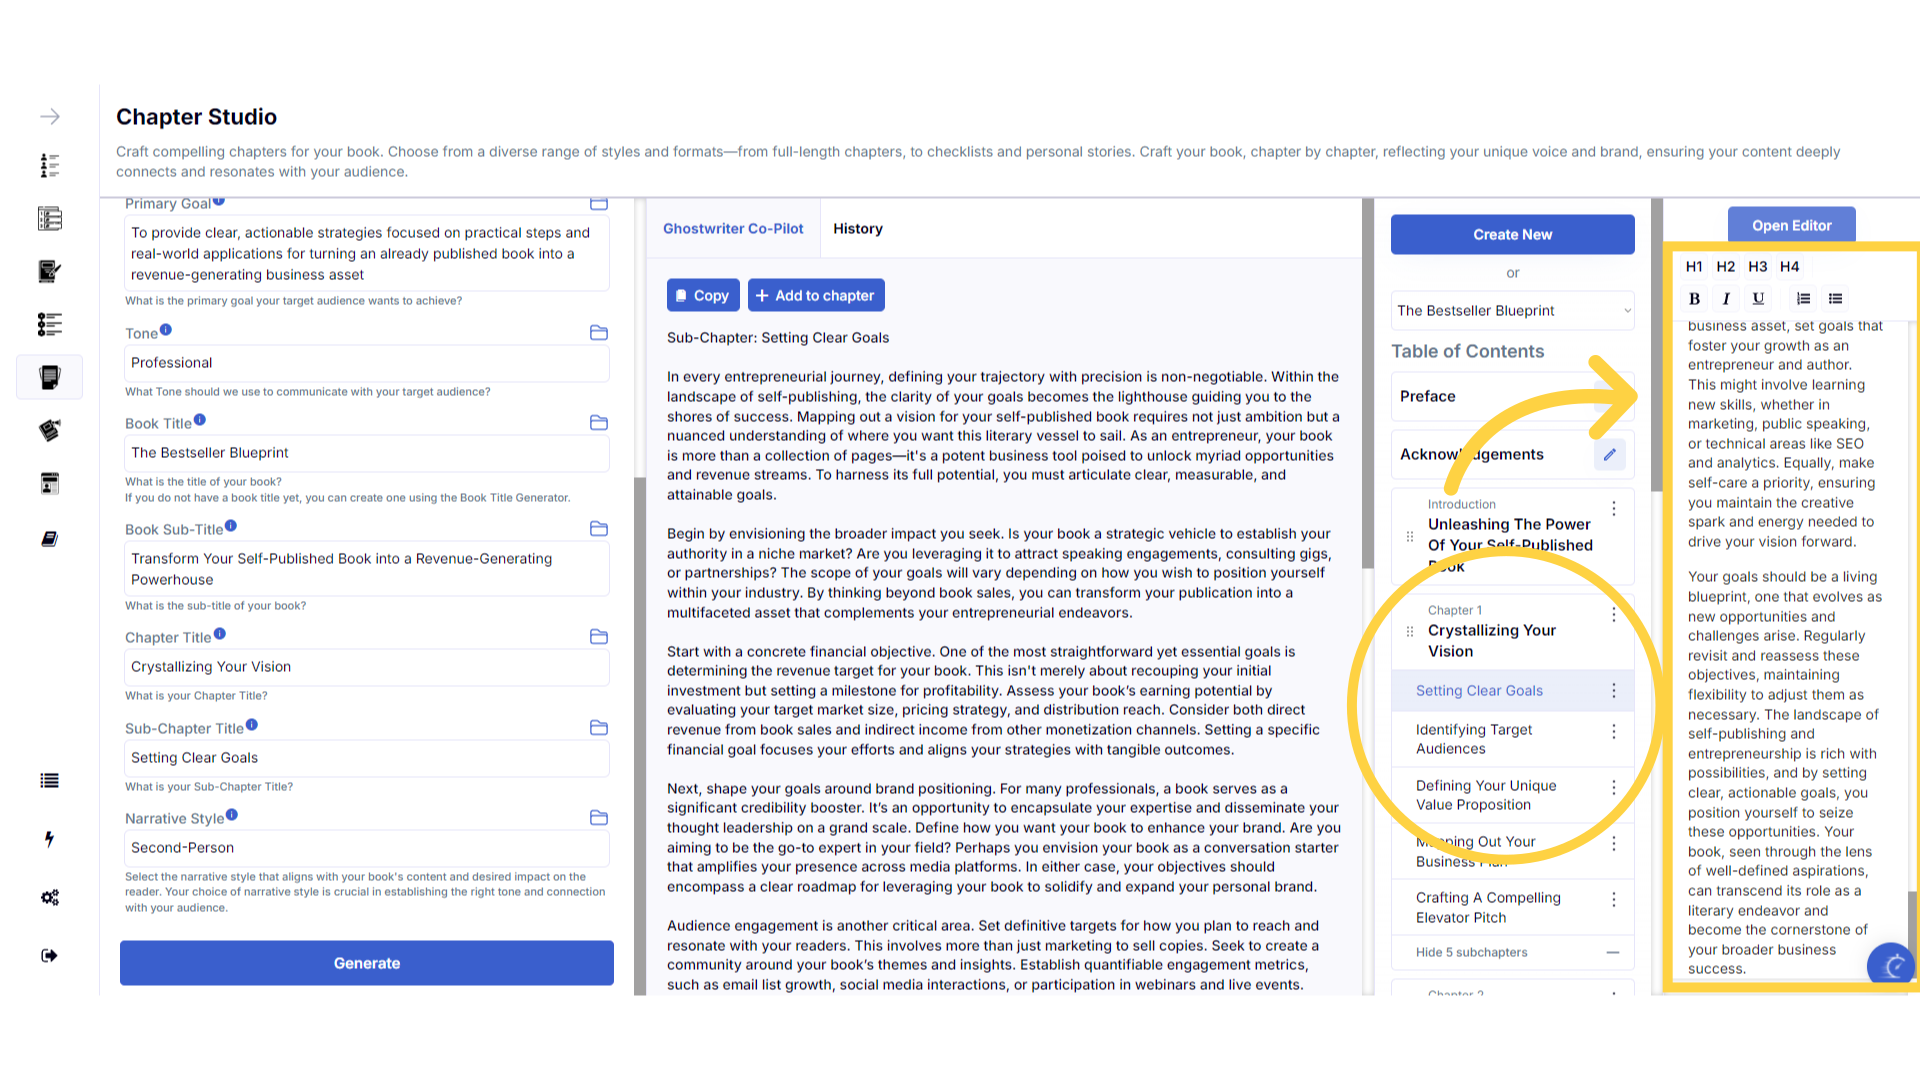)
Click in the editing box to write your own content.
If you would like to write your own content for any chapters, simply click in the chapter editor on the right and start typing. You can also click open editor to write in full screen mode.
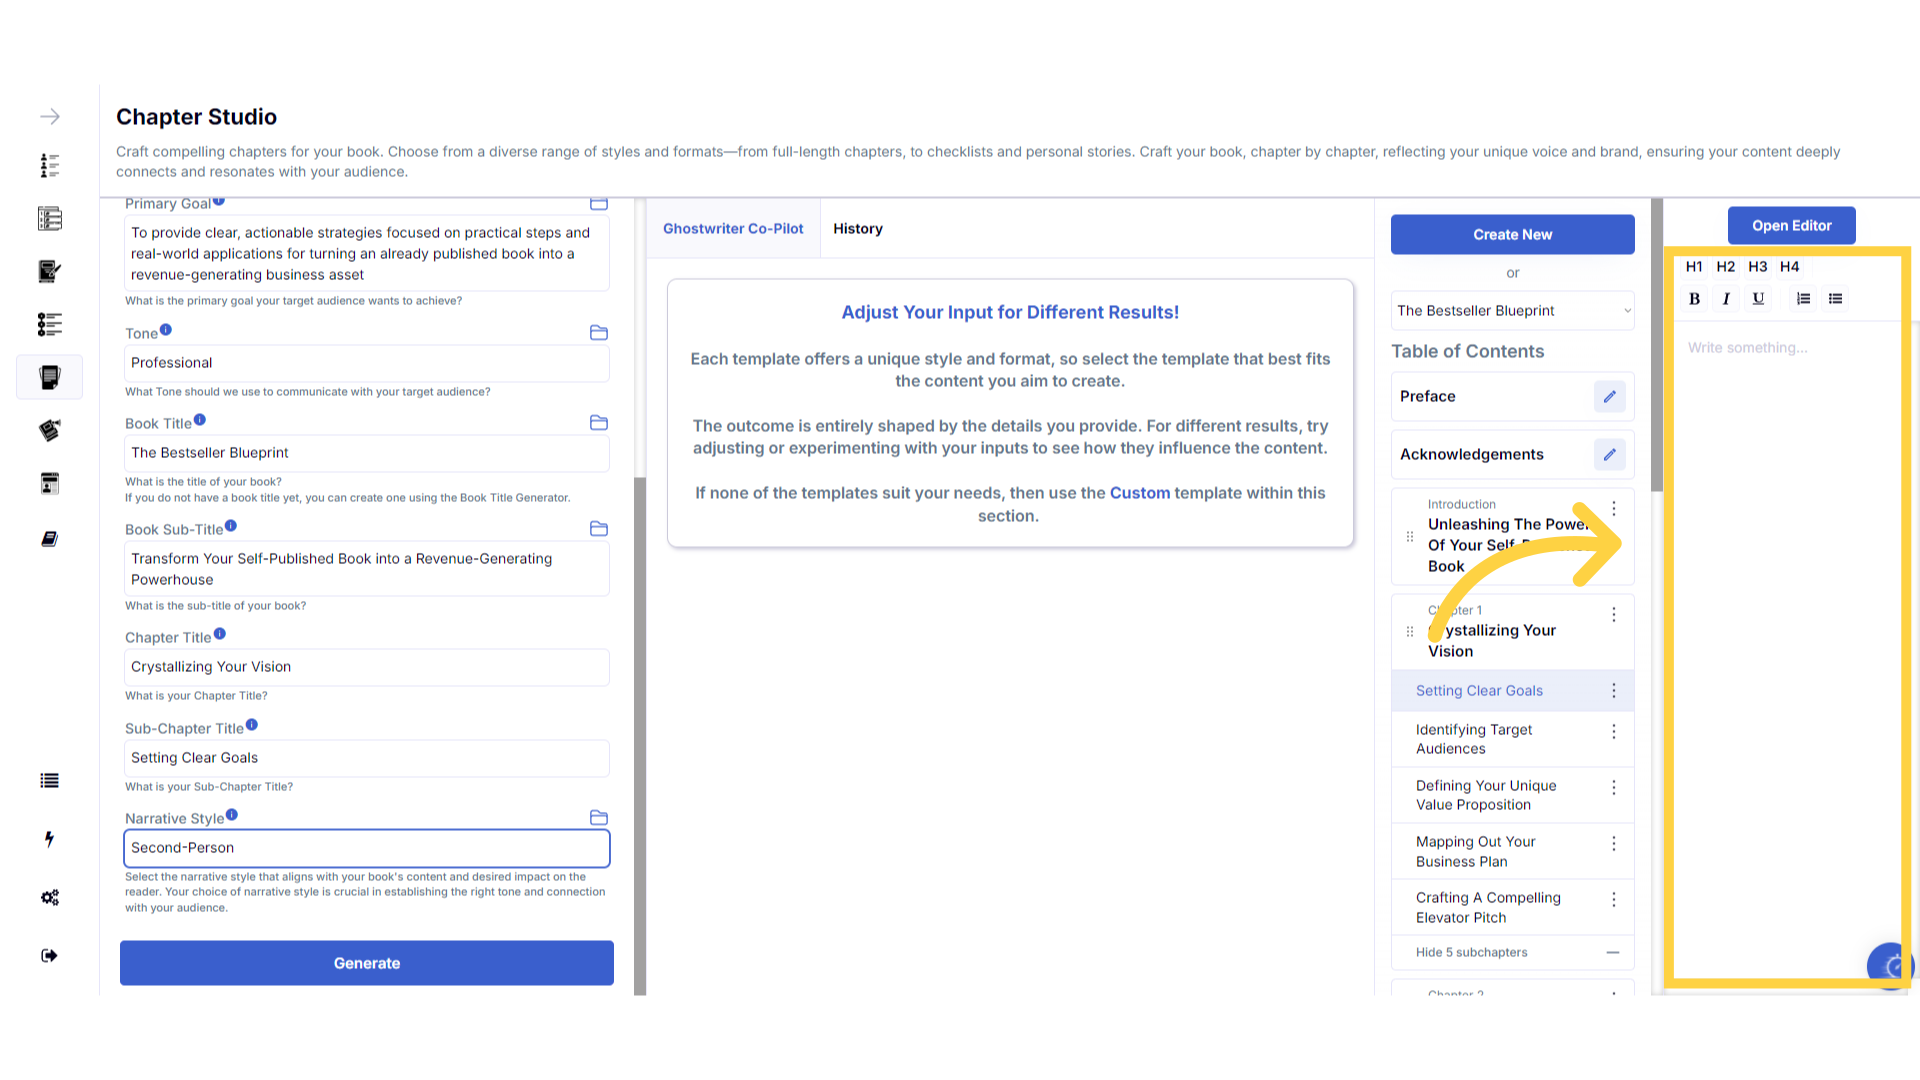)
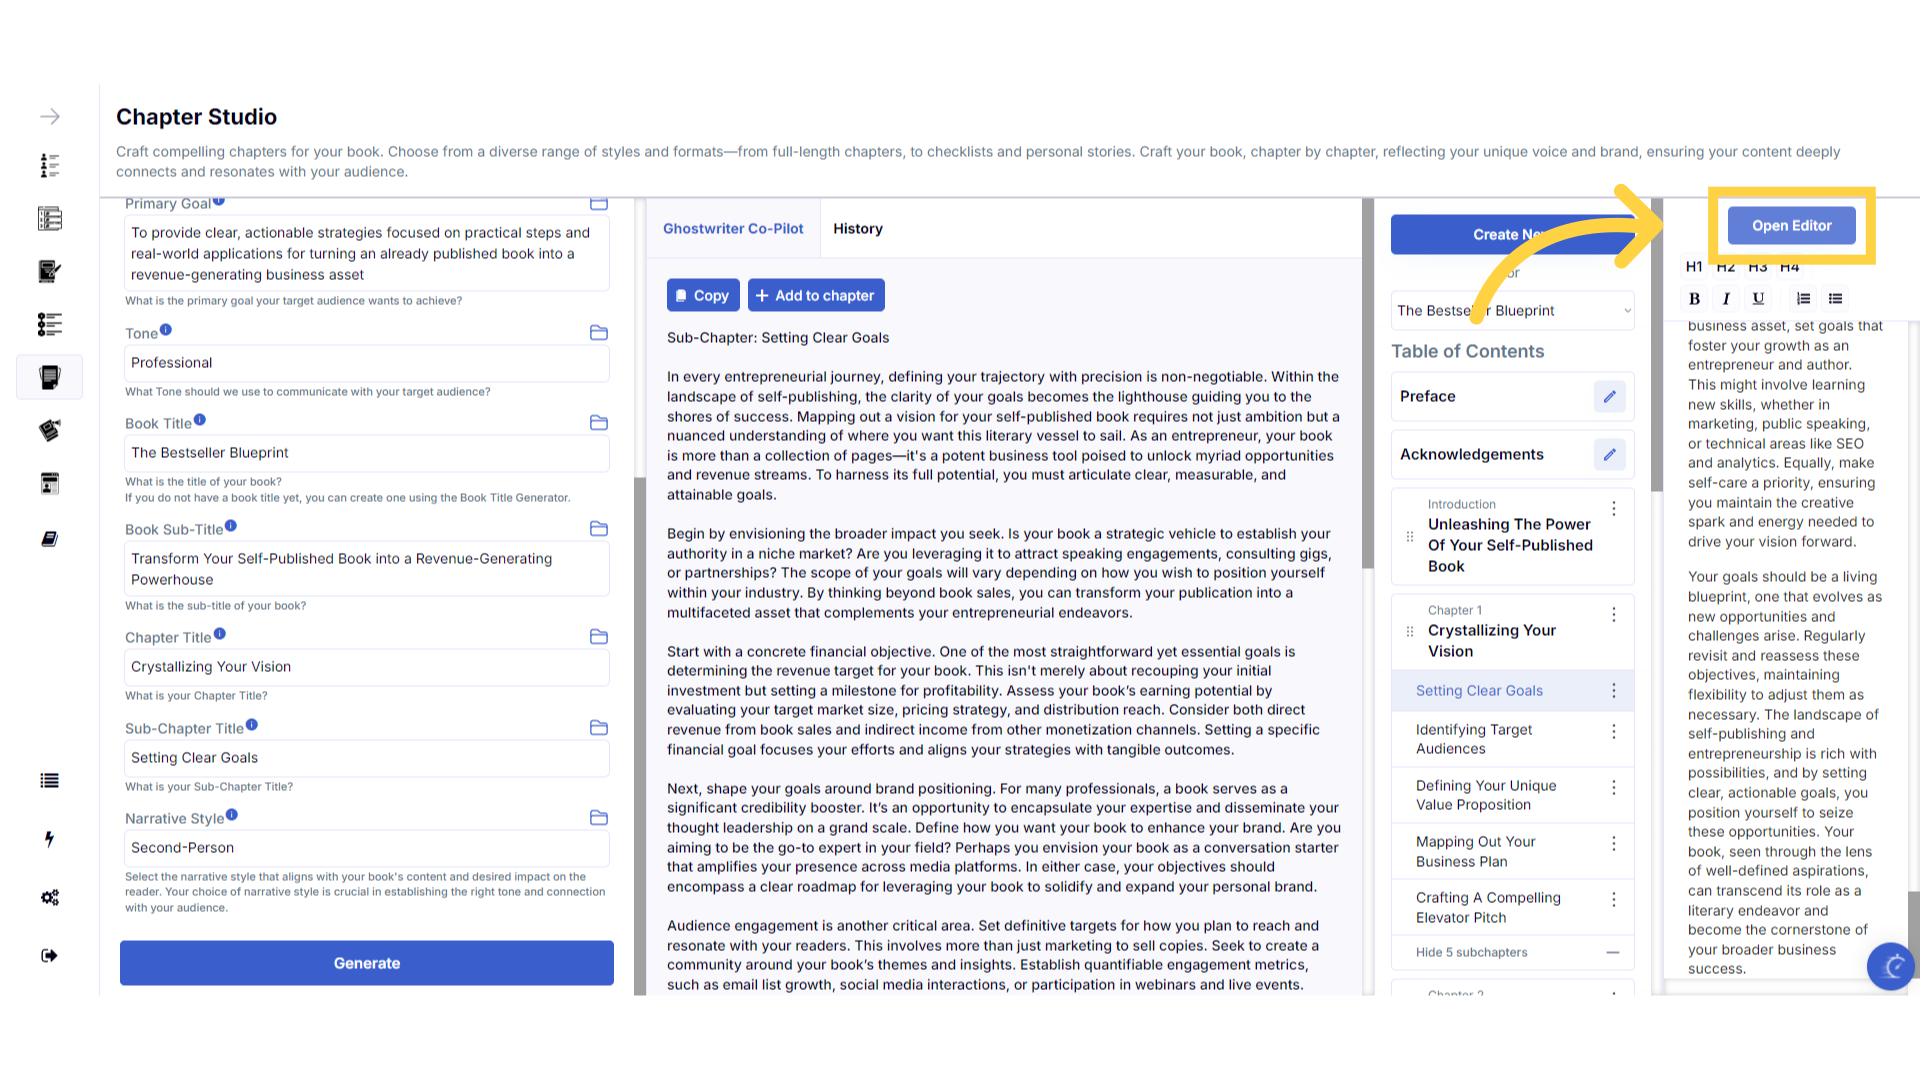
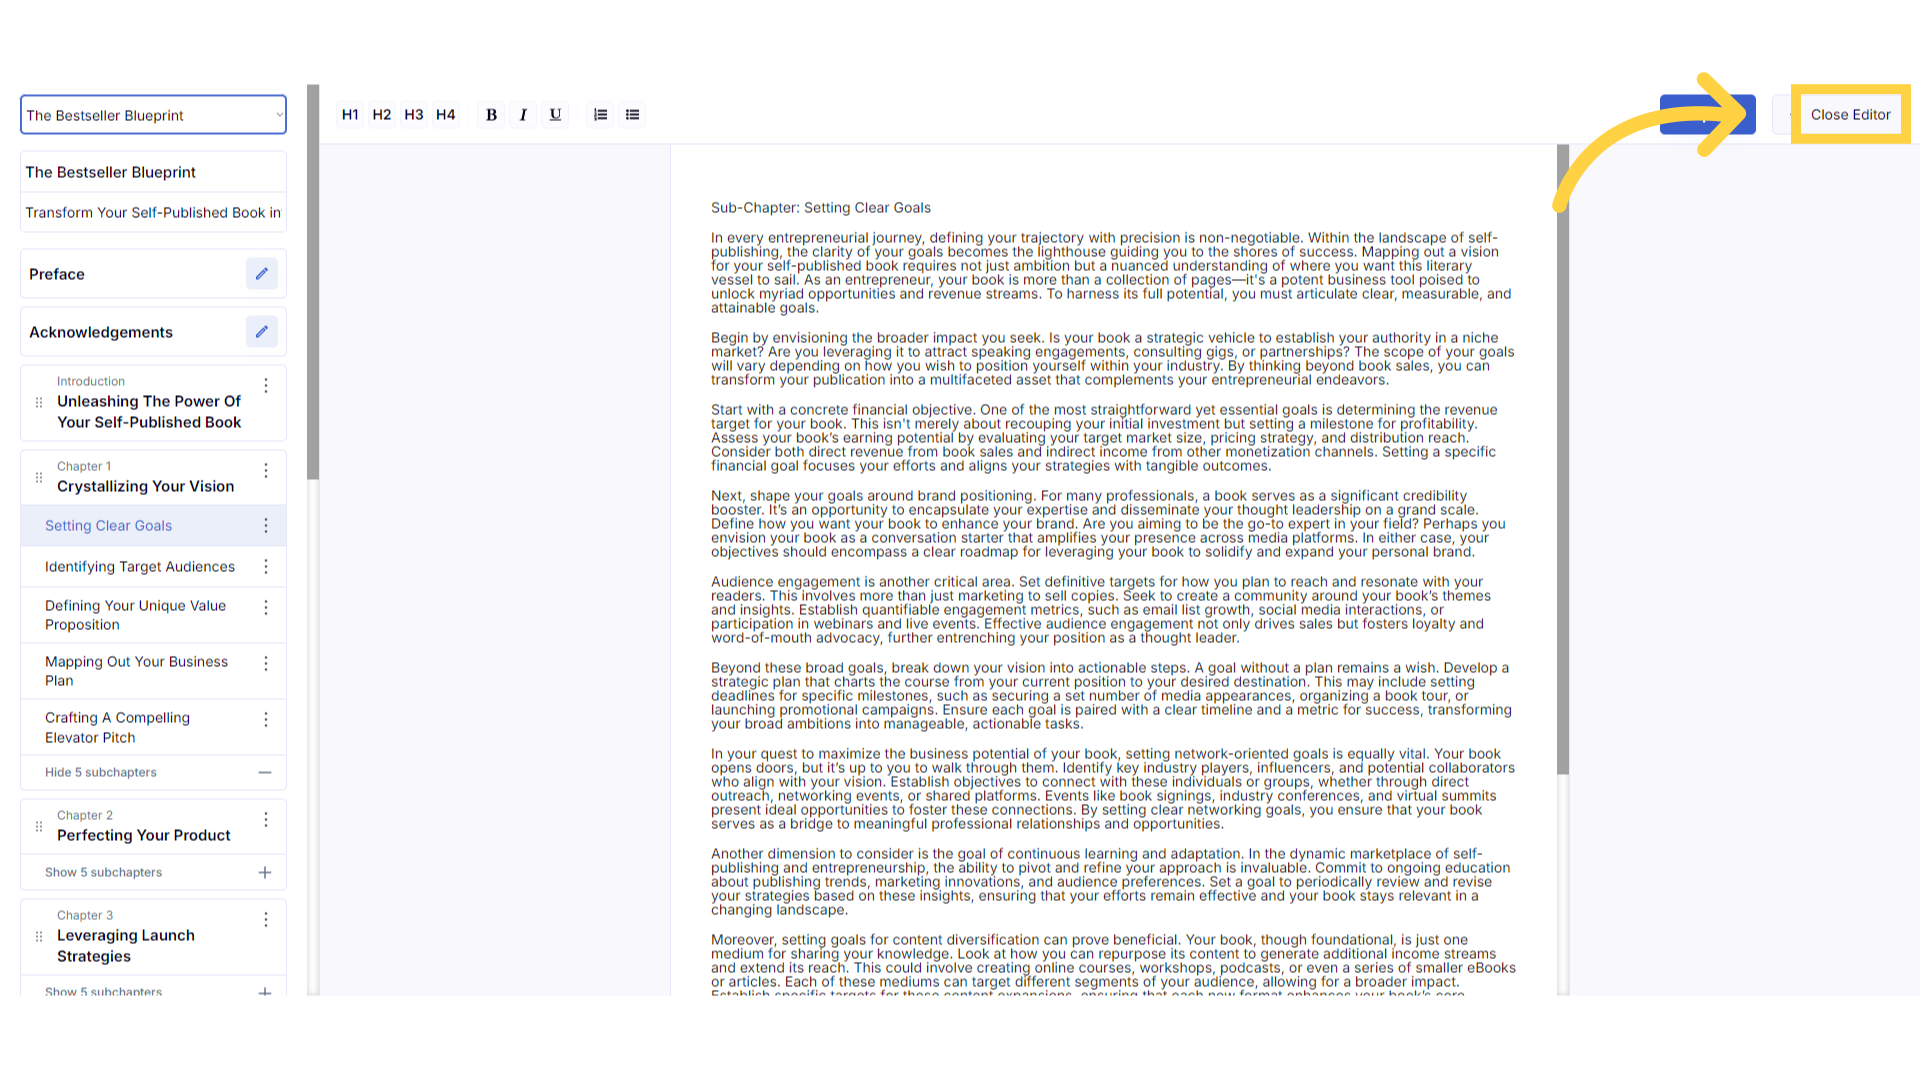
Click "Open Editor" to access your full book in editing mode to make changes or to export your book.
Click open editor to access your book in full screen editing mode and make changes. This is also where you will be able to export your formatted book.
)
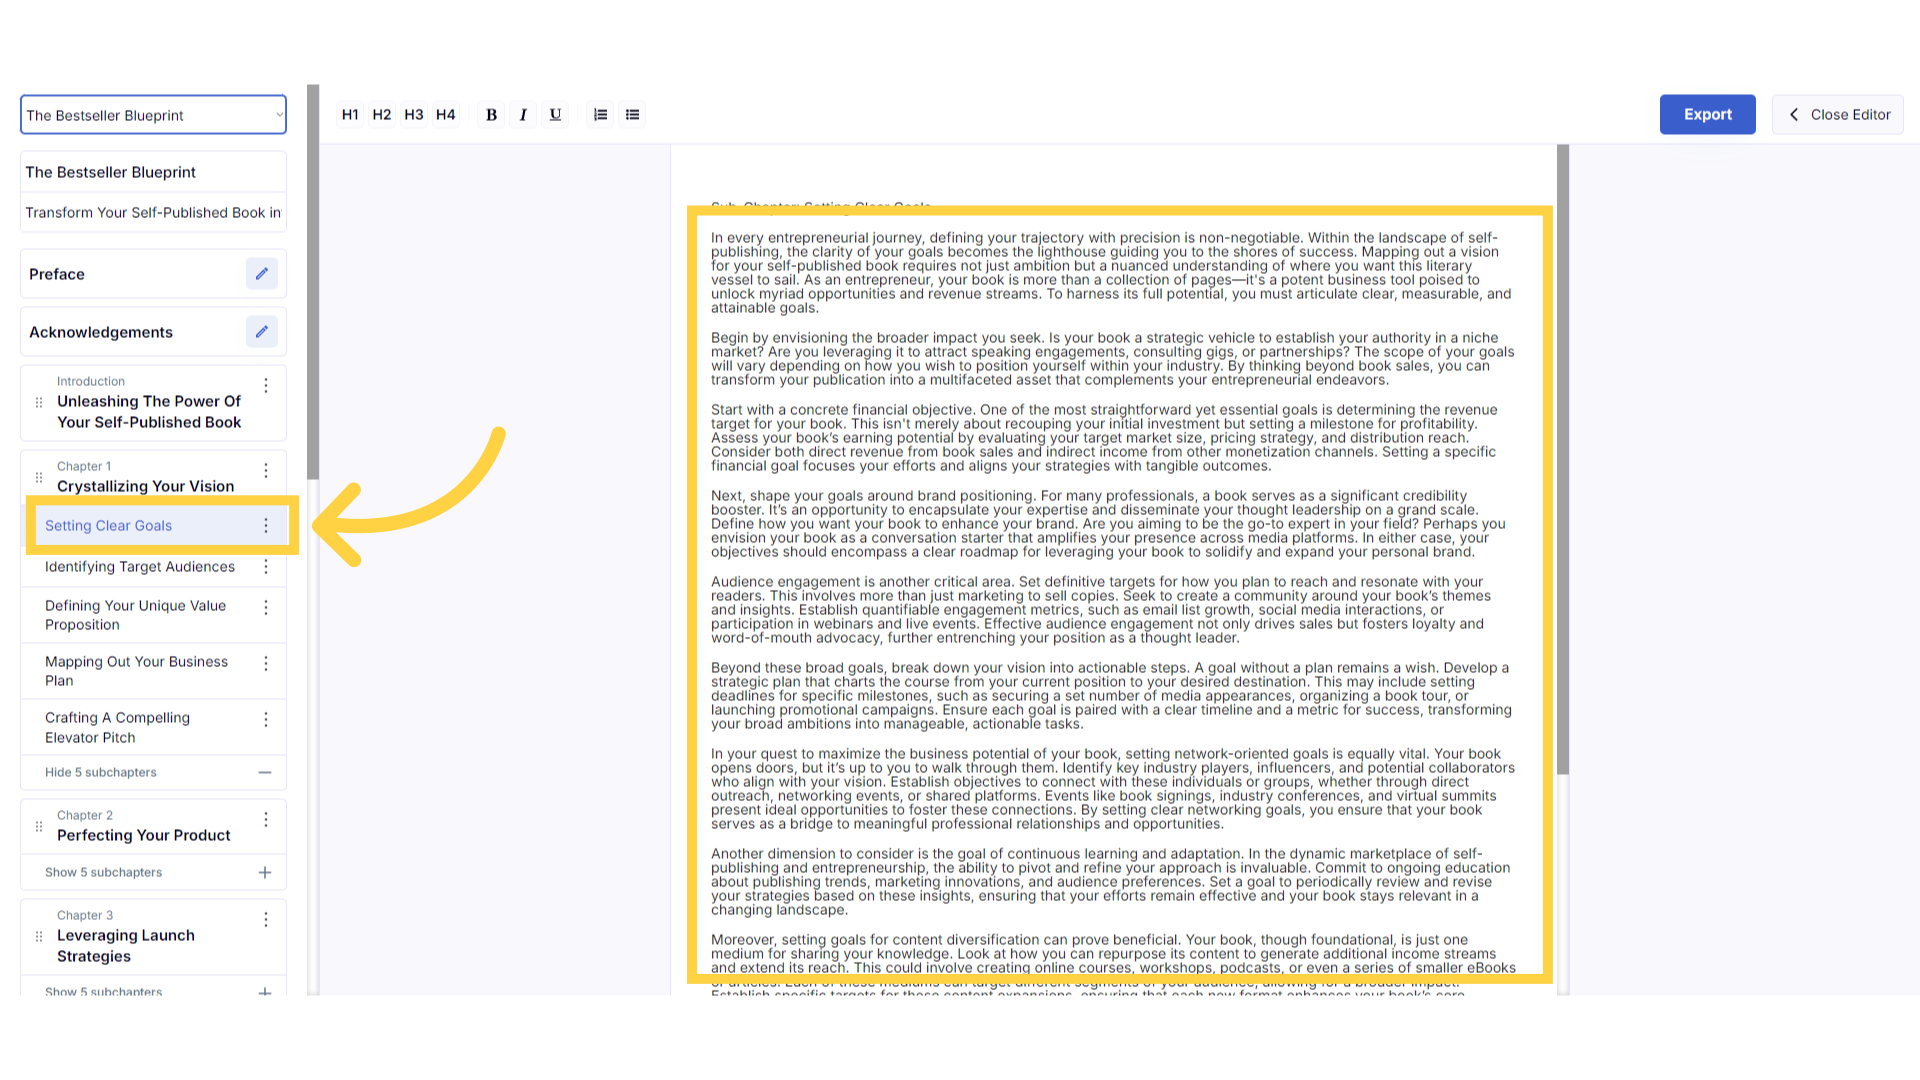
Click the chapter title to edit.
This is full screen editing mode. You can edit content in any chapter, by clicking and highlighting the chapter title, to display and edit the content on the right.
)
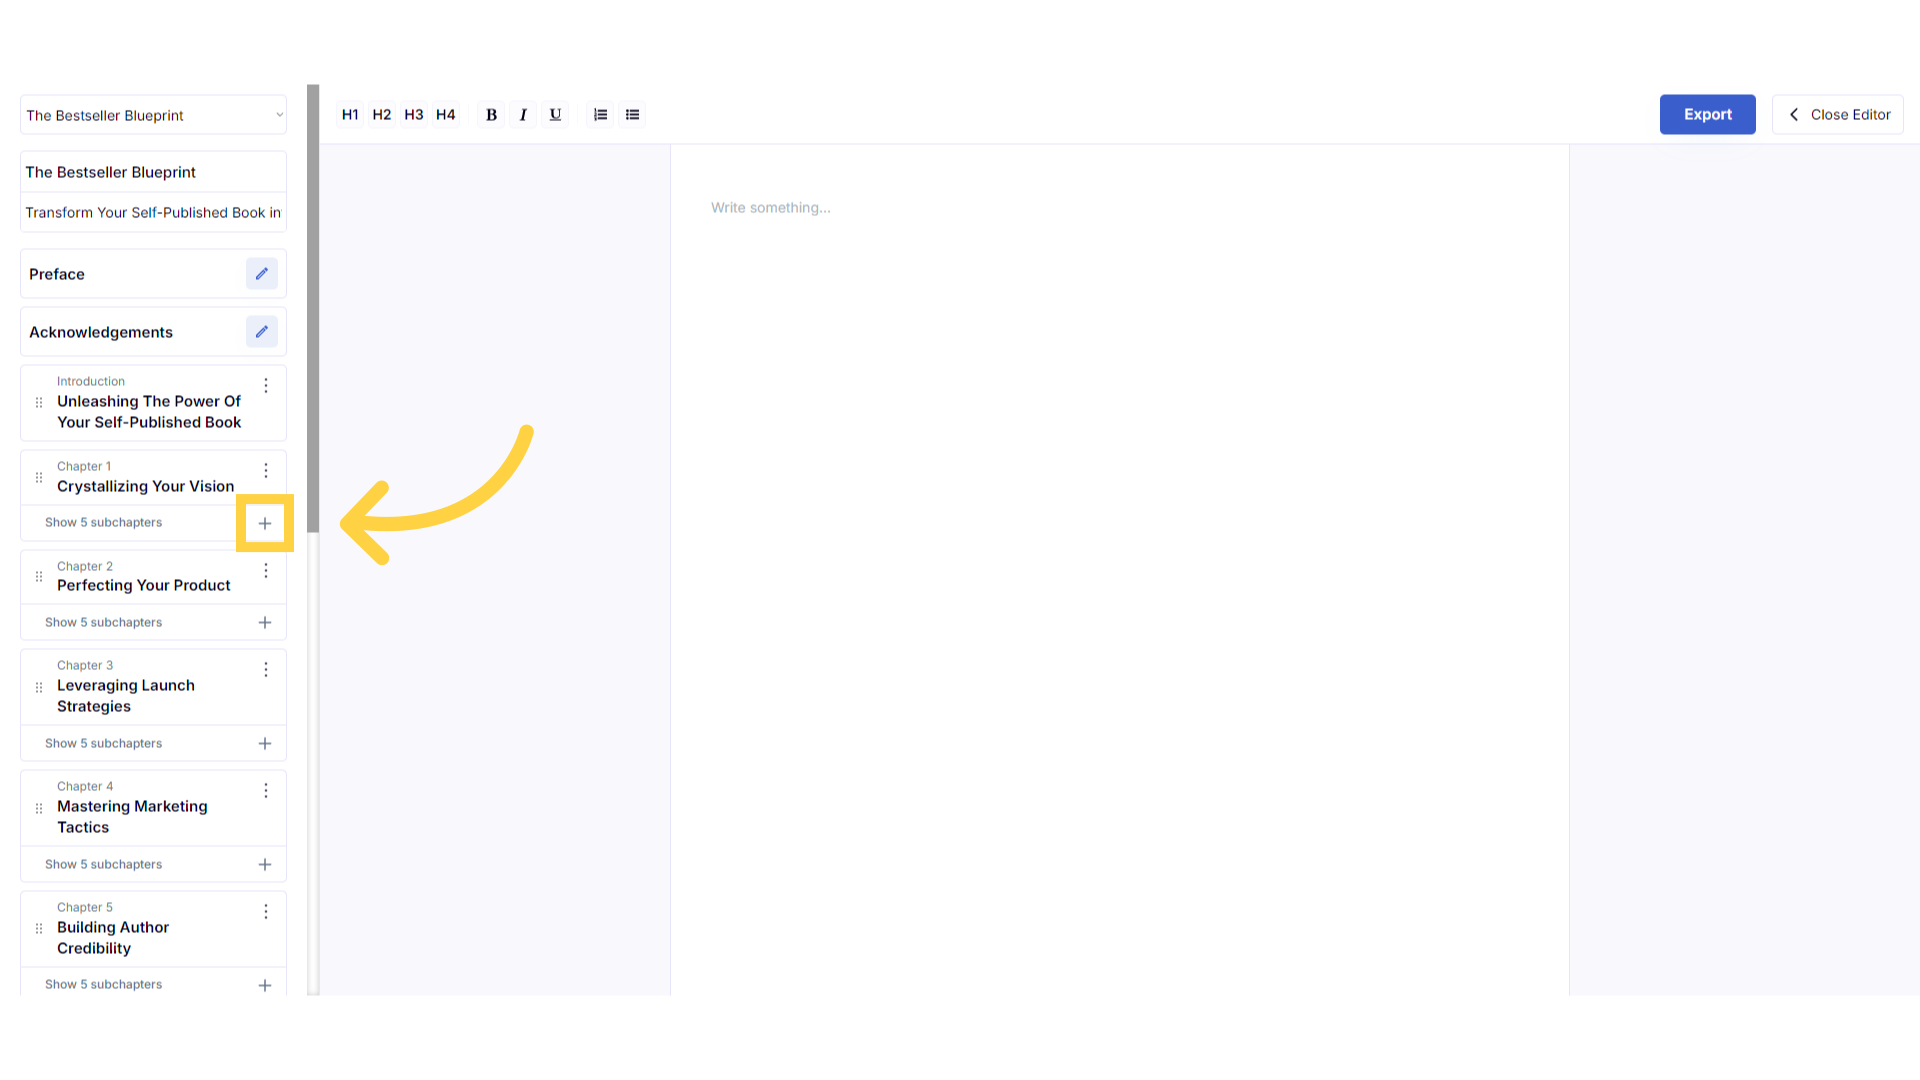
Click the plus symbol below the Chapter Title to open your subchapters and edit content.
Click the plus symbol below the chapter title to display and edit the subchapters.
)
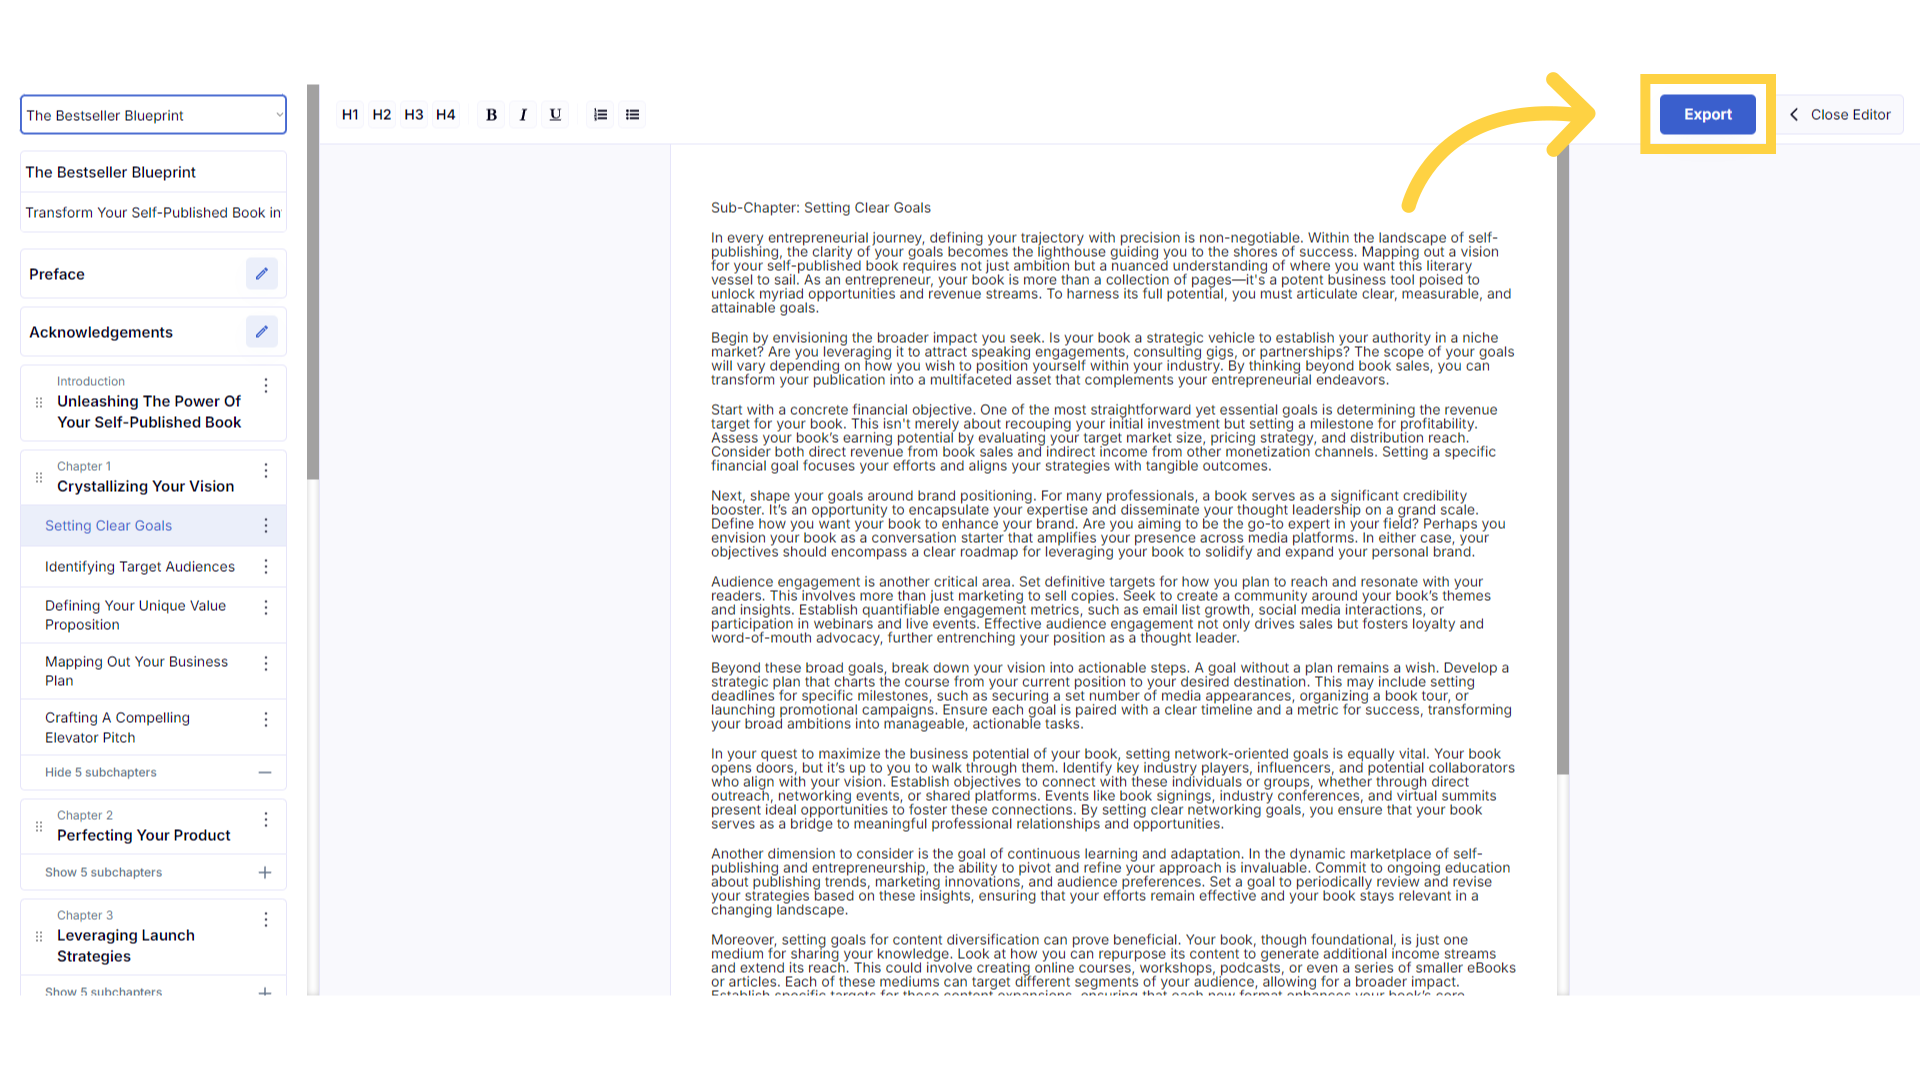
Click "Export" to download your book fully formatted in A4, US Letter or Paperback 6"x9".
Click export to download your book in Doc X format. If you don’t have Microsoft Word, you can use free alternatives like Google Docs, LibreOffice Writer, or Apache OpenOffice Writer, to open and edit your Doc X files. You can choose to download your book, formatted in 3 sizes: A4, US Letter or Paperback 6"x9". You can then edit your book externally, or forward it to your editor.
)
Click "Close Editor" to return to your book and generate different content.
Close editor to return to the book builder and generate different content.
)
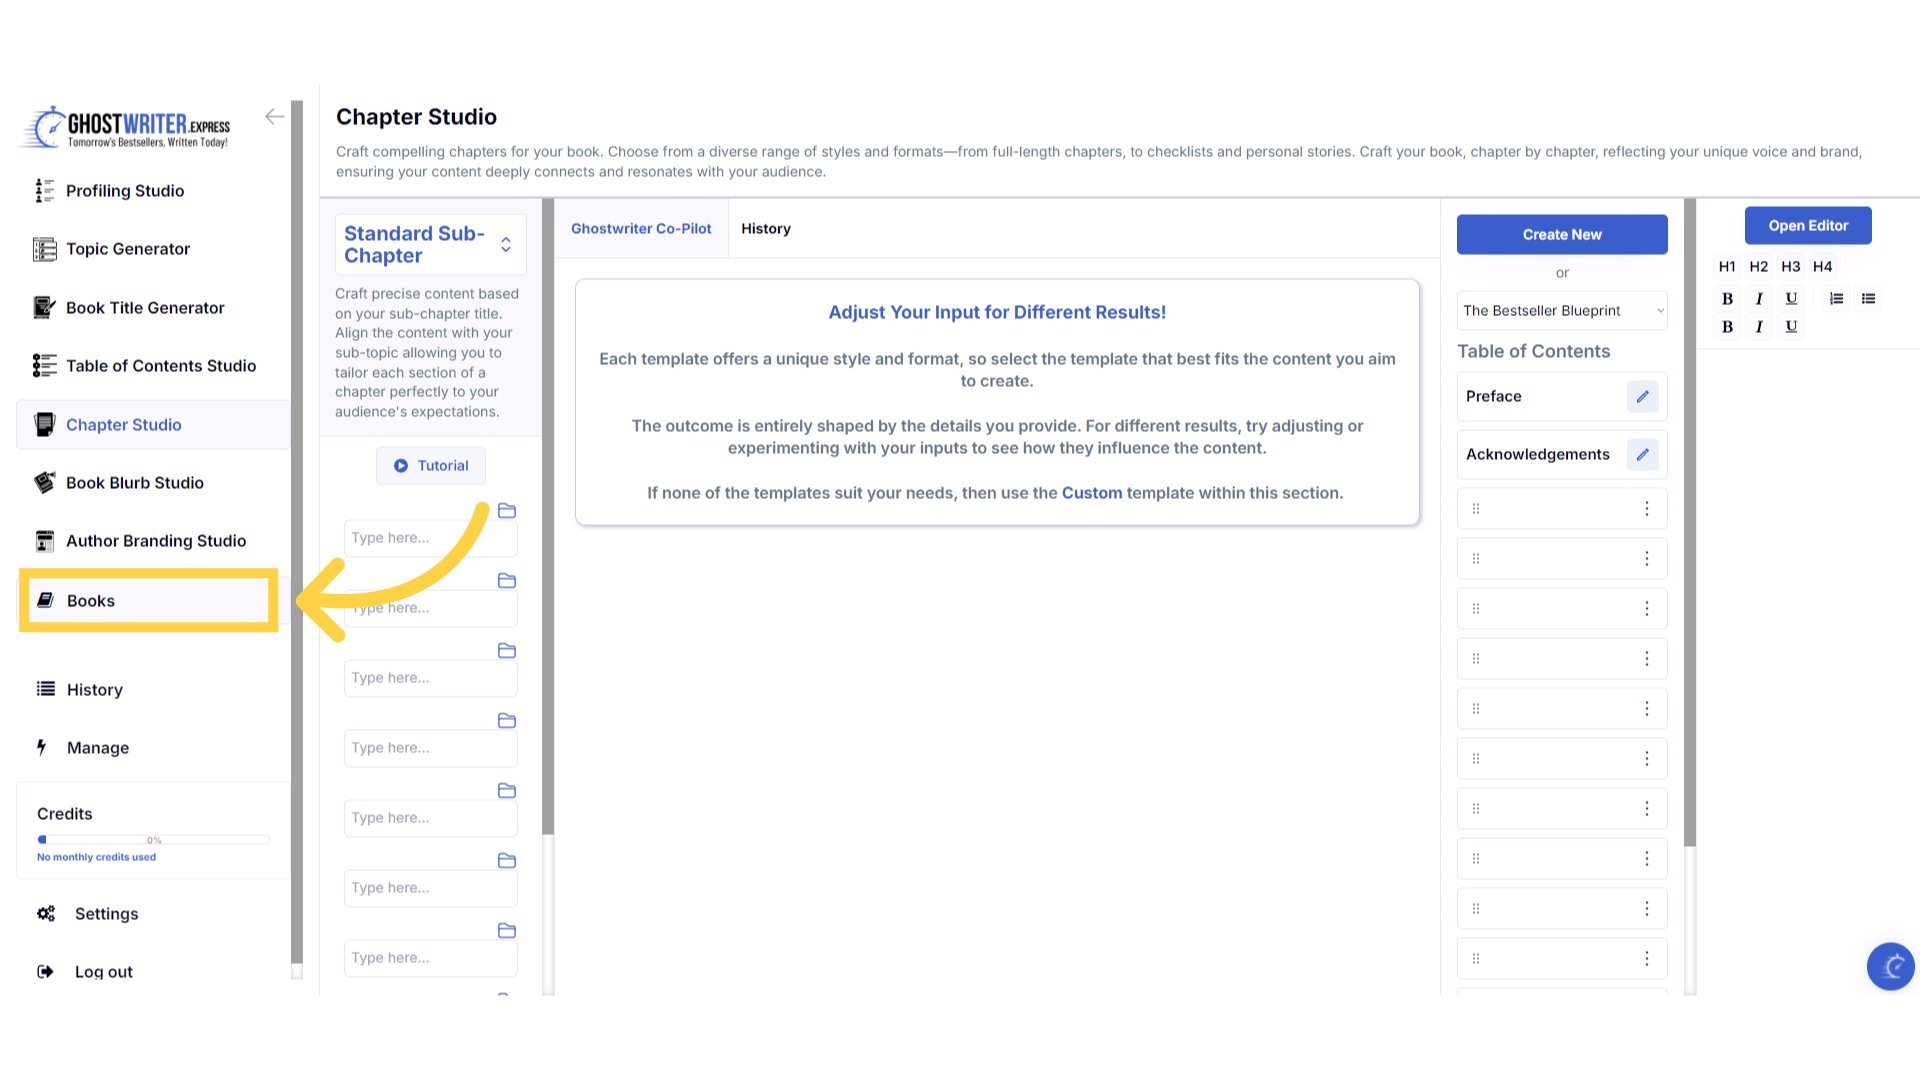
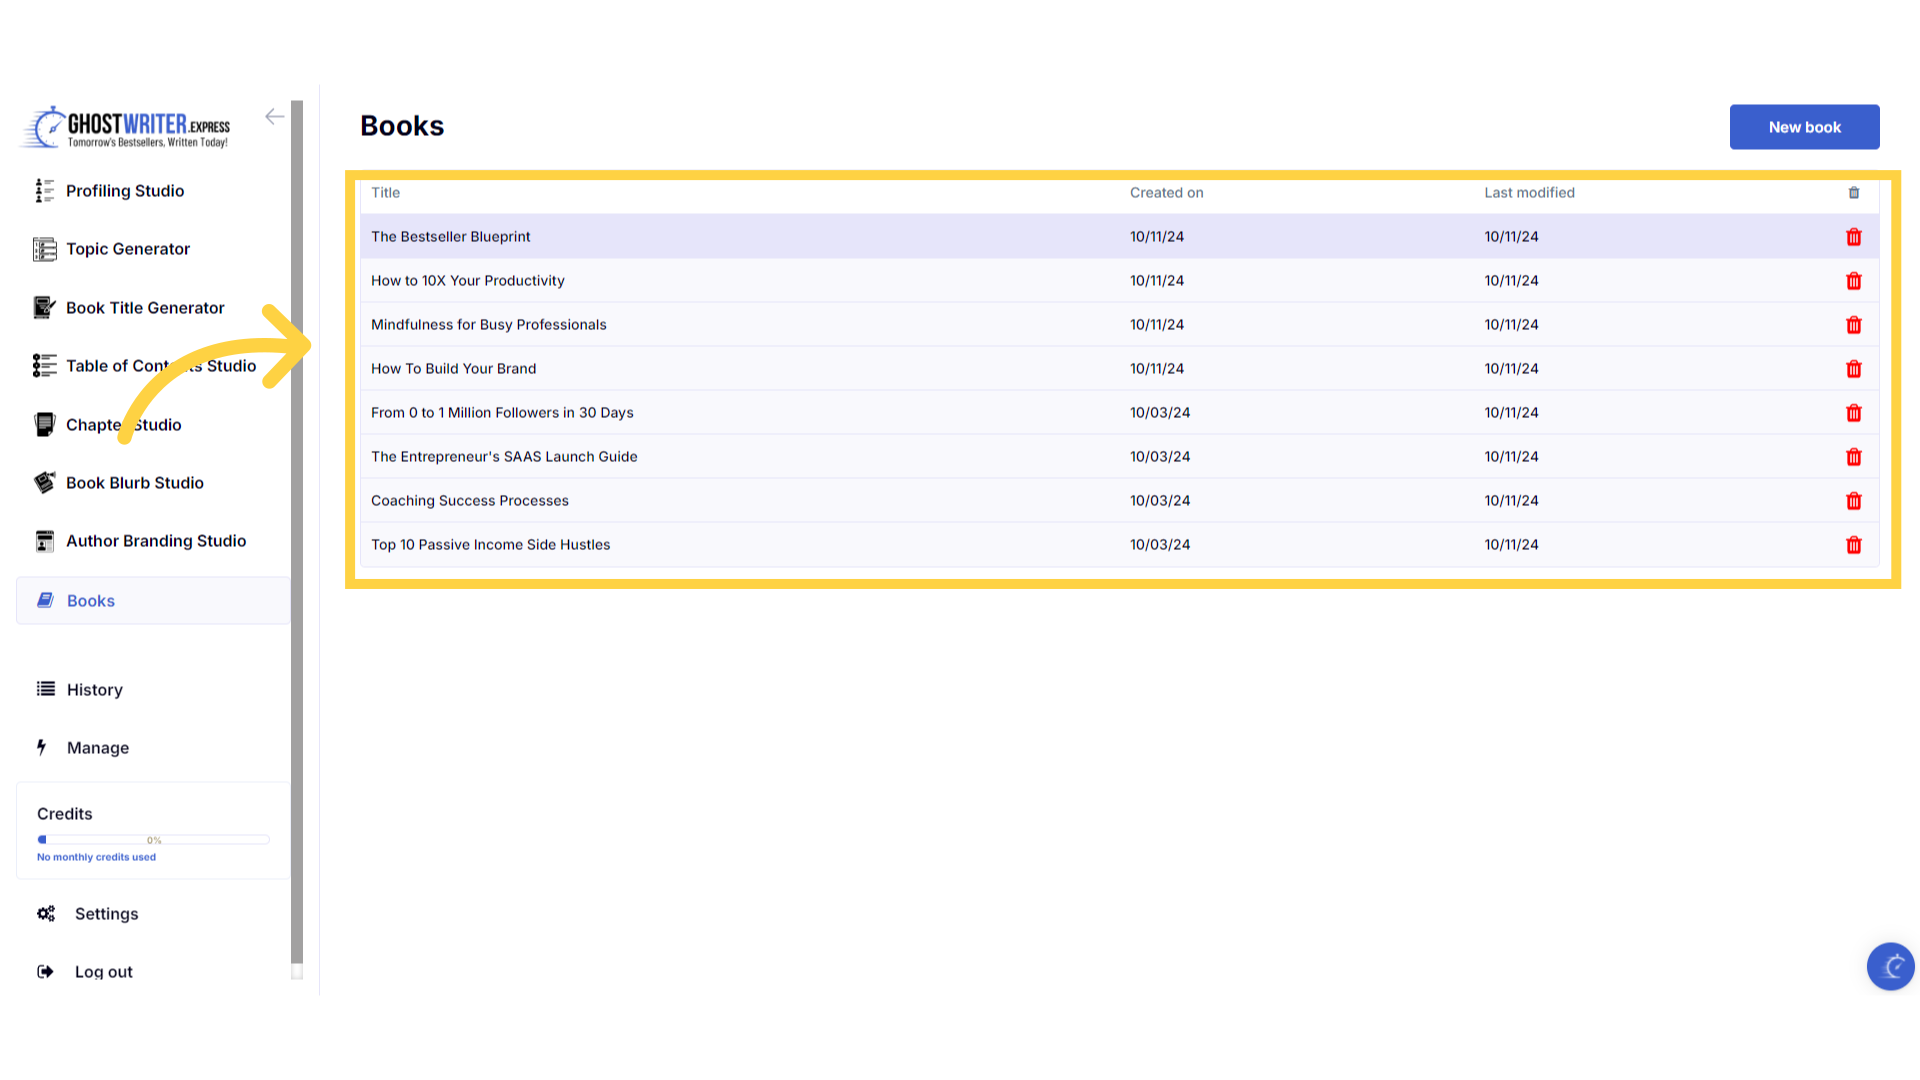
Click "Books" from the left menu to access all of your books in one place.
You can access all of the books you have created, by clicking on books in the left menu.
)
View, edit and delete books in the "Books" menu.
You can view, edit and delete any of your books. Click on the book title to open it in full screen mode to edit or export your book. Click on the red delete icon on the far right to delete a book.
)
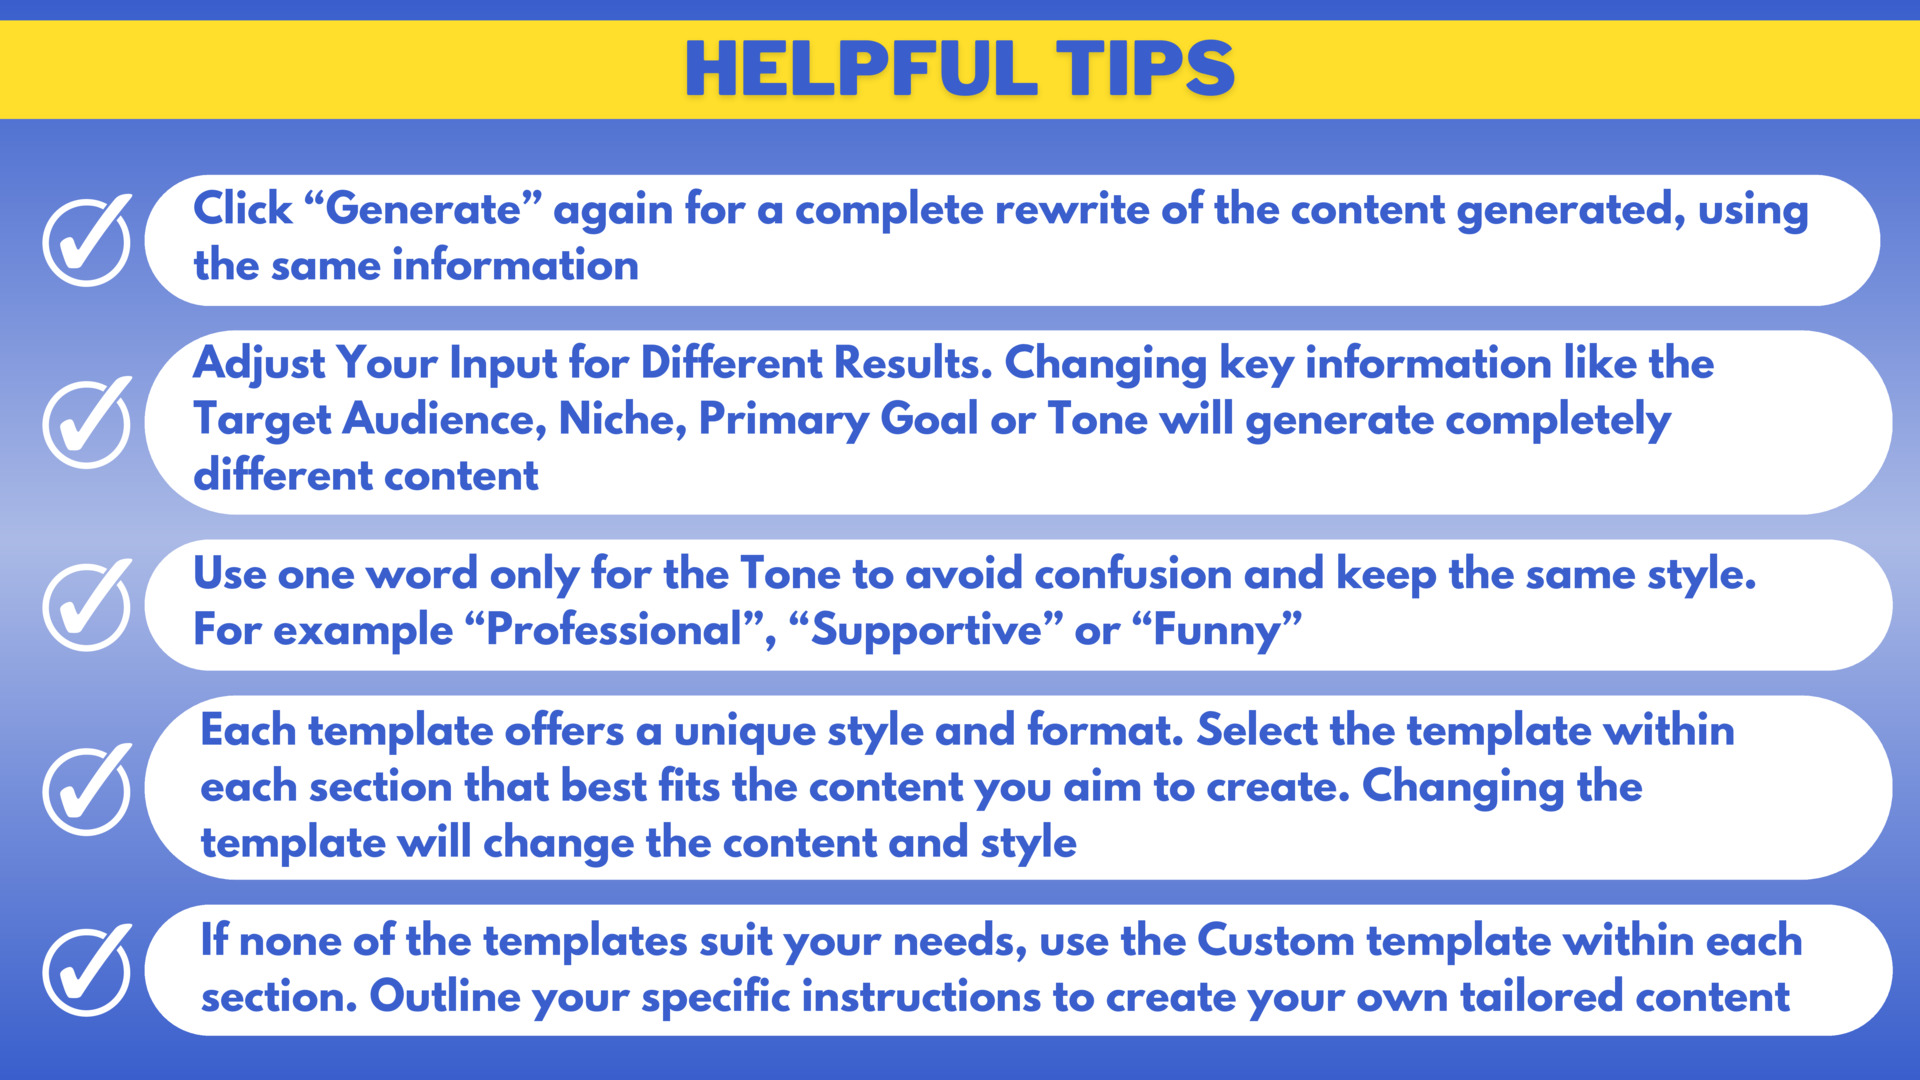
Here are some helpful tips to help you craft your book.
Here are some helpful tips to help you craft your book. Remember you can experiment with different information and tones, to get the perfect content for your book.
)
With over 130 Templates, you can easily craft books that suit your needs perfectly!